
Dell Inspiron One 2320 Support Question
Dell Inspiron One 2320 Support Question
Find answers below for this question about Dell Inspiron One 2320.Need a Dell Inspiron One 2320 manual? We have 3 online manuals for this item!
Question posted by lawrenceblack2 on June 3rd, 2014
Hy Can't I Connect To The Internet - Every Time I Get 502 Bad Gateway. An Howdo
Why can't I connect to the internet - everty time I try to I receive the message 502 Bad GatewayAnd How do I fix it?
Current Answers
Answer #1: Posted by DellJesse1 on June 4th, 2014 5:41 AM
DellJesse1

Member since:
April 19th, 2012 Points: 1,551,500

Member since:
April 19th, 2012 Points: 1,551,500
lawrenceblack2,
Click the link below for information on resolving the 502 error message.
Thank You,
Dell-Jesse1
Dell Social Media and Communities
email:[email protected]
Dell Community Forum.
www.en.community.dell.com
Dell Twitter Support
@dellcares
Dell Facebook Support
www.facebook.com/dell
#iwork4dell
Related Dell Inspiron One 2320 Manual Pages
Quick Start Guide (PDF) - Page 1
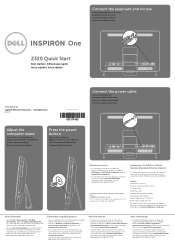
...el mouse Conecte o teclado e o mouse
One
2320 Quick Start
Snel starten | Démarrage rapide Inicio...243;n Pressione o botão liga-desliga
Connect the power cable
Sluit de stroomkabel aan Branchez...-3355). Dell™, the DELL logo, and Inspiron™ are trademarks of the Official Mexican Standard ...de functies en geavanceerde opties die voor uw desktop beschikbaar zijn.
• Ga naar dell....
Owners Manual - Page 12
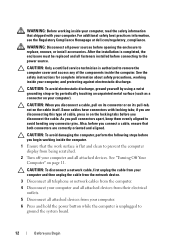
... display from your computer.
6 Press and hold the power button while the computer is completed, the enclosure must be replaced and all fasteners installed before connecting to the power source. Some cables have connectors with your computer). For additional safety best practices information, see the Regulatory Compliance Homepage at dell.com...
Owners Manual - Page 21
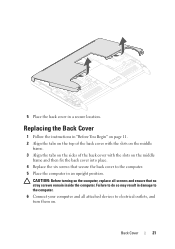
...Align the tabs on the sides of the back cover with the slots on the middle
frame and then fix the back cover into place. 4 Replace the six screws that secure the back cover to the computer.... 5 Place the computer in damage to the computer. 6 Connect your computer and all screws and ensure that no stray screws remain inside the computer.
Back Cover
21 ...
Owners Manual - Page 25
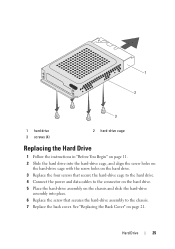
... hard-drive cage with the screw holes on the hard drive. 3 Replace the four screws that secure the hard-drive cage to the hard drive. 4 Connect the power and data cables to the connector on the hard drive. 5 Place the hard-drive assembly on page 21.
Owners Manual - Page 26
CAUTION: Before turning on the computer, replace all attached devices to electrical outlets, and turn them on.
26
Hard Drive Failure to do so may result in damage to the computer.
8 Connect your computer and all screws and ensure that no stray screws remain inside the computer.
Owners Manual - Page 29
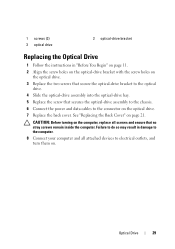
1 screws (2) 3 optical drive
2 optical-drive bracket
Replacing the Optical Drive
1 Follow the instructions in damage to the computer. 8 Connect your computer and all screws and ensure that secures the optical-drive assembly to the chassis. 6 Connect the power and data cables to the connector on the optical drive. 7 Replace the back cover. Optical...
Owners Manual - Page 33
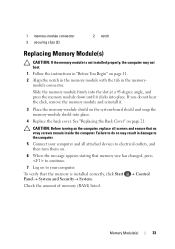
...computer, replace all attached devices to electrical outlets, and then turn them on.
6 When the message appears stating that memory size has changed, press to continue.
7 Log on page 11. 2... Align the notch in the memory module with the tab in damage to the computer.
5 Connect your computer. 1 memory-module connector 3 securing clips (2)
2 notch
Replacing Memory Module(s)
CAUTION: If ...
Owners Manual - Page 36

... the Back Cover" on .
36
Rear Stand Cover 2 1
1 rear-stand assembly
2 screws (2)
Replacing the Rear-Stand Assembly
1 Follow the instructions in damage to the computer. 5 Connect your computer and all screws and ensure that secure the rear-stand assembly to the chassis. 4 Replace the back cover.
Owners Manual - Page 38

... 21. See "Replacing the Back Cover" on page 36. 5 Replace the back cover. Replacing the VESA Mount
1 Follow the instructions in damage to the computer. 6 Connect your computer and all attached devices to electrical outlets, and turn them on the computer, replace all screws and ensure that secure the VESA mount...
Owners Manual - Page 40
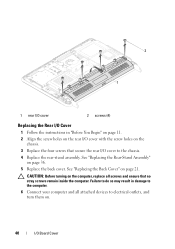
... 11. 2 Align the screw holes on the rear I /O Board Cover 2 1
1 rear I/O cover
2 screws (4)
Replacing the Rear I/O Cover
1 Follow the instructions in damage to the computer. 6 Connect your computer and all screws and ensure that secure the rear I/O cover to electrical outlets, and turn them on.
40
I /O cover with the screw holes...
Owners Manual - Page 41
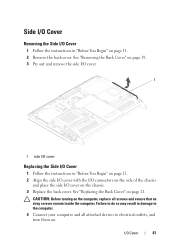
... "Before You Begin" on page 11. 2 Remove the back cover.
I/O Cover
41 CAUTION: Before turning on the computer, replace all attached devices to the computer. 4 Connect your computer and all screws and ensure that no stray screws remain inside the computer. Side I/O Cover
Removing the Side I/O Cover
1 Follow the instructions in...
Owners Manual - Page 45
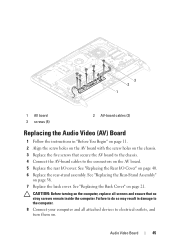
.... 5 Replace the rear I /O Cover" on . 3 2 1
1 AV board 3 screws (5)
2 AV-board cables (2)
Replacing the Audio Video (AV) Board
1 Follow the instructions in damage to the computer. 8 Connect your computer and all screws and ensure that secure the AV board to the chassis...
Owners Manual - Page 48
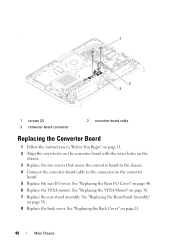
... screw holes on the converter board with the screw holes on the
chassis. 3 Replace the two screws that secure the converter board to the chassis. 4 Connect the converter-board cable to the connector on page 40. 6 Replace the VESA mount. See "Replacing the Rear-Stand Assembly"
on page 36. 8 Replace the...
Owners Manual - Page 49
CAUTION: Before turning on . Failure to do so may result in damage to the computer.
9 Connect your computer and all attached devices to electrical outlets, and turn them on the computer, replace all screws and ensure that no stray screws remain inside the computer. Main Chassis
49
Owners Manual - Page 52
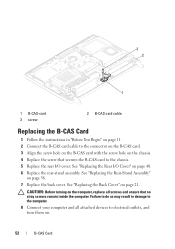
...card 3 screw
2 B-CAS card cable
Replacing the B-CAS Card
1 Follow the instructions in damage to the computer. 8 Connect your computer and all screws and ensure that secures the B-CAS card to the chassis. 5 Replace the rear I /O ... /O cover. Failure to do so may result in "Before You Begin" on page 11. 2 Connect the B-CAS card cable to the connector on the B-CAS card. 3 Align the screw hole on...
Owners Manual - Page 55
... the Rear-Stand Assembly" on page 21. 6 Replace the rear-stand assembly. CAUTION: Before turning on the computer, replace all attached devices to the computer. 8 Connect your computer and all screws and ensure that no stray screws remain inside the computer. See "Replacing the Back Cover" on page 36.
7 Replace the...
Owners Manual - Page 59
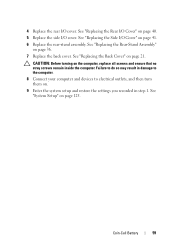
... the rear-stand assembly. See "Replacing the Back Cover" on . 9 Enter the system setup and restore the settings you recorded in damage to the computer. 8 Connect your computer and devices to electrical outlets, and then turn them on page 21.
Coin-Cell Battery
59 Failure to do so may result in...
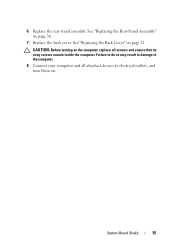
Owners Manual - Page 63

... black
6 Replace the system-board shield. CAUTION: To avoid damage to the Mini-Card, ensure that secure the Mini-Card to the system-board connector. 5 Connect the appropriate antenna cable(s) to do so may damage the connectors. Use of the Mini-Card down and replace the two screws that there are...
Owners Manual - Page 64

11 Connect your computer and all attached devices to electrical outlets, and turn them on.
64
Wireless Mini-Card
Owners Manual - Page 66
...
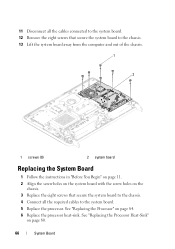
System Board See "Replacing the Processor Heat-Sink"
on the
chassis. 3 Replace the eight screws that secure the system board to the chassis. 4 Connect all the cables connected to the system board. 12 Remove the eight screws that secure the system board to the system board. 5 Replace the processor. See "Replacing the...
Similar Questions

How To Connect Wireless Mouse And Keyboard To Dell Inspiron One2320
(Posted by Francwinde 10 years ago)

Does Dell Dcsla Desktop Inspiron 531s Have Wireless Internet
(Posted by peabbw 10 years ago)


How To Connect The Dell 2320 All In One To Wireless Internet
(Posted by tharncarm 10 years ago)