Dell Inspiron N5110 Support Question
Dell Inspiron N5110 Support Question
Find answers below for this question about Dell Inspiron N5110.Need a Dell Inspiron N5110 manual? We have 2 online manuals for this item!
Question posted by nican on October 17th, 2013
What Is The Part Number For A Dell Inspirion 15r N5110 Media Board Cable
assembly
Current Answers
Related Dell Inspiron N5110 Manual Pages
Setup Guide - Page 5
Contents
Setting Up Your Inspiron Laptop 5 Before Setting Up Your Computer 5 Connect the AC Adapter 6 Connect the Network Cable (Optional 7 Press the Power Button 8 Set Up the Operating System 9 Create System Recovery Media (Recommended 10 Install the SIM Card (Optional 12 Enable...Cover (Optional 46 Removing and Replacing the Battery 50 Software Features 52 Dell DataSafe Online Backup 53...
Setup Guide - Page 6
... Memory Problems 61 Lockups and Software Problems 61
Using Support Tools 64 Dell Support Center 64 My Dell Downloads 65 Hardware Troubleshooter 66 Dell Diagnostics 66
Restoring Your Operating System 68
System Restore 69 Dell DataSafe Local Backup 70 System Recovery Media 73 Dell Factory Image Restore 74
Getting Help 76 Technical Support and Customer Service...
Setup Guide - Page 12
.... You will require the following to create the system recovery media: • Dell DataSafe Local Backup • USB key with a minimum capacity of the Operating System disc). Setting Up Your Inspiron Laptop
Create System Recovery Media (Recommended)
NOTE: It is recommended that you create system recovery media as soon as you purchased the computer, while preserving...
Setup Guide - Page 13
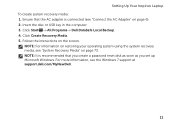
...: It is connected (see "Connect the AC Adapter" on the screen. Click Start → All Programs→ Dell DataSafe Local Backup. 4. Follow the instructions on page 6). 2. Setting Up Your Inspiron Laptop To create system recovery media: 1. Ensure that the AC adapter is recommended that you create a password reset disk as soon as you set...
Setup Guide - Page 48
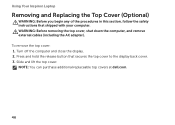
...cover: 1. Slide and lift the top cover. Turn off the computer and close the display. 2. Using Your Inspiron Laptop
Removing and Replacing the Top Cover (Optional)
WARNING: Before you begin any of the procedures in this section,.... 3. NOTE: You can purchase additional replaceable top covers at dell.com.
46 WARNING: Before removing the top cover, shut down the computer, and remove external...
Setup Guide - Page 52
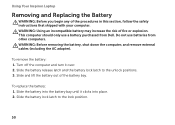
...cables (including the AC adapter). To remove the battery: 1. Slide and lift the battery out of the procedures in this section, follow the safety instructions that shipped with your computer. Using Your Inspiron Laptop...: 1. Slide the battery into place. 2. This computer should only use batteries from Dell. Slide the battery release latch and the battery lock latch to the lock position.
50...
Setup Guide - Page 56
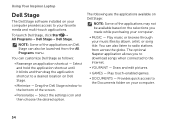
...option.
Play music or browse through your favorite media and multi-touch applications. NOTE: Some of the applications on Dell Stage can also be available based on the ...Using Your Inspiron Laptop
Dell Stage
The Dell Stage software installed on your computer provides access to a desired location on Dell Stage.
• Minimize - You can also listen to the Documents folder on Dell Stage:
...
Setup Guide - Page 57
View, organize, or edit your frequently-used programs.
Using Your Inspiron Laptop
• StickyNotes - View videos. These notes will appear on your desktop.... web browser.
• Video - Provides quick access to the Internet.
• Dell Web - You can also save notes on the bulletin board the next time you access STICKYNOTES. You can create slideshows and collections of your favorite...
Setup Guide - Page 82

lost removable media that belong with your return.
1. or damaged or lost or corrupted data; For the telephone number to call for your confidential, proprietary or personal information; Dell is for credit.
80 Include any data on the hard drive(s) and on page 66).
4. Call Dell to Dell, ensure that you back up any accessories that...
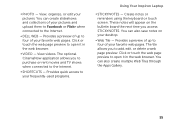
Setup Guide - Page 92
...)
MultiMedia Card (MMC)
MultiMedia Card plus (MMC+)
xD-Picture Card
Keyboard
Number of keys
86 (U.S. and Canada); 87 (Europe); 90 (Japan); 87 (Brazil)
90
Communications
Modem (optional)
external V.92 56 K USB modem
Network adapter
10/100 Ethernet LAN on system board
Wireless
WLAN, WWAN (optional), WiMax/Wi-Fi abgn/agn, and Bluetooth...
Service Manual - Page 10
...all attached devices. Damage due to servicing that both connectors are disconnecting this type of cable, press in -1 media card reader.
5 Disconnect your computer. As you are correctly oriented and aligned.
CAUTION... or contacts on the locking tabs before you connect a cable, ensure that is not authorized by Dell is flat and clean to prevent the computer cover from your...
Service Manual - Page 32

CAUTION: Pull on the plastic tab on top of the connectors to avoid damaging the connectors. 7 Disconnect the power-button board cable, touch-pad cable, and hot-key board cable from the connectors on the palm-rest assembly. 4 Turn the computer over and open the display as far as possible. 5 Remove the keyboard (see "Removing the Keyboard...
Service Manual - Page 33
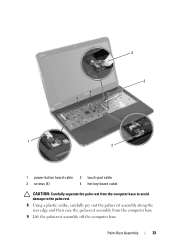
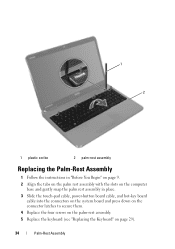
Palm-Rest Assembly
33 4 3
1 2
1 power-button board cable 3 screws (4)
2 touch-pad cable 4 hot-key board cable
CAUTION: Carefully separate the palm rest from the computer base to avoid damage to the palm rest. 8 Using a plastic scribe, carefully pry out the palm-rest assembly along the rear edge and then ease the palm-rest assembly from the computer base 9 Lift...
Service Manual - Page 34
... Begin" on page 9. 2 Align the tabs on the palm rest assembly with the slots on the computer
base and gently snap the palm rest assembly in place. 3 Slide the touch-pad cable, power-button board cable, and hot-key board
cable into the connectors on the system board and press down on the connector latches to secure them...
Service Manual - Page 65

... pins and contacts. 14
System Board
WARNING: Before working inside your computer, read the safety information that is not authorized by Dell is not covered by your computer).
Damage due to step 9 in "Removing the Palm-Rest
Assembly" on page 31. 8 Remove the display assembly (see "Removing the Display Assembly" on
page 41). 9 Remove the...
Service Manual - Page 67
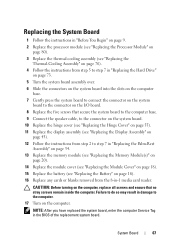
...board to the computer base. 9 Connect the speaker cable, to the connector on the system board. 10 Replace the hinge cover (see "Replacing the Hinge Cover" on page 55). 11 Replace the display assembly (see "Replacing the Display Assembly...Replacing the
Thermal-Cooling Assembly" on page 76). 4 Follow the instructions from the 8-in-1 media card reader. Replacing the System Board
1 Follow the ...
Service Manual - Page 69

.... CAUTION: To help prevent damage to the system board, remove the main battery (see the Regulatory Compliance Homepage at www.dell.com/regulatory_compliance. CAUTION: Only a certified service technician ... Follow the instructions in "Removing the System
Board" on page 9. 2 Follow the instructions from step 5 to servicing that shipped with
the cable off the computer base. CAUTION: To avoid...
Service Manual - Page 72
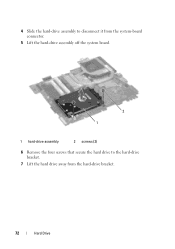
4 Slide the hard-drive assembly to disconnect it from the system-board connector.
5 Lift the hard-drive assembly off the system board.
2 1
1 hard-drive assembly
2 screws (2)
6 Remove the four screws that secure the hard drive to the hard-drive bracket.
7 Lift the hard drive away from the hard-drive bracket.
72
Hard Drive
Service Manual - Page 75

... page 65. 4 Gently peel the tape that secures the fan cable to the system board, remove the main battery (see the Regulatory Compliance Homepage at www.dell.com/regulatory_compliance. Damage due to the system board. 7 Lift the thermal-cooling assembly off the system board. CAUTION: To avoid electrostatic discharge, ground yourself by using a wrist grounding strap...
Service Manual - Page 89

...file downloads to download the latest BIOS file. Flashing the BIOS
89 d Select the product model number in the Select Your Product Line list. e Click Confirm. 4 A list of product in the... Complete window appears.
If you do not have selected a different model and want to support.dell.com/support/downloads. 3 Locate the BIOS update file for your computer:
NOTE: The Service ... board.
Similar Questions

Where Is The Sim Slot In Dell Inspiron 15r N5110
(Posted by najilive 10 years ago)


Dell Inspiron 15r N5110 Beeping When Shutting Down Windows 7
(Posted by crimsut 10 years ago)
How Do I Restore My Dell Inspiron 15r N5110 To Factory Setting
(Posted by DW70ni 10 years ago)

Inspiron 15r N5110 Number Pad Keyboard Won't Work
(Posted by vee2clj221 10 years ago)