Dell Inspiron N4030 Support Question
Dell Inspiron N4030 Support Question
Find answers below for this question about Dell Inspiron N4030.Need a Dell Inspiron N4030 manual? We have 3 online manuals for this item!
Question posted by Tupai197 on February 25th, 2014
What Buttons Do I Push To Reset My Dell Insnpiron N4030
The person who posted this question about this Dell product did not include a detailed explanation. Please use the "Request More Information" button to the right if more details would help you to answer this question.
Current Answers
Answer #1: Posted by DellJesse1 on February 27th, 2014 8:29 AM
DellJesse1

Member since:
April 19th, 2012 Points: 1,551,500

Member since:
April 19th, 2012 Points: 1,551,500
Tupai197,
To restore your computer to factory conditions using PC Restore start the computer and TAP the F8 Key. Once you have the Advanced Options on the screen choose the one that reads "Repair Your Computer" and follow the prompts to restore.
CAUTION:
This utility formats the operating system hard drive partition prior to restoring the factory image. This means data on that partition is deleted and cannot be recovered.
If the customer creates a second partition with a third-party utility, Dell Factory Image Restore is not affected as long as the image partition is not removed.
Thank You,
Dell-Jesse1
Dell Social Media and Communities
email:[email protected]
Dell Community Forum.
www.en.community.dell.com
Dell Twitter Support
@dellcares
Dell Facebook Support
www.facebook.com/dell
#iwork4dell
Related Dell Inspiron N4030 Manual Pages
Dell™ Technology Guide - Page 62
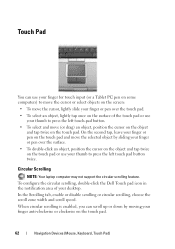
...Dell Touch pad icon in the notification area of the touch pad or use your thumb to press the left touch pad button twice. In the Scrolling tab, enable or disable scrolling or circular scrolling, choose the scroll zone width and scroll speed.
Circular Scrolling
NOTE: Your laptop...to press the left touch-pad button.
• To select and move the selected object by moving your desktop.
Dell™ Technology Guide - Page 107
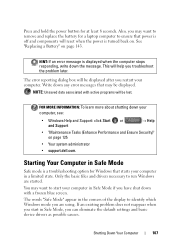
...reset when the power is off and components will help you restart your computer in the corners of the display to run Windows are using. NOTE: Unsaved data associated with a frozen blue screen.
Press and hold the power button for Windows that may want to remove and replace the battery for a laptop...8226; Your system administrator
• support.dell.com. HINT: If an error message is...
Dell™ Technology Guide - Page 136
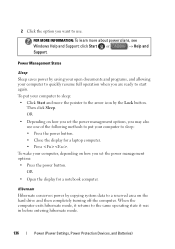
...laptop computer. • Press .
To wake your computer, depending on how you want to use one of the following methods to put your computer to a reserved area on how you set the power management options: • Press the power button...power by copying system data to sleep: • Press the power button. • Close the display for a notebook computer. Hibernate Hibernate ...
Dell™ Technology Guide - Page 272
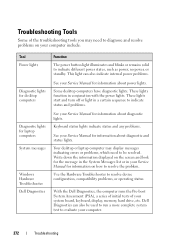
... power lights.
Keyboard status lights indicate status and any problems.
See your Service Manual for laptop computers System messages
Windows Hardware Troubleshooter Dell Diagnostics
Function
The power button light illuminates and blinks or remains solid to resolve the problem.
Dell Diagnostics can also indicate internal power problems.
See your Service Manual for information about...
Dell™ Technology Guide - Page 281
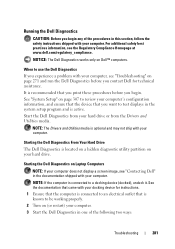
It is connected to an electrical outlet that you want to be working properly. 2 Turn on Laptop Computers
NOTE: If your computer does not display a screen image, see "Contacting Dell" in the documentation shipped with your docking device for instructions. 1 Ensure that the computer is recommended that you print these procedures before you...
Dell™ Technology Guide - Page 301
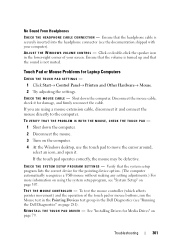
... corner of the touch pad or mouse buttons, run the Mouse test in the Pointing Devices test group in the Dell Diagnostics (see "Running the Dell Diagnostics" on page 79. Shut down the...using the system setup program, see the documentation shipped with your screen. See "Installing Drivers for Laptop Computers
CHECK THE TOUCH PAD SETTINGS -
1 Click Start→ Control Panel→ Printers and...
Dell™ Technology Guide - Page 350

... Dell for customer service or technical support. small computer system interface - serial connector - When you place a shortcut on your computer that can often be used in phones or laptop...DRAM that is used to frequently used to connect devices to your computer. real-time clock reset - ScanDisk - A type of rotations that provides quick access to install and configure hardware ...
Setup Guide - Page 4
... strictly forbidden.
Ubuntu is used in this text: Dell, the DELL logo, YOURS IS HERE, Solution Station, Inspiron, and DellConnect are either potential damage to either the entities claiming the marks and names or their products. Microsoft, Windows, Windows Vista, and the Windows Vista start button logo are trademarks of data and tells you...
Setup Guide - Page 5
... the Power Button 8 Set Up the Operating System 9 Create System Recovery Media (Recommended 10 Enable or Disable Wireless (Optional 12 Connect to the Internet (Optional 14
Using Your Inspiron Laptop 18 Right ...Display Features 34 Removing and Replacing the Battery 36 Software Features 38 Dell DataSafe Online Backup 39 Dell Dock 40
Solving Problems 41 Beep Codes 41 Network Problems 42 ...
Setup Guide - Page 7

.... WARNING: Do not block, push objects into, or allow easy access to a power source, adequate ventilation, and a level surface to place your Dell™ computer in an enclosed space... stacking heavy or sharp objects on all other sides. Restricting airflow around your Dell™ Inspiron™ laptop. Restricting the airflow can damage the computer, deteriorate the computer performance, or...
Setup Guide - Page 10

Setting Up Your Inspiron Laptop
Press the Power Button
8
Setup Guide - Page 29
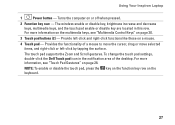
... To change the touch pad settings, double-click the Dell Touch pad icon in this row. NOTE: To enable or disable the touch pad, press the key on the function key row on or off when pressed.
2 Function key row - Using Your Inspiron Laptop
1
Power button - For more information on the multimedia keys, see...
Setup Guide - Page 34

Using Your Inspiron Laptop
Using the Optical Drive
CAUTION: Do not press down on the optical drive. 2. This optical drive plays or records CDs and DVDs. Push the optical drive tray back into the drive...the center of the optical drive tray and snap the disc onto the
spindle. 4. Press the eject button on the optical drive tray when you are not using the drive.
Pull out the optical drive tray...
Service Manual - Page 1

... may be used in this document is a registered trademark owned by Dell under license; A00 Dell™ Inspiron™ N4020/N4030 Service Manual
Before You Begin Battery Hard Drive Optical Drive Module Cover Memory Module(s) Keyboard Wireless Mini-Card Palm Rest Power Button Board Display
Camera Internal Card With Bluetooth® Wireless Technology System Board...
Service Manual - Page 3
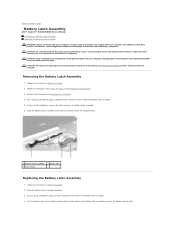
...1 battery latch assembly 3 latch spring
2 plastic clips
Replacing the Battery Latch Assembly
1. Push the plastic clips on the battery release latch into place. 3. Damage due to servicing ... Follow the instructions from step 2 to Contents Page
Battery Latch Assembly
Dell™ Inspiron™ N4020/N4030 Service Manual Removing the Battery Latch Assembly Replacing the Battery Latch Assembly
...
Service Manual - Page 5
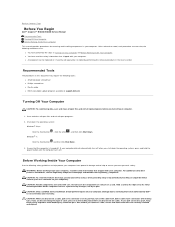
...CAUTION: When you shut down the operating system: Windows® Vista:
Click the Start button Windows® 7:
, click the arrow
, and then click Shut Down. Some cables...button and then click Shut Down.
3. CAUTION: To avoid electrostatic discharge, ground yourself by using a wrist grounding strap or by its pins.
Back to Contents Page
Before You Begin
Dell™ Inspiron™ N4020/N4030...
Service Manual - Page 34
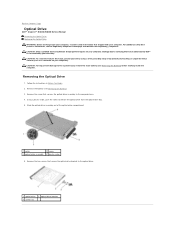
... screws that secures the optical-drive assembly to the computer base.
4. Using a plastic scribe, push the notch to remove the optical drive from the optical-drive bay.
5. Back to Contents Page
Optical Drive
Dell™ Inspiron™ N4020/N4030 Service Manual Removing the Optical Drive Replacing the Optical Drive
WARNING: Before working inside your...
Service Manual - Page 36
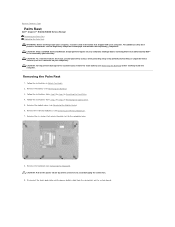
...). 6. Disconnect the touch pad cable and the power button cable from the connectors on your warranty. Remove the six screws that shipped with your computer. CAUTION: Pull on the plastic tab on your computer. Back to Contents Page
Palm Rest
Dell™ Inspiron™ N4020/N4030 Service Manual Removing the Palm Rest Replacing the...
Service Manual - Page 39
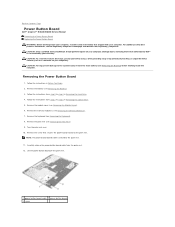
.... Remove the module cover (see Removing the Palm Rest). 9. Remove the screw that secures the power button board to Contents Page
Power Button Board
Dell™ Inspiron™ N4020/N4030 Service Manual Removing the Power Button Board Replacing the Power Button Board WARNING: Before working inside your computer, read the safety information that is not authorized by...
Service Manual - Page 47

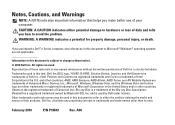
... subject to Contents Page CAUTION: A CAUTION indicates either potential damage to hardware or loss of Dell Inc.; All rights reserved. Reproduction of your computer. Trademarks used in this document to refer to Contents Page Dell™ Inspiron™ N4020/N4030 Service Manual
NOTE: A NOTE indicates important information that helps you how to avoid the...
Similar Questions

How To Get Your Microsoft To Work After Resetting Your Dell Laptop Inspiron
n4010
n4010
(Posted by Arabscis 10 years ago)


How To Search Bluetooth In Dell Laptop Inspiron N4030
(Posted by Hebri 10 years ago)

