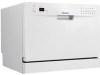
Danby DDW611WLED Support Question
Danby DDW611WLED Support Question
Find answers below for this question about Danby DDW611WLED.Need a Danby DDW611WLED manual? We have 1 online manual for this item!
Question posted by garbonzo069 on September 22nd, 2020
How To Change Or Check The Timer On A Danby Dd611wled Dishwasher
The person who posted this question about this Danby product did not include a detailed explanation. Please use the "Request More Information" button to the right if more details would help you to answer this question.
Current Answers
Answer #1: Posted by Troubleshooter101 on September 22nd, 2020 10:37 AM
Troubleshooter101

Member since:
September 30th, 2015 Points: 2,927,040

Member since:
September 30th, 2015 Points: 2,927,040
Follow this
- Shut off electrical powerFlip the house circuit breaker switch to the Off position to completely disconnect electrical power to the dishwasher (instead of a breaker, some older homes have a fuse that you remove from the fuse box). To verify that power is disconnected, make sure the display on the control panel can't be activated.
- 02.Remove the timer knobPull the timer knob straight off of the front of the control panel.Pull off the timer knob.
- 03.Remove the door latch handle knobRemove the Phillips screw located under the latch handle knob. Slide the handle knob off the end of the handle.Remove the dishwasher door latch handle knob.
- 04.Separate the outer door panel from the inner door panelOpen the door and remove every screw on the inner door panel.Shut the entire dishwasher door and latch it.Grasp the sides of the outer door panel and pull the outer door panel down to separate the door panels and access the timer that is attached to the outer door panel. The inner door panel will remain closed. Remove the inner door panel screws.Separate the dishwasher door panels.
- 05.Remove the timerDisconnect the wire harness connector from the timer. Remove the timer mounting screws and remove the timer.Unplug the wire harness.Remove the mounting screws.
- 06.Attach wires to the new timerAttach the wires to the new timer the same way they were connected to the original timer. Reinstall the timer mounting screws.
- 07.Reattach the outer door panel to the inner door panelClose the outer door so that it mates up with the inner door panel.Grasp the inner and outer door panels and open the door. Keep the inner door panel postioned against the outer door panel.Line up the mounting screw holes and reinstall the screws that hold the inner door panel and outer door panel together. Tip: The mounting screws that fit in the bottom corners of the door are machine threaded screws. These machine threaded screws must go back into the bottom corners of the inner door panel to properly secure the inner door panel to the door frame.
- 08.Reinstall the door latch handle knob.Slide the latch handle knob back onto the door latch handle and reinstall the screw.
- 09.Restore electrical powerFlip the house circuit breaker switch to the On position. The dishwasher display should light up after you restore electricity. Test that the dishwasher control buttons work.
Please respond to my effort to provide you with the best possible solution by using the "Acceptable Solution" and/or the "Helpful" buttons when the answer has proven to be helpful. Please feel free to submit further info for your question, if a solution was not provided. I appreciate the opportunity to serve you!
Troublshooter101
Related Danby DDW611WLED Manual Pages
Product Manual - Page 3
... a few moments to this appliance. To contact a Customer Service Representative, call Danby TOLL FREE: 1-800-263-2629 2 Model Number: Serial Number: Date of ...proper care and maintenance of your new appliance. For easy reference, may we suggest you for choosing a Danby appliance. Welcome
Thank you attach a copy of your sales slip/receipt to read the instructions thoroughly and ...
Product Manual - Page 4
... properly grounded. Avoid contact with a cord having a equipment grounding conductor and a grounding plug. For plastic items not marked, check the manufacturer's recommendations.
• Use only detergent and rinse additives designed for an automatic dishwasher.
• Never use . (These instructions are only applicable to be washed is 6. • The maximum permissible inlet water...
Product Manual - Page 5
..." displays then stop the delay. Operating Instructions
READ AND FOLLOW ALL OPERATING INSTRUCTIONS
To get the best performance from your dishwasher, read all operating instructions before using it for one hour).
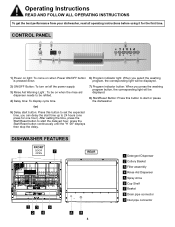
DISHWASHER FEATURES
FRONT
6
DOOR FroOnPt vEieNw
7
REAR
13
5
24
89
4
1 Detergent Dispenser 2 Cutlery Basket 3 Filter assembly 4 Rinse Aid Dispenser 5 Spray Arms...
Product Manual - Page 6
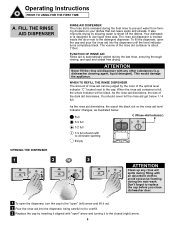
.... ATTENTION
Never fill the rinse aid dispenser with any rinse aid spills during the next wash. dishwasher cleaning agent, liquid detergent). Full
C (Rinse-Aid Indicator)
3/4 full
1/2 full
1/4 full ... judged by allowing water to prevent water from forming droplets on the rinse aid level indicator changes, as illustrated below 1 / 4 full. To fill the dispenser, open " arrow and...
Product Manual - Page 7
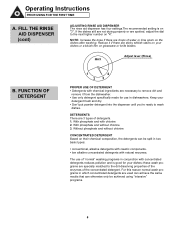
... higher number on their chemical composition, the detergents can otherwise only be split in dishwashers. FILL THE RINSE AID DISPENSER (cont)
ADJUSTING RINSE AID DISPENSER The rinse aid ...to wash
dishes. Operating Instructions
PRIOR USING FOR THE FIRST TIME
A. Reduce it from the dishwasher. • Use only detergent specifically made for your
detergent fresh and dry. • Don...
Product Manual - Page 8
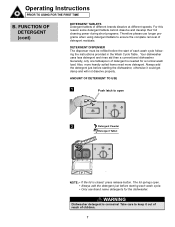
... programs. Therefore please use brand name detergents for a normal wash load. Operating Instructions
PRIOR TO USING FOR THE FIRST TIME
B. Your dishwasher uses less detergent and rinse aid than a conventional dishwasher.
Generally, only one tablespoon of each wash cycle. • Only use longer programs when using detergent tablets to open . • Always...
Product Manual - Page 10
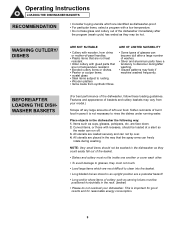
...those with a low temperature. • Do not take glass and cutlery out of the dishwasher immediately after washing.
• Glazed patterns may vary from synthetic fibres. Soften remnants of ...basket)
• Please do not overload your model.)
Scrape off . 3.
BEFORE/AFTER LOADING THE DISHWASHER BASKETS
(For best performance of left over . 4.
NOTE: Very small items should be loaded at...
Product Manual - Page 11
Operating Instructions
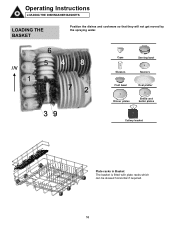
LOADING THE DISHWASHER BASKETS
LOADING THE BASKET
Position the dishes and cookware so that they will not get moved by the spraying water.
6 5
1
1 Cups
2 Serving bowl
3
4
Glasses
Saucers
1
5
6
...
Product Manual - Page 12
...
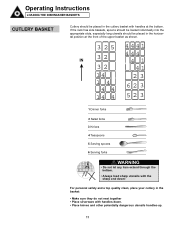
WARNING
• Do not let any item extend through the bottom.
• Always load sharp utensils with handles at the bottom.
Operating Instructions
LOADING THE DISHWASHER BASKETS
CUTLERY BASKET
Cutlery should be placed in the cutlery basket with the sharp end down . • Place knives and other potentially dangerous utensils handles...
Product Manual - Page 13
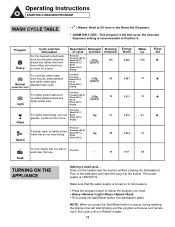
...->Normal->Light->Glass->Speed->Soak • Then press the Start/Reset button, the dishwasher starts. Rinse (60°C)
Drying
Glass
Pre-wash
A shorter wash for a...
TURNING ON THE APPLIANCE
Starting a washcycle...
Draw out the basket (see the section entitled Loading the Dishwasher).
Operating Instructions
STARTING A WASHING PROGRAM
WASH CYCLE TABLE
• ( * ) Means: Need to ...
Product Manual - Page 14
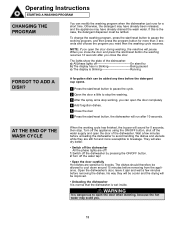
... the door during washing, the machine will also dry better.
• Switch off the dishwasher All the phase lights are sensitive to stop the washing. 3 After the spray arms stop . If this is wet inside. To change the washing program, press the start/reset button to pause the working program, and then...
Product Manual - Page 15
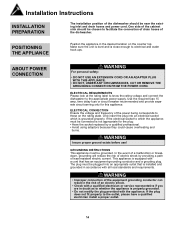
... look at the rating label to know the rating voltage and connect the dishwasher to those on the counter top. WARNING
• Improper connection of the equipment grounding conductor can result in the risk of an electric shock.
• Check with a qualified electrician or service representative if you are in doubt as...
Product Manual - Page 16
...after using.
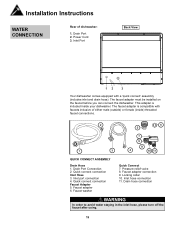
15 The faucet adapter is included inside ) threaded faucet connections. Installation Instructions
WATER CONNECTION
Rear of either male (outside) or female (inside your dishwasher. Inlet hose connection 11. Drain Port 2. QUICK CONNECT ASSEMBLY
Drain Hose 1. Quick connect connection Faucet Adapter 5. Faucet adapter connection 9. The faucet adapter must be installed...
Product Manual - Page 17
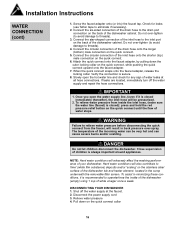
Check for any sign of the dishwasher tub and heater element, located in the sump underneath the removable filter screen. Connect the star... CONNECTION (cont)
1. Do not over -spray. Once you open the hot water line and check for leaks (use Teflon tape to threads).
4. DISCONNECTING YOUR DISHWASHER 1. Attach the quick connect onto the faucet adapter, by pulling down on the back of the...
Product Manual - Page 18
... following things should be taken out from the dishwasher
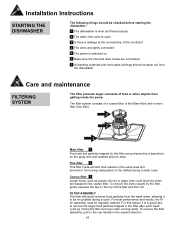
Care and maintenance
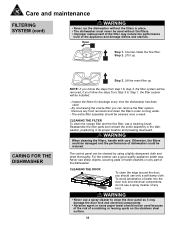
FILTERING SYSTEM
The filter prevents larger remnants of...or glass, that could block the drain are not twisted
7 All packing materials and removable printings should be checked before starting the dishwasher: 1 The dishwasher is level and fixed properly 2 The water inlet valve is open 3 Is there a leakage at the ...
Product Manual - Page 19
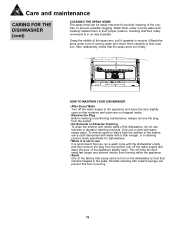
...cleaned once a week.
Care and maintenance
FILTERING SYSTEM (cont)
WARNING
• Never run the dishwasher without the filters. • Improper replacement of the filter may damage the door lock and ... kind. Lift the main filter up . Inspect the filters for blockage every time the dishwasher has been used because of the risk of scratching or leaving spots on any food remnants...
Product Manual - Page 20
... with water with a little vinegar, or a cleaning product made specifically for periodic cleaning of the nozzles, to form in the dishwasher is food that remains trapped in the seals. After reassembly, check that their rotary movement is in no way impeded. Wash them under running water andcarefully replace them carefully to remove...
Product Manual - Page 21
...turns on the drain pump. Detergent left in cord securely.
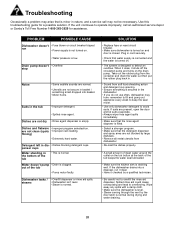
• Check that is normal.
PROBLEM
POSSIBLE CAUSE
Dishwasher doesn't • Fuse blown or circuit breaker tripped. run
• ... an authorized service depot or Danby's Toll Free Number 1-800-263-2629 for a possible solution. Wipe away any spills with a damp cloth.
• Make sure the dishwasher is level. • Steam...
Product Manual - Page 22

... date will be the consumer's responsibility to transport the appliance (at no other warranties, conditions, representations or guarantees, express or implied, made or intended by Danby or its use, whether proper or improper. Save as inadequate air circulation in customer education. 8) Improper Installation (ie. LIMITED APPLIANCE WARRANTY
This quality product is...
Product Manual - Page 43
...èce
Tel: 1-800-26(1-800-263-2629)
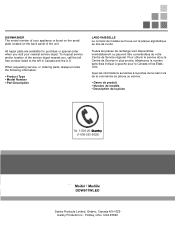
ModeMlo• dMeold•èMleo•dMèoledelo DDW611WLED
DaDnbaynbPyroPdruocdtuscLtsimLiitmedit,eGdu, eOlpnhtaOrion,taCraionaCdaanaNd1aHN61ZH96Z9 DDanabnybyPrPordoudcutcstsInIcn.,cF.,inFdinladyla, Oy,hOiohUioS, AU4S5A843598-046069
DISHWASHER The model number of your appliance is found on the serial plate located on the back panel of the...
Similar Questions

How To Change Or Check The Timer On My Dd611wled Dishwasher
(Posted by garbonzo069 3 years ago)

Danby Countertop Dishwasher Ddw611wled
I don't know what E1 is that shows in the display screen
I don't know what E1 is that shows in the display screen
(Posted by shielat2001 3 years ago)

I Have A E1 Message On My Dishwasher
I just bought this dish washer and there is an e1 message popping up on the dishwasher, there is wat...
I just bought this dish washer and there is an e1 message popping up on the dishwasher, there is wat...
(Posted by Clorissacrosby 9 years ago)

Dishwasher Isn't Changing Cycles.
Dishwasher starts well, but doesn't change cycles. It stays on wash for a long time and never change...
Dishwasher starts well, but doesn't change cycles. It stays on wash for a long time and never change...
(Posted by marciadeem55 11 years ago)

Danby Dishwasher Issues
salt aid light keeps coming on even after we put wate softener in it. It wont let us do any loads. W...
salt aid light keeps coming on even after we put wate softener in it. It wont let us do any loads. W...
(Posted by sirryan 12 years ago)