Craftsman 21914 Support Question
Craftsman 21914 Support Question
Find answers below for this question about Craftsman 21914 - 12 in. Drill Press.Need a Craftsman 21914 manual? We have 1 online manual for this item!
Question posted by helpowl14425 on October 22nd, 2012
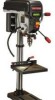
Front Pulley
How do I remove the quill pulley to replace it?
Current Answers
Related Craftsman 21914 Manual Pages
Operation Manual - Page 1
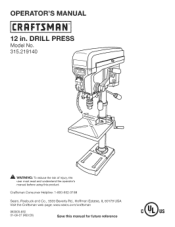
DRILL P
Model No. 315.219140
_1_ WARNING: To reduce the risk of injury, the user must read and understand the operator's manual before using this manual ... Estates, IL 60179 USA Visit the Craftsman web page: www.sears.com/craftsman
983000-830 01-08-07 (REV:05)
Save this product. RATOR'S MANUAL
12 in.
Operation Manual - Page 2
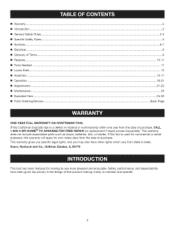
... Tools Needed ...
11
[] Loose Parts ...
12
[]... Assembly ...
13-17
[] Operation ...
18-21
[] Adjustments ...[] Maintenance ...
21-22 23
[] Exploded View ...
24-25
[] Parts Ordering/Service ...
Sears, Roebuck and Co., Hoffman Estates, IL 60179
This tool has many features for only ninety days from the date of purchase. If this tool... ON CRAFTSMAN TOOL
If this Craftsman tool fails due...
Operation Manual - Page 3
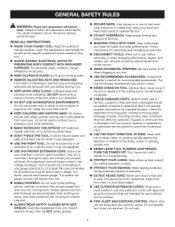
... better and safer performance. All visitors should wear safety glasses and be properly repaired or replaced by removing starter keys.
[] DON'T FORCE THE TOOL. The use the next heavier gauge. Don't leave tool until it to avoid risk of
the tool, a guard or other conditions that is recommended for alignment of moving parts, binding of...
Operation Manual - Page 4

... authorized service center.
[] ALWAYS TURN SWITCH OFF before disconnecting it well away from the rotating blade.
[] iNSPECT EXTENSION CORDS PERiODiCALLY and
replace if damaged.
[] GROUND ALL TOOLS. If repair or replacement of cord location and keep it to avoid accidental starting.
[] NEVER USE iN AN EXPLOSIVE ATMOSPHERE. Stay constantly aware of the electric...
Operation Manual - Page 5
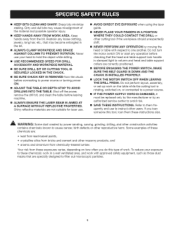
...DRILL
ACCESSORY AND WORKPIECE MATERIAL.
[] BE SURE DRILL BiT OR CUTTING TOOL iS SECURELY LOCKED iN THE CHUCK,
[] BE SURE CHUCK KEY iS REMOVED...WHEN LEAVING THE DRILL PRESS. quently and use .
[] ...replaced only by the manufacturer or by power sanding, sawing, grinding, drilling, and other construction activities contains chemicals known to cause cancer, birth defects or other cutting tool...
Operation Manual - Page 7

... explainthe levelsof riskassociatedwiththisproduct.
When servicing, use only identical replacement parts.
,_ WARNING: To avoid serious personal injury,...Craftsman Consumer Helpline at 1-800-932-3188 for assistance.
_ WARNING:
The operation of any power tool can result in the operator's manual, do
not attempt to your eyes, which is marked to ...
Operation Manual - Page 8
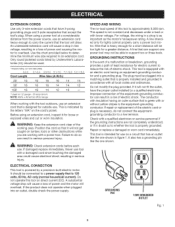
...replace immediately. Do not operate this tool is intended for outside use on a circuit that is green with a power tool. SPEED AND WIRING
The no-load speed of this tool on the cord's jacket. This tool... on 12 gauge - 20 amp circuit, NOTE: AWG = American Wire Gauge
7.1-12.0 12.1-16.0
14
14
14
12
10
-- A WARNING: Check extension cords before each
use tool with insulation...
Operation Manual - Page 9
... or Material The item on which a blade or cutting tool is being kicked back toward operator. Bevel Cut A cutting...per minute), used to blade movement. Pilot Hole (drill presses) A small hole drilled in a non-through cut which produces a square-sided...the blade. Freehand Performing a cut .
Kerr The material removed by the blade in front of the workpiece pushed into the...
Operation Manual - Page 10

... Only, 6 Amps Table Size 10 in .
Motor 2/3 HP induction Table Movement 45 ° bevel, 360 ° swivel
No Load Speed 500-3,000 r/min (RPM) Depth 12 in .
Overall Height 37-1/2 in .
Operation Manual - Page 11
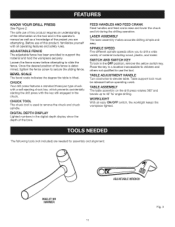
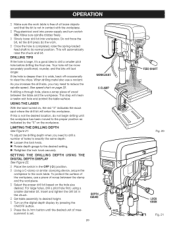
... on the drill press rotates 360 ° and bevels up to remove the chuck ...TOOL The chuck tool is tilted.
SWITCH AND SWITCH KEY To lock in a location inaccessible to children and others not qualified to elevate table. Place the key in the OFF position, remove the yellow switch key. Table support lock must be released before attempting to secure the sliding fence. KNOW YOUR DRILL PRESS...
Operation Manual - Page 16
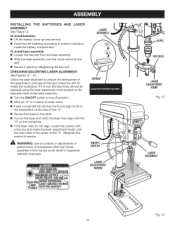
...is precisely at the spot where the drill bit meets the workpiece. CHECKiNG/ADJUSTING
LASER ALIGNMENT
See Figures 12- 13. H AVOIDIRECETYEEXPOSURE "MAXIMUM OUTPUT
...remove.
Retighten the screws to polarity indicators inside the battery compartment. To install laser assembly: [] Loosen the hex bolt from the laser assembly.
[] Slide the laser assembly over the chuck and onto the quill...
Operation Manual - Page 17
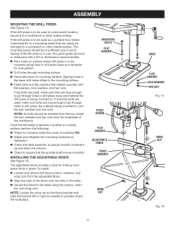
... in drill press base and material the drill press is to be used in a permanent location, secure it permanently to a workbench or other stable surface. To install:
[] Loosen and remove the ... board that the spindle shaft moves smoothly. Once the drill press is switched ON.
[] Adjust and retighten the mounting hardware as a portable tool, fasten it to . FENCE
The adjustable fence provides...
Operation Manual - Page 18
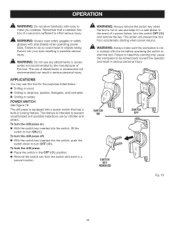
... switch in serious personal injury.
8Wl ON
J
SWITCH
0
SWITCH KEY
REMOVED
Fig. 16
18 In the event of a power failure, turn OFF ( O ). This action will prevent the tool from the switch and store in contact with side shields when operating power tools. The drill press is not in a
secure location. A WARNING: Always make you careless...
Operation Manual - Page 19
... Fig. 19 The self-ejecting chuck key ensures the chuck key is turned
On.
The table can be thrown from the chuck before the drill press is removed from the drill press, resulting in possible serious personal injury or damage to loosen or tighten the chuck using a smaller diameter bit. Do not use a piece of...
Operation Manual - Page 20
... clamping device, secure the workpiece to the proper position as indicated by pressing the
ON/OFF button. If drilling a through hole, place a scrap piece of scrap between the table and the workpiece.
I ] Select the proper drill bit based on page 22. I ] Press the in./mm button until the workpiece has been moved to the...
Operation Manual - Page 21
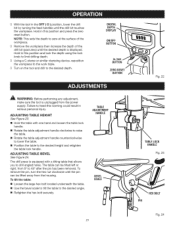
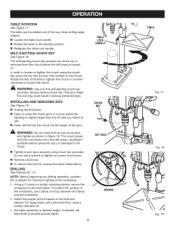
... can be lifted away from 0 ° to 45 ° after the pin has been removed.
The drill press is unplugged from the power supply. To tilt the table:
[] Loosen the large hex bolt ...in ./mm BUTTON ZERORESET BUTTON
Fig. 22
_ WARNING: Before performing any adjustment, make sure the tool is equipped with one hand and loosen the table lock
handle. [] Rotate the table adjustment handle...
Operation Manual - Page 22
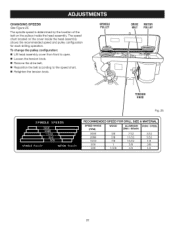
...: [] Lift head assembly cover from front to open. [] Loosen the tension knob. [] Remove the drive belt.
[] Reposition the belt according to the speed chart. [] Retighten the tension knob. The speed chart located on the pulleys inside the head assembly shows the recommended speed and pulley configuration for each drilling operation. CHANGINGSPEEDS
See Figure 25.
Operation Manual - Page 23
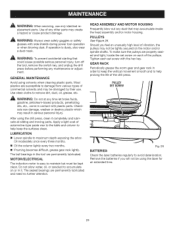
... dust that could cause possible serious personal injury, turn off the tool, remove the switch key, and unplug the drill press before performing any time let brake fluids,
gasoline, petroleum-based products, penetrating oils, etc., come in order to keep the surfaces clean. PULLEYS See Figure 26. GEAR RACK
Periodically grease the worm gear and...
Operation Manual - Page 24
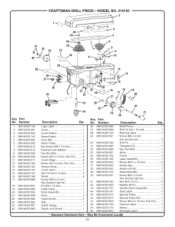
... Recoil Assembly 1 Data Label 1
Spindle Pulley 1 Special Pulley Nut 1
*Screw (M4.2 x 16 ram, Pan Hd.) ...... 1 Fraction Label 1 Sleeve 1
Worklight Label 1 Locall
24 CRAFTSMAN DRILL PRESS- Ma Be Purchased
Description
Qty. MODEL ... 089140301012 8 089140301010 9 089140301009 10 089140301008 11 089140301011 12 089140301106 13 089140301102 14 089140301107 15 089140301101 16 089140301168 ...
Operation Manual - Page 25
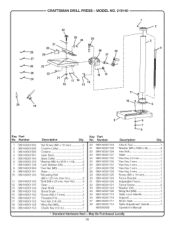
...089140301139 7 089140301138 8 089140301084 9 089140301141 10 089140301140
11 089140301136 12 089140301135 13 089140301134 14 089140301133 15 089140301132 16 089140301131 17 ... 089140301119 36 089140301118 37 089140301117 38 089140301116
983000830
Description
Qty. May Be Purchased 25
Locally CRAFTSMAN DRILL PRESS-
Chuck Tool 1
*Washer (M9 x M28 x 3t 4 Hex Bolt 1 Table 1
*Hex Key ...
Similar Questions

The Stud That The Height Adjustment Lever Goes On Is Striped. Replaceable Or Wh
Is the stud that holds height adjustment replaceable? Or what is the thread size to retread it. Has ...
Is the stud that holds height adjustment replaceable? Or what is the thread size to retread it. Has ...
(Posted by jabutler470 5 months ago)

How To Remove The Chuck From A Craftsman 9 Drill Press
(Posted by v12Ashr 9 years ago)

Remove Driven Pulley On Band Saw Model 351.214190
How Do You Remove Driver Pulley On Band Saw Model351.214190
How Do You Remove Driver Pulley On Band Saw Model351.214190
(Posted by AVERBECK 9 years ago)

Assembly Video
is there an online video on how to assemble the 12" drill press?
is there an online video on how to assemble the 12" drill press?
(Posted by davisgirl51 10 years ago)
Craftsman 21914 Quill Distance?
What is the quill distance for the Craftsman 21914 - 12 inch drill press? I need to fit a mortise at...
What is the quill distance for the Craftsman 21914 - 12 inch drill press? I need to fit a mortise at...
(Posted by remondi 12 years ago)