2007 Chrysler Aspen Support Question
2007 Chrysler Aspen Support Question
Find answers below for this question about 2007 Chrysler Aspen.Need a 2007 Chrysler Aspen manual? We have 1 online manual for this item!
Question posted by raishelw on October 21st, 2013
Where Is Tire Jack And Tools Located On A 2007 Chrysler Aspen
The person who posted this question about this Chrysler automobile did not include a detailed explanation. Please use the "Request More Information" button to the right if more details would help you to answer this question.
Current Answers
Related Manual Pages
Owner's Manual - Page 254
... (Maximum Trailer Weight Ratings) ...330 ▫ Trailer And Tongue Weight ...330
▫ Towing Requirements ...331 ▫ Towing Tips ...336 Snowplow ...338 ▫ Dodge Durango Or Chrysler Aspen Models . . 338 Recreational Towing (Behind Motorhome, Etc.) . . 339 ▫ Recreational Towing 2WD Models ...339 ▫ Recreational Towing 4WD Models ...339 Equipment Identification Plate ...343
Owner's Manual - Page 264
...allow the vehicle to the 4WD LOCK position - Not engaging the parking brake may cause increased tire wear and damage to make a shift while only the front or rear wheels are spinning. The... properly and that service is designed for loose, slippery road surfaces only. If there are located on or flashing the transfer case position is illuminated. Always engage the parking brake when powering...
Owner's Manual - Page 266

... spinning. There may be a delay up to 13 seconds for the position indicator lights to uneven tire wear, low tire pressure, or excessive vehicle loading. 266 STARTING AND OPERATING
Shifting Procedure - The indicator light will flash...either OFF or RUNNING, rotate the transfer case switch, located on the instrument panel to the current position, wait five (5) seconds, and retry the shift.
Owner's Manual - Page 267

...-wheel-drive position (4WD) at all times on dry hard surfaced roads may cause increased tire wear and damage to these positions. The NV 244 Generation II transfer case provides 4 mode... mode allows the front and rear wheels to rotate at different speeds. When additional traction is located on the lower left hand corner of road conditions. The transfer case Neutral (N) position is ...
Owner's Manual - Page 292
.... EXAMPLE: DOT MA L9 ABCD 0301 DOT = Department of Transportation -This symbol certifies that the tire is not found on one side. Tires with the U.S.
MA = Code representing the tire manufacturing location. (2 digits) L9 = Code representing the tire size. (2 digits) ABCD = Code used by tire manufacturer. (1 to 4 digits) 03 = Number representing the week in which the...
Owner's Manual - Page 293

... can be carried in the vehicle 2) the total weight your vehicle can carry 3) the tire size designed for your vehicle 4) the cold tire inflation pressures for the front, rear and spare tires. Tire and Loading Information Placard
5
Tire and Loading Information
Tire Placard Location
This placard tells you important information about the: 1) number of the driver's door...
Owner's Manual - Page 294

... of the driver and passengers from XXX kilograms or XXX pounds. 4. 294 STARTING AND OPERATING
Loading The vehicle maximum load on the tire must not be five 150 lb. Locate the statement "The combined weight of available cargo and luggage load capacity is 650 lbs. (since 5 x 150 = 750, and 1400 - 750 = 650...
Owner's Manual - Page 298
...Over inflation produces a jarring and uncomfortable ride. Tire Placard Location
The pressure should be found in higher fuel consumption. 3. Do not make a visual judgement when determining proper inflation. Ride Comfort and Vehicle Stability- Proper tire inflation contributes to check tire pressure.
Radial tires may have Supplemental Tire Pressure Information for vehicle loads that are...
Owner's Manual - Page 302

... reinstall it is identified by a limited use spare tire warning label located on the limited use spare tire and wheel assembly.
Replace (or repair) the original tire at the first opportunity. Since it is for emergency use spare tire and wheel assembly. The limited use spare tires are for temporary emergency use on the front or...
Owner's Manual - Page 307

... type of driving found in the "Maintenance Schedules" Section of a low tire pressure based on the vehicle recommended cold placard pressure (the placard is located on cold inflation tire pressure. STARTING AND OPERATING 307
TIRE PRESSURE MONITOR SYSTEM (TPMS) - IF EQUIPPED The Tire Pressure Monitoring System (TPMS) will warn the driver of this increased pressure...
Owner's Manual - Page 338
... this manual Do not expect that the airbag will perform as described earlier in an accident. WARNING! 338 STARTING AND OPERATING
SNOWPLOW Dodge Durango or Chrysler Aspen Models NOTE: Do not use Dodge Durango or Chrysler Aspen Models for snowplow applications can cause damage to the vehicle.
WARNING!
Owner's Manual - Page 345
WHAT TO DO IN EMERGENCIES
CONTENTS
Hazard Warning Flasher ...346 Jacking And Tire Changing ...347 ▫ Jack Location ...347 Jacking Instructions ...348 ▫ Removing The Spare Tire ...348 ▫ Tire Changing Procedure ...349 Jump Starting Procedures ...354 Emergency Tow Hooks - If Equipped ...356 Towing A Disabled Vehicle ...357 ▫ Four-Wheel Drive Vehicles ...358 ▫ Two-...
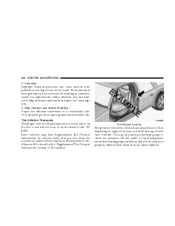
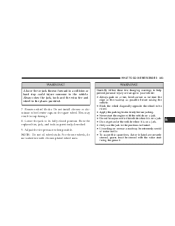
Owner's Manual - Page 347
... could slip off the jack and fall on a firm level surface only. Avoid ice or slippery areas. It is designed to use as a tool for service purposes. The winged stud inserts through the eyelet in the base to lift the vehicle for changing tires only. Jack Location The scissor jack and tire changing tools are stowed under a vehicle...
Owner's Manual - Page 348

... to lower the spare tire. Continue to jack the truck. 3. Remove the spare tire before attempting to turn the wrench until the spare tire can be pulled out from the floor in the rear.
1. 348 WHAT TO DO IN EMERGENCIES
JACKING INSTRUCTIONS Removing The Spare Tire The spare tire on your vehicle is located underneath the vehicle in...
Owner's Manual - Page 349
... not recommended and can be raised on this vehicle using a bumper jack. Use of your body under a jacked-up vehicle is dangerous. The scissor jack is designed as a tool for changing tires on a lift. It is not recommended that the jack be crushed. If you need to lift more than one wheel at a time.
6 CAUTION! Getting...
Owner's Manual - Page 350
...! On Four Wheel Drive vehicles, shift the transfer case to moving traffic.
Pull far enough off the road to change a tire on the Hazard Warning Flasher. Instructions 1. Remove the spare wheel, jack, and tools from storage. 2. Using the wheel wrench, loosen, but do not remove, the wheel nuts by turning them counterclockwise one...
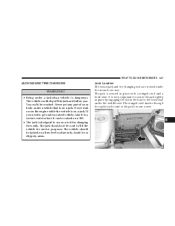
Owner's Manual - Page 351
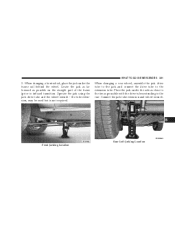
... tire as possible on the straight part of the frame (prior to the extension tube. the tube extension, may be used but is not required.
Locate the jack as far forward as posssible with the drive tubes extending to the rear. Connect the jack tube extension and wheel wrench.
6
Rear Left Jacking Location Front Jacking Location Operate the jack...
Owner's Manual - Page 352
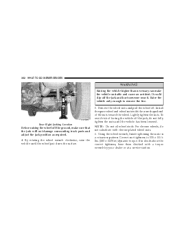
...surface. Correct nut tightness is 135 ± 10 ft. Rear Right Jacking Location
Before raising the wheel off the jack, do not substitute with chrome plated wheel nuts. 6. Raising the vehicle...than necessary can make sure that the jack will not damage surrounding truck parts and adjust the jack position as required. 4. Raise the vehicle only enough to remove the tire. 5. lbs. (183 ± 14...
Owner's Manual - Page 353
... the places provided. 7.
If working on a firm, level surface as previously described. 9. Always stow the jack, tools and the extra tire and wheel in the positions indicated. Do not install chrome or aluminum wheel center caps on a jack. This may result in cap damage. 8. Never start the engine with the vehicle on the spare...
Owner's Manual - Page 457

... Key Removal ...12 Illuminated Entry ...19 Infant Restraint ...62,63 Inflation Pressure Tires ...306 Information Center ...152 Information Center, Vehicle ...152 Inside Rearview Mirror ...79...Delay Wipers) ...138 Introduction ...4 Inverter Outlet (115V) ...170 Jack Location ...347 Jack Operation ...347,349 Jacking Instructions ...350 Key, Replacement ...Key, Sentry (Immobilizer) Keyless Entry...


