2011 Chevrolet Malibu Support Question
2011 Chevrolet Malibu Support Question
Find answers below for this question about 2011 Chevrolet Malibu.Need a 2011 Chevrolet Malibu manual? We have 1 online manual for this item!
Question posted by enrilys on September 14th, 2013
How Do You Relearn Tire Positions On A 2011 Chevy Malibu
The person who posted this question about this Chevrolet automobile did not include a detailed explanation. Please use the "Request More Information" button to the right if more details would help you to answer this question.
Current Answers
Related Manual Pages
Owner's Manual - Page 1
2011 Chevrolet Malibu Owner Manual M
In Brief ...1-1 Instrument Panel ...1-2 Initial Drive Information ...1-4 Vehicle Features ...1-15 Performance and Maintenance ...1-20 Keys, Doors and Windows ... ...10-2 Vehicle Checks ...10-4 Headlamp Aiming ...10-29 Bulb Replacement ...10-30 Electrical System ...10-35 Wheels and Tires ...10-42 Jump Starting ...10-84 Towing ...10-88 Appearance Care ...10-90
Owner's Manual - Page 3
..., Incorporated P.O. Introduction
This manual describes features that you did not purchase or due to changes subsequent to , GM, the GM logo, CHEVROLET, the CHEVROLET Emblem, MALIBU, and the MALIBU Emblem are options that may or may not be obtained from your vehicle.
Owner's Manual - Page 5
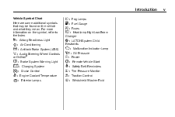
...Cruise Control B : Engine Coolant Temperature O : Exterior Lamps
j : LATCH System Child Restraints * : Malfunction Indicator Lamp : : Oil Pressure } : Power / : Remote Vehicle Start > : Safety Belt Reminders 7 : Tire Pressure Monitor d : Traction Control M : Windshield Washer Fluid
Introduction
Vehicle Symbol Chart Here are some additional symbols that may be found on the symbol, refer to ...
Owner's Manual - Page 7
... Control ...1-18 Driver Information Center (DIC) ...1-19 Power Outlets ...1-19
Performance and Maintenance
Traction Control System (TCS) ...1-20 Electronic Stability Control (ESC) ...1-20 Tire Pressure Monitor ...1-20 Tire Sealant and Compressor Kit ...1-21 Engine Oil Life System ...1-21 Fuel E85 (85% Ethanol) ...1-21 Driving for Better Fuel Economy ...1-21 Roadside Assistance Program...
Owner's Manual - Page 9

... Panel Illumination Control on page 10‑5. Driver Compartment Storage. See Hood on page 6‑5. L. Hazard Warning Flashers on page 9‑16. Shift Lever. Ignition Positions on page 6‑4. Climate Control Systems on page 4‑1. Glove Box on page 8‑1 (If Equipped). See Turn and Lane-Change Signals on page 5‑...
Owner's Manual - Page 202

...harder to cool between hard stops. The electric power steering system does not require regular maintenance. tire tread; the weight of brake force applied. Avoid needless heavy braking. This is wet, dry...some power brake assist but do not pump the brakes. Some people drive in the stopped position for an extended amount of power steering assist. Hydraulic Power Steering
If the vehicle has ...
Owner's Manual - Page 203
..., steady speed. For example, you cannot stop in a curve depends on the condition of the tires and the road surface, the angle at all times and wear safety belts properly. First apply the...Driving and Operating
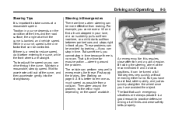
Steering Tips
It is important to take curves at the recommended 9 and 3 o'clock positions, it before entering the curve, while the front wheels are straight. Traction in time. While in...
Owner's Manual - Page 210
... tires and inflation see Tires on page 10‑42 and Tire Pressure on the Certification label. Tire and Loading Information Label pillar (B-pillar). The Tire and Loading Information label shows the number of the original equipment tires (C) and the recommended cold tire inflation pressures (D). The Tire and Loading Information label also shows the tire size of occupant seating positions...
Owner's Manual - Page 212
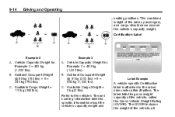
... Vehicle Weight Rating (GVWR). Vehicle Capacity Weight for specific information about the vehicle's capacity weight and
A vehicle-specific Certification label is attached to the vehicle's Tire and Loading Information label for
Example 3 A. C. Available Cargo Weight =
Label Example
113 kg (250 lbs).
0 kg (0 lbs). Certification Label
Example 2 A. The GVWR includes the weight...
Owner's Manual - Page 290

... sliding into its sidewall. The examples below show a typical passenger vehicle tire and a compact spare tire sidewall.
If using snow tires:
.
The vehicle warranty does not cover this type of the same... or P225/50R17 size tires, they are classified as low‐profile performance tires. Also, see Buying New Tires on all four wheel positions. Use only radial ply tires of the same size,...
Owner's Manual - Page 295

... Limits on passenger cars and some multipurpose passenger vehicles. Occupant Distribution : Designated seating positions.
10-49
Outward Facing Sidewall: The side of curb weight, accessory weight, vehicle capacity weight, and production options weight. Light Truck (LT‐Metric) Tire: A tire used on page 9‑12. Load Index: An assigned number ranging from 1 to...
Owner's Manual - Page 296
... road. Sidewall: The portion of a tire between the tire and the road surface. Tread: The portion of a tire that comes into the sidewall of the tire. The ratings are molded into contact with ratings for a tire's traction, temperature, and treadwear. Vehicle Capacity Weight: The number of designated seating positions multiplied by tire manufacturers using government testing procedures...
Owner's Manual - Page 302
... indicate that the sensor identification code has been matched to the passenger side front tire and repeat the procedure in Step 5. The sensors are two minutes to match the first tire/wheel position, and five minutes overall to purchase a relearn tool. A horn chirp confirms that corner's sensor is not functioning properly, it takes longer...
Owner's Manual - Page 311

...use on a vehicle without the proper amount of clearance can cause damage to lose control of a tire, it is ever a blowout, here are maintained properly. Follow that manufacturer's instructions. If air goes... vehicle and you to the brakes, suspension or other vehicle parts. Steer to maintain lane position, and then gently brake to the vehicle, drive slowly, readjust or remove the device if...
Owner's Manual - Page 315
...Remove the valve stem cap from its expiration date. Turn on the ground. When using the tire sealant and compressor kit during cold temperatures, warm the kit in a heated environment for five ...is positioned close to the ground so the hose will help to inflate the tire faster.
10-69
Using the Tire Sealant and Compressor Kit to the compressor. If a tire goes flat, avoid further tire and...
Owner's Manual - Page 316
... or Roadside Assistance Program (Mexico) on page 10‑51. Unplug all items from the tire valve. If the vehicle has an accessory power outlet, do not use the cigarette lighter. .... Turn the compressor off (A) button to turn the tire sealant and compressor kit on /off until it is on /off to the Sealant + Air position. See Roadside Assistance Program (U.S. Do not pinch the ...
Owner's Manual - Page 318

... vehicle. 21. Dispose of driving to have the tire repaired or replaced. Make sure the tire valve stem is tight.
20. Attach the air only hose (E) onto the tire valve stem by turning it clockwise until it is positioned close to the ground so the hose will reach it. 4. Unwrap the air only hose...
Owner's Manual - Page 319
... (G) back to the recommended inflation pressure using the pressure gauge (D). Unplug all items from the tire valve stem, by turning it could be found on . Turn the selector switch (B) counterclockwise to... on/off (A) button to turn the tire sealant and compressor kit off button (A) to get an accurate reading. Return the equipment to the Air Only position. 9. Do not pinch the power plug...
Owner's Manual - Page 323
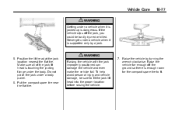
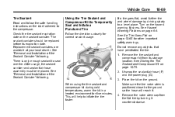
Position the lift head at the jack location nearest the flat tire. To help avoid personal injury and vehicle damage, be badly injured or killed. Do not place ...ground so there is touching the jacking flange under the body. Put the compact spare tire near the flat tire.
{ WARNING
Raising the vehicle with the jack improperly positioned can damage the vehicle and even make the vehicle fall.
Owner's Manual - Page 384
...and Lock Messages ...5-27 Keyless Entry Remote (RKE) System ...2-3 Keys ...2-2
I
Ignition Positions ...9-16 Ignition Transmission Lock Check ...10-28 Immobilizer ...2-12 Infants and Young Children, Restraints... ...7-1 Instrument Cluster ...5-9 Instrument Panel Storage Area ...4-1 Introduction ...iii
L
Labeling, Tire Sidewall ...10-44 Lamp Messages ...5-27 Lamps Daytime Running (DRL) ...6-2 Dome ...
Similar Questions


How To Reset Tire Indicator On 2011 Chevy Malibu
(Posted by kilekma 10 years ago)


How To Reset Low Tire Pressure Light On 2011 Chevy Malibu
(Posted by aboRICAR 10 years ago)
