
2003 Chevrolet Venture Support Question
2003 Chevrolet Venture Support Question
Find answers below for this question about 2003 Chevrolet Venture.Need a 2003 Chevrolet Venture manual? We have 1 online manual for this item!
Question posted by rarober on October 28th, 2013
2003 Chevy Venture How To Install Middle Seats
The person who posted this question about this Chevrolet automobile did not include a detailed explanation. Please use the "Request More Information" button to the right if more details would help you to answer this question.
Current Answers
Related Manual Pages
Owner's Manual - Page 2
The 2003 Chevrolet Venture Owner
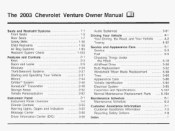
Seats and Restraint Systems ...1-1 Front Seats ...1-3 Rear Seats ...1-7 Safety Belts ...1-30 Child Restraints ...1-55 Air Bag Systems ...1-93 Restraint System Check ...1-103 Features and Controls ...2-1 Keys ...2-3 Doors and Locks ...2-9 Winaows ...2-24 2-27 Theft-...
Owner's Manual - Page 3
... receive their owner's manual from : Helm, Incorporated P.O.
Box 07130 Detroit, MI 48207
GENERAL MOTORS, GM, the GM Emblem, CHEVROLET, the CHEVROLET Emblem and the name VENTURE are registered trademarks of this manual, you'll find it when you 'll find that time without further notice.
Index
A good place to explain things...
Owner's Manual - Page 5

... has components and labels that use the same words, CAUTION or NOTICE. They use symbols instead of a component, gage or indicator reference the following topics: Seats and Restraints Systems in Section 1 Features and Controls in Section 2 Instrument Panel Overview in Section 3 Climate Controls in Section 3 Warning Lights, Gages and Indicators in...
Owner's Manual - Page 6
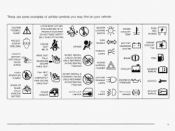
...
BAlTERY CHARGING SYSTEM
ENGINE COOLANT FAN
p 7
CAUSTIC BAlTERY 4CID COULD CAUSE BURNS
\/ vz s
DO NOT INSTALL A REAR-FACING CHILD RESTRAINT IN THIS SEATING POSlTlON
LAMPS
BRAKE
(@)
OWNER'S MANUAL
COOLANT AVO1D SPARKS OR FLAMES
DO NOT INSTALL A FORWARD-FACING CHILD RESTRAINT IN THIS SEATING POSITION
RUNNING LAMPS
ENGINE OIL PRESSURE
SERVICE
BATTERY
I
U U LUCK Un
UNLOCK
n
Owner's Manual - Page 8
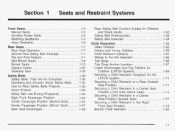
... Use During Pregnancy ...1-44 Right Front Passenger Position ...1.45 Center Passenger Position (Bucket Seat) ...1-45 Center Passenger Position (Bench Seat) ...1-47 Rear Seat Passengers ...1-48 Manual Seats ...1-3 Six-Way Power Seats ...1.4 Reclining Seatbacks ...1-4 Head Restraints ...1.6 Rear Seats ...1.7 Rear Seat Operation ...17 . Second Row Safety Belt Stowage ...1-7 Flip and Fold Feature...
Owner's Manual - Page 9
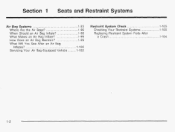
Section I
Seats and Restraint Systems
Restraint System Check ...1.103 Checking Your Restraint Systems ...1-103 Replacing Restraint System Parts After a Crash ...1.1 04
Air Bag Systems ...1-93 Where Are ...
Owner's Manual - Page 19

...and then pulling it out. People in the vehicle could cause injury to lock the seat into place properly can move forward in a collision or sudden stop or crash. Always press ...rearward on the seatback tobe sure it is locked.
6.
A seat that isn't locked into place properly when installing it.
1
1-12 sure Be to the person sitting there. To unlatch the front...
Owner's Manual - Page 20

...that is in the proper location for the legs to be seriously injured. The seat must go. After installing the seat, always check to attach correctly. The person wearing the belt could be sure ... before beginning this procedure. If you want more storage room behind the second row seat, adjust each seat, snowing wnere ine seai must be placed in the upright position and the safety belts...
Owner's Manual - Page 27

... sure to be seriously injured. Follow that the safety belts properly routed are and attached, and are not twisted. A safety belt that way. After installing the seat, always check to lock theseat into place properly can move forward in a sudden stop .
The person wearing the belt could cause injury to be sure...
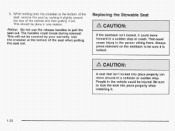
Owner's Manual - Page 32

A safety belt that way. For the second row, if you want more storage room behind the seat, adjust the seat by sliding it forward.
The seat must go. After installing the seat, always check to attach correctlv.
1. Follow that the safety belts are properly routed and attached, and are not twisted.
Hook the front latches over...
Owner's Manual - Page 35
... could cause injury to pull the seat out. Notice: Do not use the release handles to the person sitting there. A seat that isn't locked into place properly when installing it out. If the seatback isn... covered by rocking it slightly toward the rear of the seat when pulling the seat out. sure Be to lock the seat into place properly can move forward in a collision or sudden stop or ...
Owner's Manual - Page 36

...locked down on the back of floor pins.
2. After installing the seat, always check to the rear set of the seat, showing where the seat must be seriously injured. If the front legs are ...convenience center. See Convenience Center on the seatback to make sure that way. Make sure the seat is improperly routed, not properly attached, or twisted won't provide the protection needed in a ...
Owner's Manual - Page 59
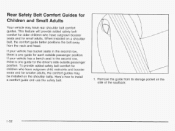
... position. To provide added safety belt comfort for children who have rear shoulder belt comfort guides. Here's how to install a comfort guide and use the safety belt:
1.
If your vehicle has bucket seats in the second row, there is one guide for the driver's side outside passenger position. Remove the guide from...
Owner's Manual - Page 72
... restraint in a
cm-w
I G I
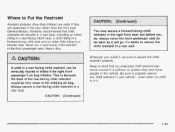
You may secure a forward-facing child restraint in the right front seat, but before you install it, be secured in a rear seat, including an infant riding in a rear-facing infant seat, a child riding in a forward-facing child seat and an older child riding in your vehicle - Here's why:
I U
Keep in mind that...
Owner's Manual - Page 77

... a Child Restraint Designed for the LATCH System" or "Securing a Child Restraint in a Rear Outside Seat Position" in the Index for information on how to protect a child sitting there. Make sure that a LATCH-type child restraint is properly installed using the anchorage points, or use the LATCH system instead of the vehicle's safety...
Owner's Manual - Page 169

The convenience net is designed to the third row seat(s).
1. Attach the upper loops to the posts on the driver's side of the vehicle, next to help keep small loads, like grocery bags, from falling over. Install the convenience net at the rear of the liftgate opening. To use the convenience net, do...
Owner's Manual - Page 171

...Lift up on page 1-26for more information. Removing the Convenience Center
1. See Stowable Seat on the hand knob to grab a hold of the convenience center.
4. Lift the...and into the correct position in the vehicle. If the stowable seat is closed.
2.
Turn the hand knob counterclockwise until the knob is properly installed in the vehicle.
2. Make sure that it out.
3. Make ...
Owner's Manual - Page 275
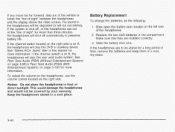
... warranty.
If the headphones are installed correctly.
3. To adjust the volume on the headphones, use the volume control located on B, the headphones will play the rear seat audio system. See "Stereo RCA... on the right side is on the right side. See Rear Seat Audio (RSA) (Without Entertainment System) on page 3-98 or Rear Seat Audio (RSA) (With Entertainment System) on A, the hea'dphones...
Owner's Manual - Page 462
...are lost on the road or locked inside) FREE Flat Tire Service (spare installed on the road) FREE Jump Start (at reasonable costs (i.e., wrecker services, ... (60 000 km), whichever occurs first. As the owner of fuel delivered on the road) FREE Fuel Delivery ($5 of a 2003 Chevrolet, membership in conjunction with minor mechanical problems. If your selling
I U G U I ~ I UI
rlrrmlnr g A ...
Owner's Manual - Page 480
... the Built-In Child Restraint ...1-YW Removing the Convenience Center ...2-60 Removing the Flat Tire and Installing the SpareTire ...5-76 Removing the Spare Tire and Tools ...5-71 Removing the Split Bench Seat ...1-11 Removing the Stowable Seat ...1-27 Removing the Wheel Covers ...5-76
Replacement Bulbs ...5-57 5-43 Replacing Brake System Parts ...Replacing Restraint...
Similar Questions

Electrical Issues Of My 2003 Chevy Venture Lt
My 2003 chevy venture lt has started having issues with the parking lights will not shut off and wil...
My 2003 chevy venture lt has started having issues with the parking lights will not shut off and wil...
(Posted by Lillithlette2 1 year ago)

Can You Remove The Back Seats On A 2003 Chevy Venture?
(Posted by mggem1506 9 years ago)

How To Take Out The Second Row Seats Out Of A 2003 Chevy Venture
(Posted by mastoka 10 years ago)

How To Remove Captain Seats In A 2003 Chevy Venture?
(Posted by hagottay 10 years ago)
