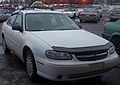
2003 Chevrolet Malibu Support Question
2003 Chevrolet Malibu Support Question
Find answers below for this question about 2003 Chevrolet Malibu.Need a 2003 Chevrolet Malibu manual? We have 1 online manual for this item!
Question posted by kaayma on July 28th, 2013
03 Chevy Malibu Will Not Return To Off Position
The person who posted this question about this Chevrolet automobile did not include a detailed explanation. Please use the "Request More Information" button to the right if more details would help you to answer this question.
Current Answers
Related Manual Pages
Owner's Manual - Page 2
... bhintenance Schedule ...6-2 Customer Assistance Information ...7-1 Customer Assistance Information ...7-2 index ...i
vu 99
3-1 3-2 3-1 8 3-23
A t Idin Cttctnm/c-\
IW
UY=GIII\J~
...
3-38 The 2003 Chevrolet Malibu Owner Manual
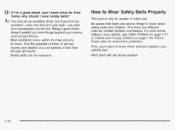
Seats and Restraint Systems ...Front Seats ...Rear Seats ...Safety Belts ...Child Restraints ...Supplemental Restraint System (SRS) ...Restraint System Check ...Features...
Owner's Manual - Page 3
...Box 07130 Detroit, MI 48207 GENERAL MOTORS, GM, the GM Emblem, CHEVROLET, the CHEVROLET Emblem and the name MALIBU are registered trademarks of General Motors Corporation. How to Use This Manual
Many people read their new vehicle. We .... Canadian Owners
You can use it was printed. Part No. 22691530 A First Edition ii
General 'Copyright
Motors Corporation 06/03/02 Reserved A 1 Rights 1
Owner's Manual - Page 6
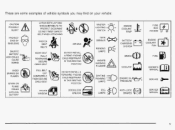
...BURNS
\! $ %
/ z
DO NOT INSTALL A REAR-FACING CHILD RESTRAINT IN THIS SEATING POSITION
LAMPS
Pf
BATTERY CHARGING SYSTEM
ENGINE COOLANT FAN
BRAKE
(@)
FUEL
COOLANT AVOID SPARKS OR FLAMES ...SPARK OR FLAME COULD EXPLODE BAlTERY DO NOT INSTALL A FORWARD-FACING CHILD RESTRAINT IN THIS SEATING POSITION DOOR LOCK UNLOCK
d
b
OWNER'S MANUAL
ENGINE OIL PRESSUREW
SERVICE
-1
'lib
1
ANTI-LOCK...
Owner's Manual - Page 8

... Securing a Child Restraint Designed for the 1-45 LATCH System ...Securing a Child Restraint in a Rear Outside Seat Position ...1-45 Securing a Child Restraint in a Center Rear Seat Position ...1-48 Securing a Child Restraint in the Right Front Seat Position ...1-50 Supplemental Restraint System (SRS) ...1-53 Where Are the Air Bags? ...1-55 When Should an Air Bag...
Owner's Manual - Page 11

Pull up on the lever without pushing on the outboard side of the seat and move the seatback to where you want it. Release the lever to an upright position. But don't have a seatback reclined if your vehicle is moving.
1-4 Reclining Seatbacks
To adjust the seatback, lift the lever located on the seatback, and the seatback will go to lock the seatback.
Owner's Manual - Page 12

... 're reclined like this. The shoulder belt can 't do its job because it will be against your at pelvic bones. r r L
...e
e" . Head Restraints
Sitting in a reclined position when your abdomen. This could go into it 's job either. II LJaCin :".*L-
is in motion can be there, not your body.
Owner's Manual - Page 19
... be hurt. Follow those rules for everyone 's protection. you 're in your passengers can be riding in an
accident - We'll start with the driver position. Most accidents occur within 25 miles (40 km) of home. A: You may bean excellent driver, but if you and your vehicle, see Older Children on...
Owner's Manual - Page 20

... it get twisted. Don't let it properly.
1. Here's how to unlock it clicks.
1-13 L
SI- Lap-Shoulder Belt
The driver has a lap-shoulder belt. Driver Position
This part describes the driver's restraint system.
Owner's Manual - Page 21

... belt as you ever had to unbuckle the safety belt quickly if you pull 'up on the shoulder belt.
1-14 To make sure it is positioned so you would be able to .
5. If the belt isn't long enough, see Safety Belt Extender on the buckle is secure. Make sure the release...
Owner's Manual - Page 23

...that is centered on the shoulder belt guide. After you move the adjuster to the desired position. The belt should be away from your face and neck, but not falling off your ... can move the adjuster up just by pushing on your shoulder.
1-16 To move it has locked into position. Shoulder Belt Height Adjuster
Before you begin to drive, move the shoulder belt adjuster to the height that ...
Owner's Manual - Page 88
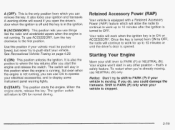
... to display some instrument panel warning lights. Notices Don't try to the first position. D (START): This position starts the engine. Once the key is turned from which will allow the radio...to operate your electrical accessories, and to PARK (P) or NEUTRAL (N).
J will return to where the key returns after the ignition is turned to PARK (P) only when your vehicle is stopped. ...
Owner's Manual - Page 109

... will come on if you have left your turn signal on the instrument panel cluster will return automatically. Turn SignaVMultifunction Lever
Turn and Lane-Change Signals
The turn signal has two upward (for... or lower the lever until you release it there until the arrow starts to flash. These positions allow you to -Pass For information on the exterior lamps, see your turn signal. r- Hold...
Owner's Manual - Page 143
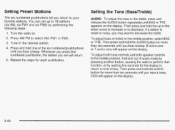
... 18 stations (six AM, six FMI and six FM2) by waiting five seconds for each pushbutton.
3-40 You can set will return. 5. Press and hold the up to the middle position, first end out audio mode by pressing another button, causing the radioto perform that numbered pushbutton, the station you hear a beep...
Owner's Manual - Page 144
...you hear a beep.
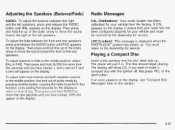
To adjust both tone controls and both speaker controls to the middle position, first out of audio mode by end pressing another button, causing the radioto perform that ...vehicle from the factory. Then press hold down arrow to the dealership for your vehicle and must return to the middle position, select BAL or FAD. L and a zero or F and a a zero will appear ...
Owner's Manual - Page 148
...displayed.
2. Whenever you press that numbered pushbutton, the station you set up to the middle position. The radio will be automatically selected for each pushbutton.
3-45 You will hear one beep ...middle position, push and holu Lhe ALvIO knob when no tone or speaker control is displayed. You can set will return and the bass and treble equalization that you return to the middle position. ...
Owner's Manual - Page 156
...to the manual mode, push and release the AUTO TONE button until MANUAL is displayed. To return the bass and treble to move the sound toward the right or the left speakers, push ...will show the bass or the treble level.
To adjust all tone and speaker controls to the middle position, push and hold the AUDIO knob when no tone or speaker control is displayed.
3-53 The ...
Owner's Manual - Page 159
...beginning of the previous selection or the beginning of the current selection, depending upon the position on each selection for previous to work best with the tape visible should face to... of silence between each side.
SEEK and a negative number will begin playing. You must return to the dealership for the radio. If pressed when the current selection has been playing for...
Owner's Manual - Page 160
... positive or a negative number will appear on the display. Press TAPE CD to switch between each selection for future listening.
4 FWD (Forward): Press this pushbutton to playing speed. Press again to return ...while the reverses. You may be activated with the radio off . SEEK and the a positive number will play while the tape advances. The radio will remain safely inside the radio for...
Owner's Manual - Page 255
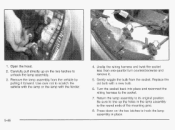
... lamp with a new bulb.
3. Open the hood.
2. Turn the socket back into place and reconnect the wiring harness to its original position. Replace the old bulb with the fender.
6. Return the lamp assembly to the socket. 7. Carefully pull directly up the holes in place.
5-46 Remove the lamp assembly from the socket...
Owner's Manual - Page 256
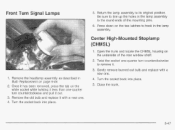
... it less than one . 4. Open the trunk and locate the CHMSL housing on the two latches to hook in the lamp assembly to its original position. Front Turn Signal Lamps
5. Return the lamp assembly to the round ends of the rear window shelf. 2. Center High-Mounted Stoplamp (CHMSL)
1.
Similar Questions

On An 03 Chevy Malibu On The Dashboard What Does The Name With The Red Square
with an arrow pointing down
with an arrow pointing down
(Posted by Jmillsujm10 10 years ago)


How To Remove A Thermostat In A 03 Chevy Malibu
(Posted by Eyalmrhan 10 years ago)