2003 Chevrolet Astro Support Question
2003 Chevrolet Astro Support Question
Find answers below for this question about 2003 Chevrolet Astro.Need a 2003 Chevrolet Astro manual? We have 1 online manual for this item!
Question posted by GRANDPAKEN8 on March 31st, 2015
Oil Pan Removal
The person who posted this question about this Chevrolet automobile did not include a detailed explanation. Please use the "Request More Information" button to the right if more details would help you to answer this question.
Current Answers
Answer #1: Posted by BusterDoogen on March 31st, 2015 6:15 PM
BusterDoogen

Member since:
October 30th, 2011 Points: 28,565,407

Member since:
October 30th, 2011 Points: 28,565,407
1: remove exhaust from flanges on both sides
2: drop fly wheel cover
3: drop starter and wire off to the side
4: loosen nuts on the bracket holding the axle shaft
5: Loosen mounts on the differential as needed to get the clearence required
6: remove the oil pan bolts and remove the pan
2: drop fly wheel cover
3: drop starter and wire off to the side
4: loosen nuts on the bracket holding the axle shaft
5: Loosen mounts on the differential as needed to get the clearence required
6: remove the oil pan bolts and remove the pan
I hope this is helpful to you!
Please respond to my effort to provide you with the best possible solution by using the "Acceptable Solution" and/or the "Helpful" buttons when the answer has proven to be helpful. Please feel free to submit further info for your question, if a solution was not provided. I appreciate the opportunity to serve you!
Related Manual Pages
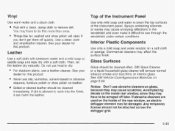
Owner's Manual - Page 6

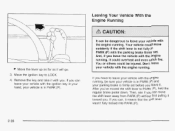
ENGINE OIL PRESSURE W
SERVICE
POWER WINDOW
LAMPS
$0
ANTI-LOCK BRAKES
( ) @
MANUAL
V
u,
\
ENGINE COOLANT cc TEMP
PROTECT EYES BY SHIELDING
TURN SIGNALS
CAUSTIC BATTERY K I D COULD CAUSE BURNS
\!$! / a
DO ...
Owner's Manual - Page 14
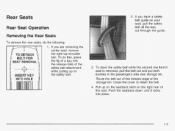
... of a key into place.
1-7 To store the safety belt while the second row bench seat is removed, pull the belt out and put both buckles in the passenger's side rear storage bin. To do the...the forward edge of the seat. Rear Seats
Rear Seat Operation
Removing the Rear Seats
To remove the rear seats, do this, press SEAT REMOVAL the tip of the safety belt attachment while pulling up on the...
Owner's Manual - Page 15

... the left and the right seat release levers at the same time. First, a low effort to overcome the first stage and then a moderate effort to remove the seat assembly from the rear latch pins. To fully release the latch, two levels of the vehicle. Then, pull back and lift the seat...
Owner's Manual - Page 18
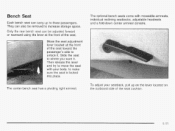
..., individual reclining seatbacks, adjustable headrests and a fold-down center armrest console.
Slide the seat to increase storage space.
Only the rear bench seat can be removed to where you want it . The optional bench seats come with your seatback, pull up to unlock it . They can also be adjusted forward or...
Owner's Manual - Page 39
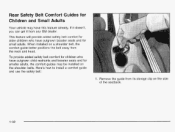
... children who have outgrown child restraints and booster seats and for smaller adults, the comfort guides may have outgrown booster seats and for small adults. Remove the guide from its storage clip on a shoulder belt, the comfort guide better positions the belt away from any GM dealer. Rear Safety Belt Comfort...
Owner's Manual - Page 41
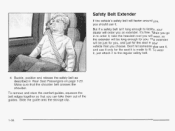
... as described in your dealer will order you choose. But if a safety belt isn't long enough to fasten, your vehicle that you an extender. To remove and store the comfort guides, squeeze the belt edges together so that the shoulder belt crosses the shoulder. It's free. When you go in to...
Owner's Manual - Page 61

... the top strap to use, where the bottom of the seatback meets the back of the seat cushion. 2. See Top Strap on the seat. To remove the child restraint, simply unhook the top strap from the top tether anchor and then disconnect the anchor points. Securing a Child Restraint in different directions...
Owner's Manual - Page 63

... the belt.
6 . Push and pull the child restraint in different directions to be ready to work for an adult or larger child passenger.
1-56 To remove the child restraint, just unbuckle the vehicle's safety belt and let it is positioned so you would be able to unbuckle the safety belt quickly...
Owner's Manual - Page 65
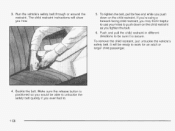
Run the vehicle's safety belt through or around the restraint. To remove the child restraint, just unbuckle the vehicle's safety belt. It will show you push down on thechild restraint. Make sure the release button is secure. ...
Owner's Manual - Page 85

... of the battery is weak if the transmitter won't work at the normal range in your body transferred to these surfaces may damage the transmitter.
1. Remove the battery and replace it 's probably time to change the battery. Static from the top.
2. Snap the top and bottom together.
2-6 To replace the battery...
Owner's Manual - Page 99
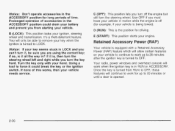
... which will continue to work up to 20 minutes or until a door is it could drain your vehicle. Notice: If your hand. Using a tool to remove your ignition, steering wheel and transmission. Retained Accessory Power (RAP)
Your vehicle is equipped with your key seems stuck in LOCK and you are using...
Owner's Manual - Page 101
... into a properly grounded three-prong 110-volt AC outlet.
You could be plugged in ? The dealer can help. If the cord won't reach, use of oil you keep it was before to list everything here, we ask that particular area.
2-22
Instead of extension cord could cause an electrical shock.
Before...
Owner's Manual - Page 107
... your parking brake is in your hand, your vehicle with the engine running , it will go.
3. You or others could overheat and even catch fire. Remove the key and take it toward you 've moved the shift lever to PARK (P), hold the regular brake pedal down. Move the ignition key to...
Owner's Manual - Page 120
... door opener positioned properly and the right number of pegs in place, you press the button. Adjust the position o the garage door openerand add or remove pegs as needed, until the garage door opener operates with the compartment door closed , press the button again to operate the opener. 5. Add one peg...
Owner's Manual - Page 232
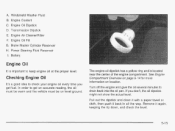
... Cylinder Reservoir
H. Checking Engine
Oil
It's a good idea to drain back into the Oil pan. If YOU don't, the oil dipstick might not showthe actual level. Windshield Washer Fluid B.EngineCoolant C.
Engine Air Cleaner/Filter F.Engine Oil Fill
G. Battery
Engine Oil
It is located near the center of the engine compartment. Engine Oil Dipstick D. Remove it back in all...
Owner's Manual - Page 261
...you do need brake fluid, use the proper brake fluid.
5-44 of mineral-based oil, suchas engine oil, in your vehicle's painted surfaces, the paint finish can be replaced. Always clean... the brake fluid reservoir cap and the area around the cap before removing it off immediately. Always use only DOT...
Owner's Manual - Page 296

... Tighten each nut by hand, use a scraper or wire brush later, if you change a wheel, remove any rust or dirt from the places where the wheel attaches the to do , the nuts might come... extension and see your dealer as soon as possible. Remove any rust ordirt from the wheel bolts, mounting surfaces and spare wheel.
10. If a nut can use oil or grease on the compact spare tire. Never use ...
Owner's Manual - Page 302
...reflections in the windshield and even make it can harm the leather.
0
Notice: Don't use oils, varnishes, solvent-based or abrasive cleaners, furniture polish or shoe polish on leather. Anytemporary license... than once.
0
Top of the rear window, an electric defogger element may have to remove dirt.
If abrasive cleaners are used onthe inside rear window, since they may have to ...
Owner's Manual - Page 304
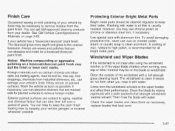
... clean aluminum. Protecting Exterior Bright Metal Parts
Bright metal parts should be necessary to remove residue from the paint finish. However, you rinse it with aluminum trim. Use special... the wiper blade chatters when running, wax, sap or other salts, ice melting agents, road oil and tar, tree sap, bird droppings, chemicalsfrom industrial chimneys, etc., can take their performance. ...
Owner's Manual - Page 306
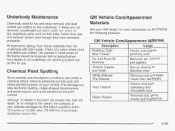
... you. GM Vehicle Care/Appearance Materials
Descrbtion
Polishing Cloth Wax-Treated Tar and Road Oil Remover Chrome Cleaner and Polish White Sidewall Tire Cleaner Vinyl Cleaner Glass Cleaner
Usaae
Interior and...dealer for more information on the underbody parts such as fuel lines, frame, floor pan and exhaust system even though they have corrosion protection. This damage can do this ...
Similar Questions

Transmission Removal
how do i remowe the linkage on the driver side of the transmission?
how do i remowe the linkage on the driver side of the transmission?
(Posted by cplgille4 9 years ago)


Why Is The Oil Cooler Mount Leaking
When I change the o-ring on the oil cooler mount on my chevy astro van it leaks. I put back it see...
When I change the o-ring on the oil cooler mount on my chevy astro van it leaks. I put back it see...
(Posted by dbonner002 11 years ago)

1986 Astro Van 4.3 L Developed A Major Oil Leak
this is the carburetor automatic rwd 4.3l engine that was working great for it's age. It burned a li...
this is the carburetor automatic rwd 4.3l engine that was working great for it's age. It burned a li...
(Posted by TVDan 11 years ago)

Oil Leak
i have a 1999 astro van.i have an oil leak.it looks like it's coming out of a hose.is that posable?l...
i have a 1999 astro van.i have an oil leak.it looks like it's coming out of a hose.is that posable?l...
(Posted by sdmorrell 12 years ago)