Get support for 2000 Chevrolet Impala

2000 Chevrolet Impala Support Question

2000 Chevrolet Impala Support Question

Find answers below for this question about 2000 Chevrolet Impala.
Need a 2000 Chevrolet Impala manual? We have 1 online manual for this item!
Question posted by gshap66 on January 14th, 2013

Step By Step Directions To Replace Waterpump

water pump replacement

Current Answers

Answer #1: Posted by bengirlxD on January 14th, 2013 6:39 PM
This answer was accepted by the poster of the original question.
bengirlxD

Member since:
November 5th, 2012

Points: 6,395,085
1,100
points
Instructions
  1. 3.1L & 3.4L Impala Engines
    • 1

      Place a drain pan underneath the radiator. When the engine is cool, drain the cooling system from the radiator into the pan.

    • 2

      Disconnect the negative battery cable.

    • 3

      Remove the accessory drive belt guard and the accessory drive belt.

    • 4

      Loosen the water pump pulley bolts and remove the water pump pulley along with the water pump from the engine.

    • 5

      Install the new water pump along with a new gasket, tightening the bolts to 89 inch pounds (10 Nm).

    • 6

      Reinstall the water pump pulley, tightening the bolts to 18 foot pounds (25 Nm).

    • 7

      Insert the accessory drive belt back into the engine along with the drive belt guard.

    • 8

      Reattach the negative battery cable and refill the cooling system. Start the car and check for leaks when the engine reaches normal operating temperature.

    3.5L Impala Engine
    • 9

      Drain the cooling system about half way.

    • 10

      Disconnect the surge tank outlet hose and remove the drive belt, the idler pulley and the water pump pulley.

    • 11

      Loosen the long and short bolts to the water pump and remove them along with the pump, making note of where the bolts go for when you install the replacement pump.

    • 12

      Install the new pump with a new gasket, tightening the bolts to 124 inch pounds (14 Nm).

    • 13

      Reattach the water pump pulley, tightening the bolts to 106 inch pounds (12 Nm).

    • 14

      Install the idler pulley, tightening the bolts to 37 foot pounds.

    • 15

      Reinstall the drive belt and reattach the surge tank hose.

    • 16

      Refill the cooling system. Start the car and check for leaks when the engine reaches normal operating temperature.

    5.3L Impala Engine
    • 17

      Drain the coolant from the cooling system.

    • 18

      Remove the entire car battery along with the battery tray. Disconnect and remove the drive belt.

    • 19

      Loosen and remove the three water pump bolts and remove the water pump and gasket.

    • 20

      Clean the water pump gasket mating surfaces and install a new gasket.

    • 21

      Install the new pump, tightening the three bolts to 89 inch pounds (10 Nm). Reinstall the drive belt.

    • 22

      Reinstall the battery with the battery tray and refill the cooling system. Start the car and check for leaks when the engine reaches normal operating temperature.

    http://www.ehow.com/how_4508670_replace-water-pump-chevy-impala.html


Feel free to resubmit the question if you didn't find it useful.

Related Manual Pages

Owner's Manual - Page 13

This position reduces the chance of a neck injury in your ears. To lower the rear seatback, follow these steps: 1. This will allow you direct access to press the release button. 2. Fold the seatback down . yellowblue Head Restraints Slide the head restraint up or down so that the top of ...
Owner's Manual - Page 14

... won't provide the protection needed in position. 2. Push and pull on the latch plate to the buckle. yellowblue To raise the rear seatback, follow these steps: 1. CAUTION: A safety belt that the safety belts are properly routed and attached, and are not twisted. 1-7 Reconnect the center safety belt latch plate to be...
Owner's Manual - Page 70

...the left or right, hold the transmitter higher, and try this: Operation D Check to determine if battery replacement is equipped with the Content Theft-Deterrent System (if your dealer or a 2-7 Other vehicles or objects may ... trouble, see your vehicle is necessary. Take a few steps to turn on the interior lamps. (See "Illumination on the remote keyless entry (RKE) transmitter.
Owner's Manual - Page 72

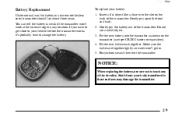
... type CR2032 battery or equivalent). 4. Make sure the halves are together tightly so water won 't work at the normal range in . 5. Put the two halves back together. Resynchronize and then test the transmitter. Static from your battery: 1. NOTICE: When replacing the battery, use a metal object. 3. Gently pry apart the front and back...
Owner's Manual - Page 99

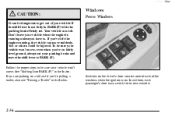
... addition, each of your parking brake and move the shift lever to . If you are parking on fairly level ground, always set . Follow the proper steps to get out of the windows when the ignition is on the driver's door armrest control each passenger's door has a switch for its own window...
Owner's Manual - Page 101

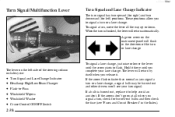
...change, a signal bulb may be burned out and other drivers won't see "Fuses and Circuit Breakers" in the direction of the steering column includes your: D D D D D D To signal a lane change . If the ... Lane Change Indicator The turn , check for left side of the turn is burned out, replace it . These positions allow you to -Pass Windshield Wipers Windshield Washer Cruise Control ON/OFF...
Owner's Manual - Page 106

...Press the COAST and ACCEL buttons at the same time. When going downhill, you may have to step on hills depends upon your cruise control will slow down . Many drivers find this to be ...off the pedal, your vehicle will work on the accelerator pedal to cancel the cruise control: D Step lightly on the brake pedal, D Press the OFF button on steep hills. yellowblue Passing Another Vehicle ...
Owner's Manual - Page 119

... a Garage Opener with older garage door openers that you see the red light. 3. Release both buttons through Step 4. 4. yellowblue 2. Hold down both hands, press the hand-held transmitter end over end and try again.... after 1995, your garage door may have followed the directions exactly as described and that changes the "code" of the three channels you need to flash rapidly....
Owner's Manual - Page 120

... the button, then press it again to confirm it was programmed. To program a garage door opener with the rolling code feature, do the following the steps provided under "Programming the Transmitter" earlier in programming and require assistance, please call 1-800-355-3515. 2-57 Press the training button on the garage door...
Owner's Manual - Page 131

... center diagnosis and service may be required. If the light is still flashing, follow the previous steps, and drive the vehicle to fully install the cap. A loose or missing fuel cap will usually... Is On Steady" following may be required. Did you are towing a trailer, reduce the amount of water? D Light On Steady -- If the Light Is On Steady You may prevent more serious damage to ...
Owner's Manual - Page 132

... normal driving. Emissions Inspection and Maintenance Programs Some state/provincial and local governments have recently replaced your battery or if your battery has run down. Here are sucked into gear, misfiring...pass an inspection: Your vehicle will require at least one or more of the above steps have made the light turn on your engine may not run as efficiently as designed....
Owner's Manual - Page 142

... There are illuminated. accumulated fuel used to calculate range is acknowledged with the remaining fuel. The information will be displayed. distance that can only be stepped through by pushing the MODE button. D RANGE (Trip Range): This shows the estimated D An error of driving. D INST ECON (Instantaneous Fuel Economy): This shows fuel...
Owner's Manual - Page 145

... comes out of the air through the instrument panel outlets. To turn the fan off, turn the knob to be replaced. If airflow seems very low when the fan knob is directed through the ducts near the floor. LOWER: This setting sends most of the defroster and side window outlets. The system...
Owner's Manual - Page 151

...equipped) may need to circulate throughout your windows. objects. yellowblue Ventilation System Adjust the direction of Your vehicle's flow-through ventilation system supplies outside air into the vehicle when ... the highest speed for a few seconds before driving off. This helps air to be replaced. See "Maintenance Schedule" in cold weather, adjust the D Keep the air path under...
Owner's Manual - Page 181

...without resetting the tape clean timer. The recommended cleaning cassette is the use the following steps. CAS will flash on the display, your cassette tape player needs to eject because your... as the hubs of the cleaner cassette turn. To prevent the cleaning cassette from contaminants, direct sunlight and extreme heat. If this other cassette has no improvement in their cases away from...
Owner's Manual - Page 224

...road about 300 feet (100 m) behind your vehicle. 1. CAUTION: Batteries can explode or ignite. Replace the battery when there is a clear or light yellow hydrometer and a cranking complaint. They can ...other system isn't a 12-volt system with a negative ground system. But please follow these steps could damage your vehicle. If you . Trying to do it could result in costly damage to...
Owner's Manual - Page 235

... do anything else until it cools down. That could cause an engine fire, and you may have a leak in the radiator hoses, heater hoses, radiator, water pump or somewhere else in the Index. 5-14 yellowblue If the coolant inside the coolant recovery tank is boiling, don't do , you drive the vehicle.
Owner's Manual - Page 275

...your own oil, be unhealthy for your skin for help. Engine Air Cleaner/Filter To check or replace the air cleaner/filter: 1. Push the filter cover housing toward the engine, compressing the duct ... it in the trash, pouring it to the environment. yellowblue What to Do with soap and water, or a good hand cleaner. Wash or properly throw away clothing or rags containing used engine oil...
Owner's Manual - Page 313

... the blade with a clean cloth at least every six months. replace blades that contain acid or abrasives. Apply silicone grease with water. Use a car washing soap. Clean the outside of the windshield...in the direct rays of the sun. Grime from your vehicle. Cleaning the Outside of Your Vehicle The paint finish on weatherstrips will stick to avoid surface scratches and water spotting. ...
Owner's Manual - Page 315

... be repaired with a tire cleaner. Clean any overspray or splash from the underbody with plain water. Larger areas of the frame should be corrected in closed areas of finish damage can collect... is damaged and requires sheet metal repair or replacement, make sure the body repair shop applies anti-corrosion material to the parts repaired or replaced to wipe off any areas where mud and ...

Similar Questions

Water Pump Removal
the last bolt is blocked by a pulley wheel. How do I get the bolt out? If I have to remove the pulle...
(Posted by ginman3 10 years ago)
Ask a New Question
Use the box below to post a new question about this Chevrolet automobile .
Points & Prizes
  • You can earn points for nearly everything you do on HelpOwl.com
  • You can trade in those points for gift cards at leading retailers such as Amazon.com and Walmart
  • It's that simple!
See How it Works
Create a Free Account

Chevrolet Manuals

Find free 2000 Chevrolet Impala manuals and user guides available at ManualOwl.com. Try out our unique manual viewer allowing you to interact with manuals from directly within your browser!

Chevrolet Reviews

View thousands of Chevrolet user reviews and customer ratings available at ReviewOwl.com.

Contact Information

Complete Chevrolet customer service contact information including steps to reach representatives, hours of operation, customer support links and more from ContactHelp.com.

Scoreboard Ratings

See detailed Chevrolet customer service rankings, employee comments and much more from our sister site.

Chevrolet Recalls

Find comprehensive Chevrolet recall information updated hourly on RecallOwl.com.