Canon PIXMA MX432 Support Question
Canon PIXMA MX432 Support Question
Find answers below for this question about Canon PIXMA MX432.Need a Canon PIXMA MX432 manual? We have 11 online manuals for this item!
Question posted by NeedHcsta on May 24th, 2014
How To Send A Fax Document From Cannon Printer Prixma 432
Current Answers
Answer #1: Posted by sabrie on May 25th, 2014 7:59 PM
Member since:
May 23rd, 2013 Points: 3,306,778

IMPORTANT
It may be possible that faxes will reach unintended recipients due to the misdialing or incorrect registration of fax/telephone numbers. When you send important documents, it is recommended that you send them after speaking on the telephone.
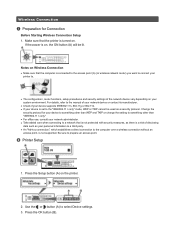
1. Make sure that the machine is turned on.
2. Press the FAX button.
The Fax standby screen is displayed.
3. Load documents on the platen glass or in the ADF.
[ Loading Paper ]
IMPORTANT
When sending a double-sided document, load the document on the platen glass. Double-sided documents cannot be automatically scanned and sent from the ADF.
REFERENCE
For details on the types, conditions of document, and how to load the document:
[ Loading Paper ]
4. Adjust the scan contrast and resolution as necessary.
Adjust the scan contrast and resolution following the procedure below.
(1) Press the Menu button.
The FAX menu screen is displayed.
(2) Use the
Button to select FAX TX settings, then press the OK button.
(3) Use the
Button to select Scan contrast, then press the OK button.
The Scan contrast screen is displayed.
(4) Use the
The button decreases the scan contrast, and the
Button increases the scan contrast.
By pressing the OK button, the LCD returns to the FAX TX settings screen.
(5) Use the
Button to select Scan resolution, then press the OK button.
The Scan resolution screen is displayed.
(6) Use the
By pressing the OK button, the LCD returns to the Fax standby screen.
The following settings are selectable on Scan resolution.
Standard
Suitable for text-only documents.
Fine
Suitable for fine-print documents.
Extra fine
Suitable for detailed illustration or fine-print quality documents.
If the recipient's fax machine is not compatible with Extra fine (300 x 300 dpi), the fax will be sent in the Standard or Fine resolution.
Photo
Suitable for photographs.
REFERENCE
The * (asterisk) on the LCD indicates the current setting.
When sending a color fax, documents are always scanned in the same resolution (200 x 200 dpi). The image quality (compression rate) is determined by which scan resolution is selected, except that Extra fine and Photo provide the same image quality.
5. Use the Numeric buttons to dial the recipient's fax/telephone number.Use the following buttons to dial the recipient's fax/telephone number.
Numeric buttons:
Enters the number.
Button:
Enters a space.
Button:
Deletes the last character you entered.
(#) button:
By pressing this button once, "#" is entered. By pressing this button one more time, "P" is entered.
6. Press the Color button for color transmission, or the Black button for black & white transmission.
The machine starts scanning the document.
IMPORTANT
Color transmission is available only when the recipient's fax machine supports color faxing.
Do not open the document cover until scanning is completed.
7. Start sending.
If you load the document in the ADF:
The machine scans the document automatically and starts sending the fax.
REFERENCE
To cancel a fax transmission, press the Stop button. To cancel a fax transmission while it is in progress, press the Stop button, then follow the instructions on the LCD.
If documents remain in the ADF after the Stop button is pressed while scanning is in progress, Close the feeder cover [OK]Eject the document is displayed on the LCD. By pressing the OK button, the remaining documents are automatically ejected.
If you load the document on the platen glass:
After scanning the document, the confirmation screen asking you if you load the next document is displayed.
To send the scanned document, press the OK button to start sending it.
REFERENCE
To send two or more pages, follow the message to load the next page, and press the Color or Black button. After scanning all pages, press the OK button to start sending.
To cancel sending the fax, press the Stop button.
REFERENCE
When your machine is connected to a PBX (Private Branch Exchange) system, refer to the operating instructions of the system for details on dialing the recipient's fax/telephone number.
In case the machine was not able to send a fax, such as when the recipient's line was busy, it has the function to automatically redial the number after a specified interval. Automatic redialing is enabled by default. Refer to [ Automatic Redialing ] within this webpage.
Unsent documents, such as those pending redial, are stored in the machine's memory. They are not stored in the case of a sending error.
Do not disconnect the power plug until all documents are sent. If you disconnect the power plug, all unsent documents stored in the machine's memory are lost.
Resending Faxes (Redialing a Busy Number)
There are two methods of redialing: Automatic redialing and Manual redialing.
Automatic Redialing
If you send a document and the recipient's line is busy, the machine will redial the number after a specified interval.
Refer to [ Automatic Redialing ] within this webpage.
Manual Redialing
You can redial to the recipients dialed using the Numeric buttons.
Refer to [ Manual Redialing ] within this webpage.
IMPORTANT
It may be possible that faxes will reach unintended recipients due to the misdialing or incorrect registration of fax/telephone numbers. When you send important documents, it is recommended that you send them after speaking on the telephone.
REFERENCE
Automatic redialing is enabled by default.
For details on the basic sending operations:
Refer to [ Sending Faxes with the Numeric Buttons ] within this webpage.
Automatic Redialing
You can enable or disable automatic redialing. If you enable automatic redialing, you can specify the maximum number of redial attempts and the length of time the machine waits between redial attempts.
Enable and specify the automatic redialing setting on Auto redial in Adv. FAX settings under Fax settings.
IMPORTANT
While automatic redialing, the unsent fax is stored in the machine's memory temporarily until the sending fax is complete. If a power failure occurs or you unplug the power cord before automatic redialing is complete, all faxes stored in the machine's memory are deleted and not sent.
REFERENCE
To cancel automatic redialing, wait until the machine starts redialing, then press the Stop button.
To cancel automatic redialing, delete the unsent fax from the machine's memory while the machine is on-standby for a redial operation.
Manual Redialing
Follow the procedure below for manual redialing.
1. Make sure that the machine is turned on.
2. Press the FAX button.
The Fax standby screen is displayed.
3. Load documents on the platen glass or in the ADF.
4. Adjust the scan contrast and resolution as necessary.
REFERENCE
For details on how to adjust the scan contrast and resolution, Refer to [ Sending Faxes with the Numeric Buttons ] within this webpage.
5. Press the Menu button.
The FAX menu screen is displayed.
6. Use the
Button to select Redial, then press the OK button.
The Redial screen is displayed.
7. Use the
Button to select the recipient's number to redial, then press the OK button.
8. Press the Color button for color transmission, or the Black button for black & white transmission.
IMPORTANT
Color transmission is available only when the recipient's fax machine supports color faxing.
www.techboss.co.za
Related Canon PIXMA MX432 Manual Pages