2006 Buick Rendezvous Support Question
2006 Buick Rendezvous Support Question
Find answers below for this question about 2006 Buick Rendezvous.Need a 2006 Buick Rendezvous manual? We have 1 online manual for this item!
Question posted by Pgremphdcy on August 1st, 2013
How To Remove Knee Panel On Rendezvous
The person who posted this question about this Buick automobile did not include a detailed explanation. Please use the "Request More Information" button to the right if more details would help you to answer this question.
Current Answers
Related Manual Pages
Owner's Manual - Page 1
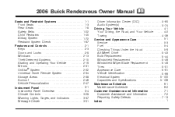
2006 Buick Rendezvous Owner Manual
Seats and Restraint Systems ...1-1 Front Seats ...1-3 Rear Seats ...; System ...2-32 Universal Home Remote System ...2-34 Storage Areas ...2-38 Sunroof ...2-46 Vehicle Personalization ...2-47 Instrument Panel ...3-1 Instrument Panel Overview ...3-4 Climate Controls ...3-28 Warning Lights, Gages, and Indicators ...3-37 Message Center ...3-51
M
Driver Information...
Owner's Manual - Page 109
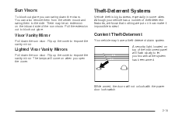
... in some cities. While armed, the doors will flash slowly to let you can also remove them from the center mount and swing them to block out glare. You can swing down the visors...inboard side of theft-deterrent features, we know that nothing we put on top of the instrument panel will not unlock with the power door lock switch.
2-15 Lighted Visor Vanity Mirrors
Pull down ...
Owner's Manual - Page 110
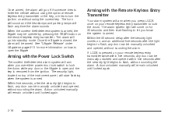
...under Liftgate on page 2-11 for 30 seconds and then start flashing when the system is removed from the ignition. Arming with the Remote Keyless Entry Transmitter
Your alarm system will arm when you ...keyless entry transmitter or the key, or tries to turn the ignition on top of the instrument panel, will start flashing to let you use either power door lock switch to lock the ...
Owner's Manual - Page 114

...ignition switch will continue to work for normal driving. Use the correct key and turn it to display some instrument panel warning lights.
The switch stays in . Make sure the key is all the way in ON when the engine ... the key. C (ON): This is the only position in which you can remove the key. Ignition Positions
With the key in the ignition, you can turn the key only with your hand.
Owner's Manual - Page 134
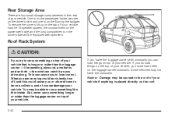
...is longer or wider than the luggage carrier - like this could be caused to carry something like paneling, plywood, a mattress and so forth - the wind can load things on the tabs. What you...vehicle, you drive along. Notice: Damage may be violently torn off, and this inside.
To remove the covers, lift up on top of course damage your vehicle. Rear Storage Area
There are on...
Owner's Manual - Page 158
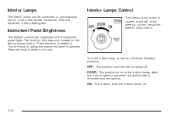
...door is opened and when the ignition key is located on the interior lamps control. The knob for this feature is removed from the ignition. Turn the interior lamp control to extend it. They are explained in use.
ON: This position... off . Interior Lamps Control
The interior lamp control is located to adjust the instrument panel brightness. Press the knob to one of the instrument...
Owner's Manual - Page 169

...Do not hang any electrical equipment to the driver's seat. Lift the lid to the instrument panel. Notice: Holding a cigarette lighter in the ashtray, hot cigarettes or other components from the ... lighter. Notice: Improper use of accessory or accessory bracket from working as they should. To remove the ashtray, lift it is heating will pop back out by itself. Do not hold a...
Owner's Manual - Page 172

...the button is activated. The rear window defogger will only run for your vehicle.
< REAR:
Press this button to the instrument panel outlets.
3-30 Operation
Turn the right knob clockwise or counterclockwise to direct the airflow inside of the following:
H ... pressing the button again or by your vehicle. Notice: Do not use anything similar to remove fog from the rear window.
Owner's Manual - Page 173
... compressor also comes on or off . This mode directs most of the air to the instrument panel outlets, then directs the remaining air to the floor outlets. For more efficiently. When ... and warmer air to the floor outlets. This is activated. The air-conditioning system removes moisture from entering your vehicle or help with floor, defog, defrost or outside air ...
Owner's Manual - Page 258
... off , or if the headphones are listening to be stored for a long period of time, remove the batteries, and keep them in heat or direct sunlight. If the front seat passengers are out... system through the vehicle's speakers and the rear seat passengers are located below the overhead RSE control panel. To adjust the volume on the left side of the vehicle, the headphones will not be ...
Owner's Manual - Page 328

...Changing a Flat Tire ...5-70 Removing the Spare Tire and Tools ...5-71 Removing the Flat Tire and Installing the... Spare Tire ...5-77 Secondary Latch System ...5-81 Storing a Flat or Spare Tire and Tools ...5-84 Compact Spare Tire ...5-90 Appearance Care ...5-91 Cleaning the Inside of Your Vehicle ...5-91 Fabric/Carpet ...5-92 Leather ...5-93 Instrument Panel...
Owner's Manual - Page 344

... II intervals and replace it at the first oil change after each engine oil change. Remove the two clamps on page 6-4 for the location of the housing.
5-18 When to release loose... top of the engine air cleaner/filter housing. 4. Unlatch the two hooks on the bottom of the panel with dirt, a new filter is required.
3.5L V6 Engine shown, 3.6L V6 Engine similar 3....
Owner's Manual - Page 371

..., away from the lamp housing. 3. Pull the bulb assembly out from the vehicle. 5. See Hood Release on the headlamp panel and lift up the headlamp retaining clip partway, but do not remove.
4. Turn the bulb socket one-quarter of the lamp assembly.
5-45 Unsnap the headlamp assembly by pulling back on the...
Owner's Manual - Page 373

... 10. Turn the bulb socket one-quarter of a turn counterclockwise. 5. Reinstall the screws removed in Step 2. 11. Close the liftgate.
3. Pull the bulb assembly out from the vehicle... enough so that the tabs hook over the tab on the inboard taillamp panel.
4. Install the new bulb into the electrical connector. Remove the two screws on the bulb. 8. Open the liftgate. Reinstall the ...
Owner's Manual - Page 374
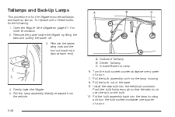
... lamp housing and turn the bulb socket clockwise one-quarter of the base. 9. See Liftgate on the bulb. 10. Remove the seven wing nuts and the four outboard nuts (two at each end). Pull the bulb out of a turn .... A. Open the liftgate. Taillamps and Back-Up Lamps
This procedure is for more information. 2. Remove the panel inside the liftgate by lifting the tabs and pulling the...
Owner's Manual - Page 375
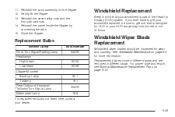
... replacement bulbs not listed here, contact your windshield is designed for more information. Gently lift the liftgate. 13. Reinstall the panel inside the liftgate by connecting the tabs. 15. If you ever have to get your HUD image may look blurred or ... to get one that your dealer. 5-49
Replacement blades come in different types and are removed in mind that is part of focus.
Owner's Manual - Page 419

...soft cloth dampened with water may be used to dry. Never use spot lifters or spot removers on your vehicle's interior because they can be used to clean leather. If a more thorough...to preserve and protect leather may permanently change the appearance and feel of your instrument panel. Some commercial products may increase gloss on plastic surfaces. If any impression that a ...
Owner's Manual - Page 425

It is not removed from outside your vehicle. You can see it if you ever need to order parts. On this label, ...parts.
VIN Model designation Paint information Production options and special equipment
Be sure that this label on the inside of the access panel located on the driver's side of the rear of title and registration. The VIN also appears on the Vehicle Certifi...
Owner's Manual - Page 429

...5-10 for more information on the passenger's side of the underhood fuse block. To remove the cover, press the two tabs in the engine compartment, on location. The back-...Power Sunroof Power Windows Map Lamps, Courtesy Lamps and Instrument Panel Lights Radio UQ3 Radio Amplifier Head-Up Display Hazard Flashers Instrument Panel Cluster, Climate Control, Security LED and Remote Keyless Entry...
Owner's Manual - Page 476

...and Lane-Change ...3-7 Spare Tire Accessory Inflator ...5-68 Compact ...5-90 Installing ...5-77 Removing ...5-71 Storing ...5-84 Specifications, Capacities ...5-106 Speedometer ...3-39 Split Bench Seats ...1-8... ...2-46 Surge Tank Pressure Cap, SGCM Coolant ...3-51 Switchbanks, Instrument Panel ...3-20
T
Tachometer ...3-40 Taillamps Back-Up Lamps ...5-48 Turn Signal, and Stoplamps ...5-...
Similar Questions

How To Remove A Buick Rendezvous Throttle Bottle
(Posted by bigfbrendy 9 years ago)

How To Remove Dash Panel On 2004 Buick Rendezvous
(Posted by samnuAshle 10 years ago)

How To Take The Left Rear Interior Door Panel Off A 2006 Buick Rendezvous
(Posted by Jowarr 10 years ago)

How To Remove The Spare Tire From A 06 Buick Rendezvous
(Posted by argich 10 years ago)
