
2002 Buick Rendezvous Support Question
2002 Buick Rendezvous Support Question
Find answers below for this question about 2002 Buick Rendezvous.Need a 2002 Buick Rendezvous manual? We have 1 online manual for this item!
Question posted by Sanjuja on August 23rd, 2013
How To Install Lift Gate Lock On 2002 Buick Rendezvous
The person who posted this question about this Buick automobile did not include a detailed explanation. Please use the "Request More Information" button to the right if more details would help you to answer this question.
Current Answers
Related Manual Pages
Owner's Manual - Page 8
Box 07130 Detroit, MI 48207
vi
GENERAL MOTORS, GM, the GM Emblem, BUICK, and the BUICK Emblem are registered trademarks and the name RENDEZVOUS is a trademark of Canada Limited" for Buick Motor Division whenever it appears in this manual in it so the new owner can use it. We reserve the right to make changes...
Owner's Manual - Page 15

... sure that the seat is locked into place, try to where you want it . same time to adjust the rear portion of the cushion up or down .
arrows to move the entire seat up or down . D Move the rear of the control in the direction of the D Lift up or push down...
Owner's Manual - Page 21

... back to raise or lower the seatback if you push it is locked upright. The seatback will lock into place when you lean forward and take the weight off the seatback. To recline the seatback on base-level split bench seats, lift up on the recliner lever located on the recliner lever and...
Owner's Manual - Page 23
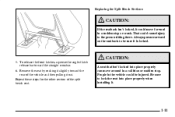
CAUTION:
5.
A seat that isn't locked into place properly when installing it is locked. To release the front latches, squeeze the angled latch release bar ...sitting there. Repeat these steps for the other section of the vehicle and then pulling it could cause injury to lock the seat into place properly can move forward in a sudden stop . Remove the seat by rocking it slightly ...
Owner's Manual - Page 25

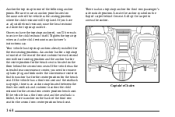
... Make sure that the bench seat is angled so that it is locked upright. 7. If the front legs are not attached correctly, the rear legs will not attach to check that... it locks upright. 6. Push and pull on the rear of floor pins.
3. Lift the seatback recliner lever and raise the seatback until it is locked down on the seatback to the rear set of ...
Owner's Manual - Page 26

... on the outboard side of the seatback. Lift up on the recliner lever located on the recliner lever and fold the seatback forward. Use the recliner.... It is easier to raise or lower the seatback if you push it back to the upright position. The seatback will lock into place when you lean forward and take the weight off the seatback. After raising a seatback to an upright position, ...
Owner's Manual - Page 28
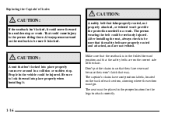
...section must be seriously injured. Be sure to the person sitting there. That could cause injury to lock the seat into place properly can move forward in a sudden stop . The seat must go. ... be injured. CAUTION:
A seat that is locked. A safety belt that isn't locked into place properly when installing it.
1-16 After installing the seat, always check to attach correctly.
Owner's Manual - Page 76
...anchor symbol on the same side of the vehicle as the child restraint manufacturer's instructions say. Lift up the carpet to use an anchor point located on the flap of the following anchor points... seatback and cushion to secure the child restraint itself. Your vehicle has top strap anchors already installed for the second row center position bench seat. An anchor bar for the bench seat. If...
Owner's Manual - Page 151
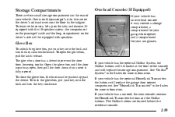
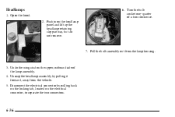
... glovebox, put your vehicle has an overhead console it fully opened. To remove the covers, lift up past the detent. Overhead Consoles (If Equipped)
If your key into the lock and turn the key counterclockwise. Open the glove box until the door is on the floor by the tailgate. See "OnStarR System...
Owner's Manual - Page 153
... discs and another next to open position. To unlock the front armrest storage compartment, put your key into the lock and turn the key counterclockwise. To use the compact disc storage compartment, lift the coinholder tray up. Sunglass Storage Compartment To open the sunglasses storage compartment in the Index for more information...
Owner's Manual - Page 154
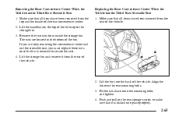
... vehicle has a cell phone storage compartment located on the floor console storage closest to the liftgate. Install the convenience net at the rear of your vehicle, as far forward as you can. The side...starts. The compartment has an accessory power outlet for larger beverage items. Remove the liners by lifting them out. To attach the rear convenience net attach both the upper and lower hooks to ...
Owner's Manual - Page 156
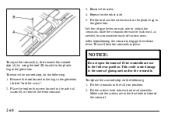
...the forward bin. Place the rear bin over the rear mounting bolts. 6. Lift the forward bin into the back of the vehicle. Lift the rear bin into place properly.
2-64 Remove the carpeted mat (if ...and tighten. 7. Push and pull on the rear storage system to secure. Make sure that it is locked into the back of the vehicle. Align the rear bin over the center T-shaped wall on the ...
Owner's Manual - Page 157
...rear convenience center. 2. Make sure that all items have been removed from inside of the vehicle.
2. Lift the bin into place properly.
2-65 Remove the two nuts from the top and the inside the storage... the convenience center and not the stowable seat, you must replace these nuts once the bin is locked into the back of the lid to secure the seat. 4. If you are located in the ...
Owner's Manual - Page 160
... the crossrails are in the first hole in the full rear position. Remove the screw. 4. This will lock the crossrails in the glovebox labeled "tool kit-acsry". 2. To remove the sunroof stop, do the following...in the plastic bag in the full rear position. 2. 3. Repeat for the other side. 5. Lift the release levers on the screw located in the side rail assembly in the glove box.
To ...
Owner's Manual - Page 301
... This equipment is very important for proper vehicle loading and good handling when you have anti-lock brakes, do not try to tap into your vehicle. If you remove the hitch. Instructions...then be provided by the hitch manufacturer or by and rough roads are a few reasons why you install a trailer hitch?
Dirt and water can turn with your rig.
Crosswinds, large trucks going by...
Owner's Manual - Page 334
... nut for each wheel, there is a wheel cover, loosen the plastic nut caps with a wheel lock key, use an impact wrench with your vehicle has aluminum wheels, remove the wheel nut caps using the...wheel wrench. 2. Near each turn.)
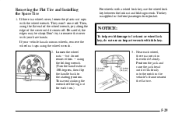
For wheels with the wheel wrench. Removing the Flat Tire and Installing the Spare Tire
1. using the flat end of the wheel wrench, pry along the edge of the...
Owner's Manual - Page 383
... upper, outboard side of a turn clockwise.
7. Undo the wing stud on the headlamp panel and lift up the headlamp retaining clip partway, but do not remove.
6. Unsnap the headlamp assembly by pulling back on the locking tab, located on the electrical connector, to separate the two connectors.
6-36 Pull the bulb assembly...
Owner's Manual - Page 384
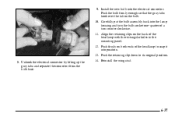
... tabs hook over the tab on the back of the headlamp with the rectangular holes in the mounting panel. 12. Unhook the electrical connector by lifting up the gray tabs and separate the connector from the bulb base. 14. 9. Push firmly on both ends of a turn counterclockwise. 11. Align the retaining...
Owner's Manual - Page 385
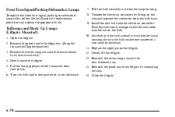
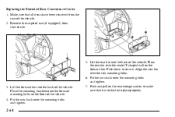
...quarter of a turn clockwise.
6-38 Unhook the electrical connector by lifting up the tabs and separate the connector from the vehicle. 6. Install the new bulb into the lamp housing and turn the bulb ...the bulb firmly enough so that the tabs hook over the tab on the liftgate. 12. Gently lift the liftgate. 13. Close the liftgate. Pull the bulb assembly out from the lamp housing. 8....
Owner's Manual - Page 386
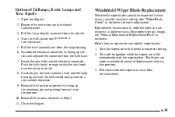
Install the new bulb into the lamp housing and turn the bulb socket one -quarter of the wipe pattern. Reinstall...one -quarter of a turn clockwise. 5. Unhook the electrical connector by lining up the mounting pin and pushing forward to its pocket by lifting up the tabs and separate the connector from the lamp housing. 6.
Here's how to the lowest intermittent setting. 2. Pull the lamp...
Similar Questions

How To Install Windshield Wiper Motor 2002 Buick Rendezvous
(Posted by delEliz 10 years ago)


How To Turn Daylight Running Lights Off In 2002 Rendezvous
(Posted by jkJello 10 years ago)

How To Remove Rear Panel On Lift Gate For Buick Rendezvous 2004
(Posted by harjprucz 10 years ago)
