
Brother International LX2500 Support Question
Brother International LX2500 Support Question
Find answers below for this question about Brother International LX2500.Need a Brother International LX2500 manual? We have 2 online manuals for this item!
Question posted by pgbobdo on December 13th, 2013
How To Thread A Brother Xl 2500 Sewing Machine
The person who posted this question about this Brother International product did not include a detailed explanation. Please use the "Request More Information" button to the right if more details would help you to answer this question.
Current Answers
Related Brother International LX2500 Manual Pages
Users Manual - English and Spanish - Page 3
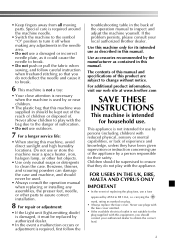
...to break.
• Do not push or pull the fabric when sewing, and follow the
troubleshooting table in this machine, avoid direct sunlight and high humidity locations.
Children should never be...fuse, use . For additional product information, visit our web site at www.brother.com
SAVE THESE INSTRUCTIONS
This machine is used .
• Always consult the operation manual when replacing or ...
Users Manual - English and Spanish - Page 4

... bed attachment 5
USING YOUR SEWING MACHINE 6 Connecting plugs 6 Main power and sewing light switch 7 Foot controller 7 Checking the needle 7 Replacing the needle 7 Changing the presser foot 8
THE CONTROLS 9 Pattern selection dial 9 Patterns and stitch names 9 Reverse sewing lever 10
THREADING THE MACHINE 11 Winding the bobbin 11 Lower threading 13 Upper threading 14 Drawing up the...
Users Manual - English and Spanish - Page 5
... needle)
3 Walking Foot
4 Quilting Foot
Part Code Americas Others
XE2241-001
X57521-021
SA107 SA129
F034N: XC2165-002
F005N: XC1948-002
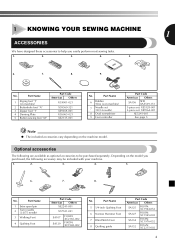
No. No. 1 KNOWING YOUR SEWING MACHINE
1
ACCESSORIES
We have designed these accessories to help you purchased, the following are available as optional accessories to be included with your...
Users Manual - English and Spanish - Page 6

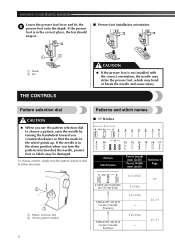
... nearest authorized service center. Slide the flat bed attachment to the left to choose the stitch you want.
KNOWING YOUR SEWING MACHINE
THE MAIN PARTS
43 2
1
5 A
6 0
7
9
8
1 Bobbin winder (Page 11) This winds the thread onto the bobbin for 220/240V area
The foot controller part code differs depending on and off. B Buttonhole fine...
Users Manual - English and Spanish - Page 7

... are away from the outlet. These things may result. Connect the power supply plug to a wall 2 outlet.
2
1
Note
● If a power outage occurs while the sewing machine is not to fit in a polarized outlet only one
blade wider than the other power sources may result. ● When unplugging the...
Users Manual - English and Spanish - Page 8

... (toward the 'O' mark)
Foot controller
When you
(counterclockwise) so that nothing is accidentally pressed and the machine starts sewing.
● Only use sewing machine needles for smooth sewing.
1 2
1 Turn on (toward you press the foot controller down lightly, the machine will stop.
■ Checking the needle correctly Put the flat side of cloth and dust to...
Users Manual - English and Spanish - Page 9

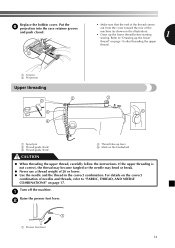
... the power on and step on the controller, the machine will have to change the presser foot. Press the black button at the back of the sewing machine may be damaged.
● Always turn the
needle ...may cause injury.
● Only use presser feet that have been designed to be used with this machine.
Hold the needle with an oval
hole in line with the slot on what you change the presser...
Users Manual - English and Spanish - Page 10
... choose a stitch, simply turn the pattern selection dial, the needle, presser foot or fabric may bend or break the needle and cause injury. KNOWING YOUR SEWING MACHINE
Lower the presser foot lever and fix the 5 presser foot onto the shank. If the needle is not installed with the correct orientation, the needle...
Users Manual - English and Spanish - Page 12

KNOWING YOUR SEWING MACHINE
THREADING THE MACHINE
Winding the bobbin
CAUTION
● We designed the bobbin that comes with this machine.
Then, pass the thread around the pre-tension disk and pull the thread in completely.
11
1
1 Pre-tension disk
CAUTION
● If the spool of 1 thread on this machine or bobbins of the same type (part code: SA156, SFB...
Users Manual - English and Spanish - Page 13
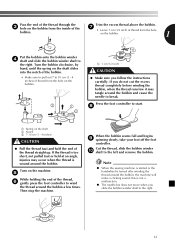
... shaft 2 Notch 3 7-10 cm (3 - 4 inches)
CAUTION
● Pull the thread taut and hold the end of the thread, 6 gently press the foot controller to wind
the thread around the bobbin and cause the needle to break. Then stop the machine. Note
● When the sewing machine is started or the handwheel is wound around the bobbin...
Users Manual - English and Spanish - Page 14

... to be injured. Hold the end of the thread, push the 5 bobbin down with thread. CAUTION
● Make sure you turn off the machine while threading. KNOWING YOUR SEWING MACHINE
CAUTION
● Not winding the bobbin properly may cause the thread tension to loosen, and may cause the thread tension to sew, you could be incorrect or break the...
Users Manual - English and Spanish - Page 15
... up lever 5 Mark on the handwheel
CAUTION
● When threading the upper thread, carefully follow the instructions. Refer to "FABRIC, THREAD, AND NEEDLE COMBINATIONS" on page 16 after threading the upper
thread.
1 Groove 2 Projection
Upper threading
2
2
3 4
1 5
1 Spool pin 2 Thread guide (back) 3 Thread guide (front)
4 Thread take-up the lower thread before starting
1
sewing.
Users Manual - English and Spanish - Page 16
KNOWING YOUR SEWING MACHINE
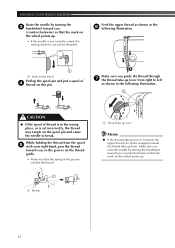
Raise the needle by turning the handwheel toward you (counterclockwise) so that the spring in the groove
catches the thread.
1
1 Spring
1
1 Thread take-up lever
Memo
● If the thread take -up lever.
Feed the upper thread as shown in the 6 following illustration.
1
CAUTION
● If the spool of 4 thread on this pin. While...
Users Manual - English and Spanish - Page 17
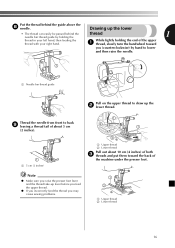
... lower
and then raise the needle.
1
1 Needle bar thread guide
Pull on the upper thread to back 9 leaving a thread tail of about 5 cm
(2 inches).
1
1 5 cm (2 inches)
1 2
1
2
1 Upper thread 2 Lower thread
Pull out about 10 cm (4 inches) of
the machine under the presser foot.
Drawing up the 2 lower thread. Thread the needle from front to draw up the lower...
Users Manual - English and Spanish - Page 18
...YOUR SEWING MACHINE
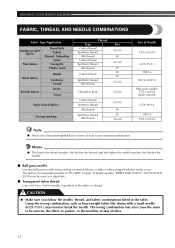
FABRIC, THREAD, AND NEEDLE COMBINATIONS
Fabric Type/Application
Medium weight fabrics
Thin fabrics
Broadcloth Taffeta
Flannel, Gabardine Lawn
Georgette Challis, Satin
Thick fabrics Stretch fabrics
Denim
Corduroy Tweed Jersey
Tricot
Easily frayed fabrics
For top-stitching
Thread Type Cotton thread Synthetic thread Silk thread Cotton thread Synthetic thread Silk thread...
Users Manual - English and Spanish - Page 19
...may be injured.
● Do not start sewing without placing the fabric under the presser foot,
and then pull out about 5 cm (2 inches) of thread toward the rear of the machine.
1
1 5 cm (2 inches)
18...
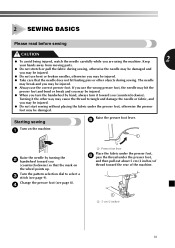
you may be damaged. If you use the correct presser foot. Starting sewing
Raise the presser foot lever.
5
Turn on the machine.
1
1
Raise the needle by hand, always turn the handwheel by ...
Users Manual - English and Spanish - Page 20
... toward you
(counterclockwise). Lower the presser foot lever.
8
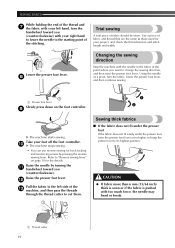
Changing the sewing direction
Stop the machine with too much force, the needle may bend or break.
1 Thread cutter
19
Trial sewing
A trial piece of the c machine, and then pass the threads
through the thread cutter to cut them.
.
1
Sewing thick fabrics
■ If the fabric does not fit under...
Users Manual - English and Spanish - Page 21
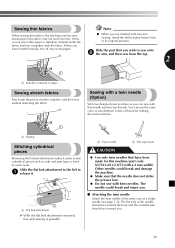
... the pieces of thread for this needle and two top threads. Sewing with a 2 mm width). Sewing thin fabrics
Note
When sewing thin fabrics, the stitching may become misaligned or the fabric may not feed correctly.
fabric and sew it easier to sew cylindrical pieces such as a single needle (see page 7-8). You can sew with this machine (part code: X57521...
Users Manual - English and Spanish - Page 22
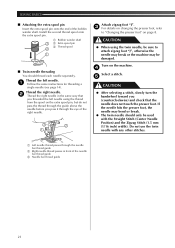
...mm (1/16 inch) width). CAUTION
● When using the thread from the spool on the machine.
4
Select a stitch.
5
CAUTION
● After selecting ...thread through the guide above the needle before you threaded the left needle. 1 Follow the same instructions for threading a
single needle (see page 14). Thread the right needle. 2 Thread the right needle in front of the bobbin winder shaft. SEWING...
Users Manual - English and Spanish - Page 41

... the machine stops operating correctly, check the following possible problems before requesting service.
You can solve most problems by yourself.
Fit the spool properly.
-
15, 20
6
The area around the hole in the thread. You have not used the foot controller properly. sew.
The needle is too tight. Visit us at " http://solutions.brother...
Similar Questions

How To Take Covers Of A Brother Xl-6452 Sewing Machine.
How to take covers of a Brother XL-6452 sewing machine.
How to take covers of a Brother XL-6452 sewing machine.
(Posted by kitebugy 3 years ago)

How To Lower Thread A Brother Lx 2500 Sewing Machine
(Posted by mhidmchug 9 years ago)


What Kind Of Thread To Use In Brother Lx 2500 Sewing Machine
(Posted by angrimm9 10 years ago)

Im Trying To Get A Manuel For This Brother Xl 5130 Sewing Machine..
where can I find a manuel for a Brother XL 5130 sewing machine
where can I find a manuel for a Brother XL 5130 sewing machine
(Posted by karlatrains 11 years ago)