Get support for Brother International CE-5500PRW

Brother International CE-5500PRW Support Question

Brother International CE-5500PRW Support Question

Find answers below for this question about Brother International CE-5500PRW.
Need a Brother International CE-5500PRW manual? We have 3 online manuals for this item!
Question posted by Val13674 on June 1st, 2014

Sewing Ce5500prw

Digital display of stitch numbers are hard to see. Is there a back lighf feature.

Current Answers

There are currently no answers that have been posted for this question.
Be the first to post an answer!

Remember that you can earn up to 1,100 points for every answer you submit. The better the quality of your answer, the better chance it has to be accepted.

Related Brother International CE-5500PRW Manual Pages

Users Manual - English - Page 1

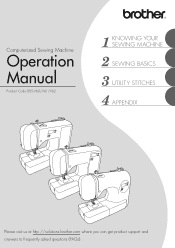
Computerized Sewing Machine Operation Manual Product Code:885-V60/V61/V62 KNOWING YOUR SEWING MACHINE SEWING BASICS UTILITY STITCHES APPENDIX Please visit us at http://solutions.brother.com where you can get product support and answers to frequently asked questions (FAQs).
Users Manual - English - Page 6

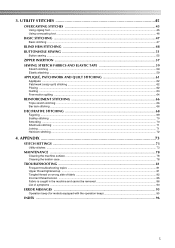
...36 SEWING ...36 General sewing procedure ...36 Selecting stitching ...37 Adjusting the stitch length and width ...38 Starting to sew ...39 Thread tension ...41 USEFUL SEWING TIPS ...42 Trial sewing ...42 Changing the sewing direction ...42 Sewing curves ...42 Sewing thick fabrics ...42 Sewing hook-and-loop fastener ...43 Sewing thin fabrics ...44 Sewing stretch fabrics ...44 Stitching cylindrical...
Users Manual - English - Page 7

... machine and cannot be removed 86 List of symptoms ...90 ERROR MESSAGES ...95 Operation beep (for models equipped with the operation beep 95 INDEX ...96 5 3. UTILITY STITCHES 45 OVERCASTING STITCHES 45 Using zigzag foot ...45 Using overcasting foot ...46 BASIC STITCHING ...47 Basic stitching ...47 BLIND HEM STITCHING 48 BUTTONHOLE SEWING 51 Button sewing ...55 ZIPPER INSERTION ...57 SEWING...
Users Manual - English - Page 8

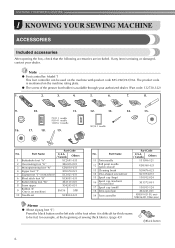
...on machine) XC3021-031 6 Blind stitch foot "R" XC4051-031 7 Button fitting foot "M" XE2137-001 8 Seam ripper X54243-051 9 Bobbin (4) (One is difficult for thick seams to be used on machine)... "J"; Press the black button on machine.) SA156 SFB 10 Needle set XC8834-021 No. KNOWING YOUR SEWING MACHINE 1 KNOWING YOUR SEWING MACHINE ACCESSORIES Included accessories After opening the...
Users Manual - English - Page 10

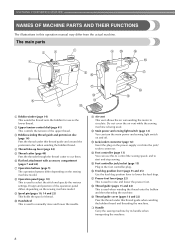
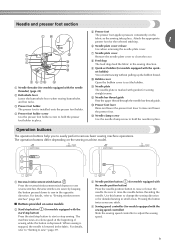
...when winding the bobbin thread and threading the machine. n Foot controller (page 13) You can turn the main power and sewing light switch on the sewing machine model. c Bobbin-winding thread guide and pretension...cover (pages 16 and 22) Pass the thread under this to control the sewing speed, and to select the stitch and specify the various settings. q Presser foot lever (page 22) This ...
Users Manual - English - Page 11

... onto the presser foot holder. g Needle plate cover Remove the needle plate cover to easily perform various basic sewing machine operations. j Bobbin cover Open the bobbin cover to change the sewing direction or for the selected stitching. 1 f Needle plate cover release Use when removing the needle plate cover. d Presser foot holder screw Use the...
Users Manual - English - Page 12

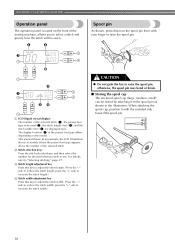
... panel, located on the front of the sewing machine, allows you wish to use. For details, refer to reduce the stitch width; press the "+" side to increase the stitch width.) CAUTION ● Do not grab the bar to raise the spool pin. The display location (2) of the selected stitch. When attaching the spool cap, position it...
Users Manual - English - Page 13

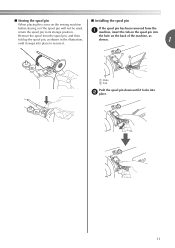
...the spool pin into Remove the spool from the spool pin, and then the hole on the sewing machine before storing or if the spool pin will not be used, return the spool pin to ... ■ Storing the spool pin ■ Installing the spool pin When placing the cover on the back of the machine, as fold up the spool pin, as shown in the illustration, shown. 1 until it locks into place to its...
Users Manual - English - Page 14

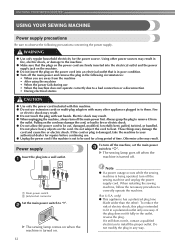
... that the plugs on the power cord are away from the outlet. b X The sewing lamp comes on when the machine is in poor condition. ● Turn off the main power and remove the plug...may result. If the plug does not fit fully in any way. 12 KNOWING YOUR SEWING MACHINE USING YOUR SEWING MACHINE Power supply precautions Be sure to heat. To reduce the risk of time. If the cord...
Users Manual - English - Page 15

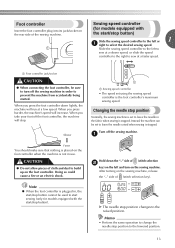
... position. 13 Note ● When the foot controller is plugged in order to build up on the sewing machine, release the "-" side of (stitch selection key). After turning on the foot controller. Slide the sewing speed controller to the left to sew at a slower speed, or slide the speed controller to the right to start...
Users Manual - English - Page 16

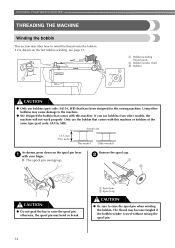
... used without raising the spool pin. 14 a Bobbin-winding thread guide b Bobbin winder shaft c Bobbin CAUTION ● Only use the bobbin that comes with this sewing machine. Actual size 11.5 mm (7/16 inch) This model Other models As shown, press down on the fast bobbin winding, see page 17. The thread may...
Users Manual - English - Page 18

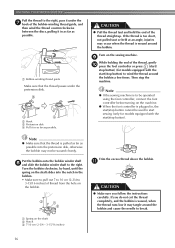
... the excess thread above the bobbin. If the thread is pulled as far as possible. KNOWING YOUR SEWING MACHINE Pull the thread to the right, pass it under the pretension disk. Note ● If the sewing machine is plugged in as far as possible into the notch in as far as possible. a Spring on...
Users Manual - English - Page 19

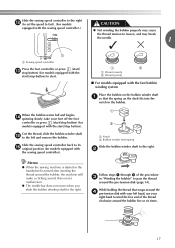
...(for models equipped with the start/stop button) (for models equipped with the sewing speed controller). Slide the sewing speed controller back to wind the free end of the procedure c in the ...the bobbin winder shaft a so that wraps around the bobbin, the machine will make a clicking sound; Memo ● When the sewing machine is started or the handwheel is not a malfunction. ● The ...
Users Manual - English - Page 20

... button) to start /stop button). a Slit in the bobbin or the needle may break the needle. this is cut the thread as described. KNOWING YOUR SEWING MACHINE Pull the thread to cut to the right. 18 CAUTION ● Be sure to the right and pass it through e the slit in cutter) X The...
Users Manual - English - Page 21

... thread is indicated by turning a the handwheel toward you turn the power off the sewing machine. If the thread unrolls in the right direction. CAUTION ● Make sure you could... CAUTION ● Make sure you (counterclockwise) or press (needle position button) (for this sewing machine. Be sure to loosen, breaking the needle and resulting in d the direction shown by the...
Users Manual - English - Page 22

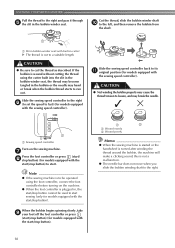
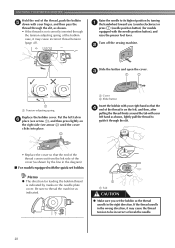
... indicated. b Slide the button and open the cover. Be sure to be incorrect or break the needle. 20 KNOWING YOUR SEWING MACHINE Hold the end of the thread, push the bobbin e down with your finger, and then pass the thread through the slit, as shown. • If ...
Users Manual - English - Page 24

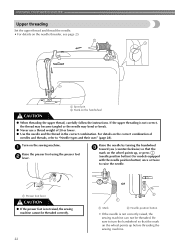
... combination. a Presser foot lever CAUTION ● If the presser foot is not raised, the sewing machine cannot be threaded. Be sure to turn the handwheel so that the mark on the wheel points... the needle. a Spool pin b Mark on the needle threader, see page 25. KNOWING YOUR SEWING MACHINE Upper threading Set the upper thread and thread the needle. • For details on the handwheel CAUTION...
Users Manual - English - Page 26

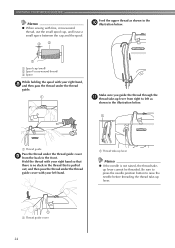
... cover with fine, cross-wound thread, use the small spool cap, and leave a small space between the cap and the spool. KNOWING YOUR SEWING MACHINE Memo ● When sewing with your right hand so that there is no slack in the thread that is not raised, the thread takeup lever cannot be threaded...
Users Manual - English - Page 27

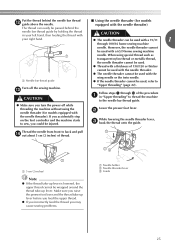
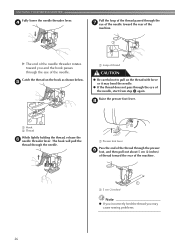
... used with the needle threader. ● The needle threader cannot be used with a 65/9 home sewing machine needle. Make sure you raise the presser foot lever and the thread take -up lever before you ... be used with the wing needle or the twin needle. Follow steps a through 100/16 home sewing machine needle. Put the thread behind the needle bar thread l guide above the needle. ■ Using...
Users Manual - English - Page 28

... needle threader lever. Catch the thread on the thread with force or it may cause sewing problems. 26 e a Loop of the machine. Raise the presser foot lever. X The end of the needle threader rotates toward you .... d Pull the loop of the thread passed through the eye of the machine. a 5 cm (2 inches) Note ● If you incorrectly feed the thread you and the hook passes...

Similar Questions

Auto Threader On Brother Sewing Machine Ce 8080prw
my new brother sewing machine auto threader does not work.have changed needle position and needles s...
(Posted by curtisbuchanan48 10 years ago)
How To Change Needle Brother Sewing Machine Ce 5500 Prw
i lost my manual and do not know how to change the needle for a brother sewing machine CE 5500 PRW. ...
(Posted by giomariagina 11 years ago)
Ask a New Question
Use the box below to post a new question about this Brother International product .
Points & Prizes
  • You can earn points for nearly everything you do on HelpOwl.com
  • You can trade in those points for gift cards at leading retailers such as Amazon.com and Walmart
  • It's that simple!
See How it Works
Create a Free Account

Brother International Manuals

Find free Brother International CE-5500PRW manuals and user guides available at ManualOwl.com. Try out our unique manual viewer allowing you to interact with manuals from directly within your browser!

Brother International Reviews

View thousands of Brother International user reviews and customer ratings available at ReviewOwl.com.

Contact Information

Complete Brother International customer service contact information including steps to reach representatives, hours of operation, customer support links and more from ContactHelp.com.

Scoreboard Ratings

See detailed Brother International customer service rankings, employee comments and much more from our sister site.