
Brother International CE-5000PRW Support Question
Brother International CE-5000PRW Support Question
Find answers below for this question about Brother International CE-5000PRW.Need a Brother International CE-5000PRW manual? We have 1 online manual for this item!
Question posted by CyaRJ on August 10th, 2014
Brother Ce-5000prw Stitch Won't Hold
The person who posted this question about this Brother International product did not include a detailed explanation. Please use the "Request More Information" button to the right if more details would help you to answer this question.
Current Answers
Related Brother International CE-5000PRW Manual Pages
Users Manual - English - Page 1

KNOWING YOUR SEWING MACHINE SEWING BASICS UTILITY STITCHES APPENDIX
Computerized Sewing Machine
Operation Manual
Users Manual - English - Page 2
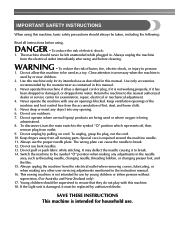
... switch to be taken, including the following:
Read all moving parts. This sewing machine is required around the machine needle. 11.
Keep ventilation openings of lint, dust, and loose cloth.
...pull or push fabric while stitching. To reduce the risk of burns, fire, electric shock, or injury to break. 12. IMPORTANT SAFETY INSTRUCTIONS
When using this machine, basic safety precautions should ...
Users Manual - English - Page 4
... Brother dealer. up lever, needle, or other hot objects. 2. When storing this product are subject to change without notice.
2 For repair or adjustment In the event a malfunction occurs or adjustment is required, first follow the troubleshooting table in the back of the most advanced computerized household sewing machines.
PLEASE READ BEFORE USING THIS MACHINE...
Users Manual - English - Page 5
... YOUR SEWING MACHINE 9
Power supply precautions ...9 Power supply ...9 Foot controller ...10 Sewing speed ...SEWING BASICS 26
SEWING ...26
General sewing procedure ...26 Selecting stitching ...27 Starting to sew ...28 Thread tension ...29
USEFUL SEWING TIPS ...30
Trial sewing ...30 Changing the sewing direction ...30 Sewing curves ...30 Sewing thick fabrics ...30 Sewing thin fabrics ...31 Sewing...
Users Manual - English - Page 7
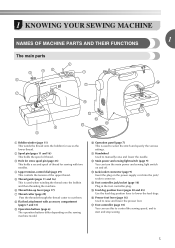
... pin (page 23) This holds a second spool of thread for use this to control the sewing speed, and to select the stitch and specify the various settings.
l Main power and sewing light switch (page 9) You...16) Used to manually raise and lower the needle.
1 KNOWING YOUR SEWING MACHINE
1
NAMES OF MACHINE PARTS AND THEIR FUNCTIONS
The main parts
a Bobbin winder (page 11) This winds the ...
Users Manual - English - Page 8
....
For details, refer to "Sewing reinforcement stitches" (page 29).
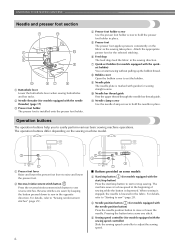
■ Buttons provided on some models
c Start/stop button (for models equipped with the start/stop button) Press the start/stop sewing.
a Presser foot lever Raise and lower the presser foot lever to easily perform various basic sewing machine operations. KNOWING YOUR SEWING MACHINE
Needle and presser foot...
Users Manual - English - Page 9

... accessories in a compartment inside the compartment. Operation panel
The operation panel, located on the front of the sewing machine, allows you wish to use.
Slide the flat bed attachment to the left to reduce the stitch width;
If the accessories are not in millimeters (4) are stored in the bag, and then store the...
Users Manual - English - Page 10
...Canada Others
No.
KNOWING YOUR SEWING MACHINE
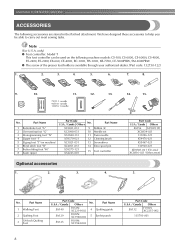
ACCESSORIES
The following machine models: CS-100, CS-6000, CS-6000i, CS-4000, ES-2400, ES-2000, EX-660, CE-4000, BC-1000, HS-1000, XR-7700, CE-5000PRW, SM-6500PRW
● The ... foot controller can be able to help you be used on machine) 6 Blind stitch foot "R" 7 Button fitting foot "M" 8 Seam ripper
Part Code U.S.A. / Canada Others
No.
Users Manual - English - Page 12
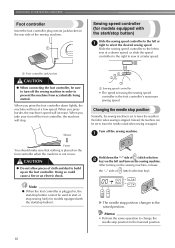
... stopped. When you press the foot controller down the "-" side of (stitch selection key). Changing the needle stop .
Hold down lightly, the machine will run at a faster speed.
Instead, the machine can be sure to turn on the sewing machine. Doing so could cause a fire or an electric shock.
When you take your foot off the...
Users Manual - English - Page 14
.../stop button cannot be used to its l original position (for models equipped with
the sewing speed controller). CAUTION
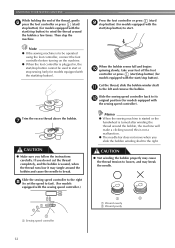
● Not winding the bobbin properly may break the needle.
1
2
a Wound evenly b Wound poorly
a Sewing speed controller
12 KNOWING YOUR SEWING MACHINE
While holding the end of the thread, gently f press the foot controller or press (start...
Users Manual - English - Page 15
...holding the thread that wraps around the pre-tension disk (page 11).
1
Place the bobbin on the bobbin winder shaft b so that the spring on the shaft fits into the slit in the bobbin winder seat, the thread may break the needle.
Turn on the machine... before turning on the sewing machine. Note
● If the sewing machine is to be used to start or stop sewing (only for models equipped...
Users Manual - English - Page 16
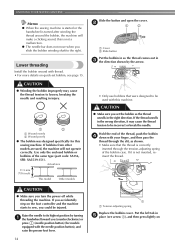
... thread around the bobbin, the machine will not operate correctly. this sewing machine. CAUTION
● Make sure you accidentally step on the foot controller and the machine starts to the right. If ... Raise the needle to be incorrect or break the needle.
Hold the end of the thread, push the bobbin d down with this machine.
CAUTION
● Make sure you (counterclockwise) or
press...
Users Manual - English - Page 19
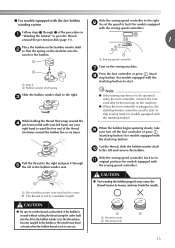
... needle threader lever, c hook the thread onto the guide.
The thread can easily be used with home sewing machine needles size 75/11100/16.
a 5 cm (2 inch)
a Needle holder b Needle threader lever c Guide... by holding the thread in the figure d on page 20 for models equipped with your left . Make sure the main power switch is set incorrectly, the thread may
cause sewing problems....
Users Manual - English - Page 20

... needle threader rotates toward the back of the sewing
machine. d
Pull out about 5 cm (2 inch) of the needle. a 5 cm (2 inch)
Note
● If you incorrectly feed the thread you and the hook passes through the eye of thread through the needle. e
a Hook b Thread
While lightly holding the thread, release the f needle threader lever...
Users Manual - English - Page 22
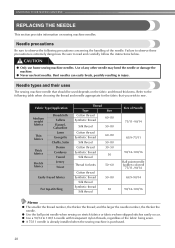
... number, the thicker the needle.
● Use the ball point needle when sewing on sewing machine needles.
Bent needles can easily break, possibly resulting in injury. KNOWING YOUR SEWING MACHINE
REPLACING THE NEEDLE
This section provides information on stretch fabrics or fabrics where skipped stitches easily occur. ● Use a 90/14 to 100/16 needle with...
Users Manual - English - Page 23

... table on the previous page.
CAUTION
● Before replacing the needle, be skipped stitches.
c
1
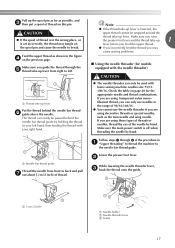
a Flat surface
a Presser foot lever
21 In addition, the stitching may be uneven or puckered or there may be sure to turn off the sewing machine, otherwise injuries may occur if the foot controller or the start/ stop button is...
Users Manual - English - Page 24

... needle clamp
screw counterclockwise to turn . (If the needle clamp screw is loosened too much .)
Install the twin needle in the same way.
KNOWING YOUR SEWING MACHINE
Hold the needle with the end of the needle bar, and then
tighten the needle clamp screw.
Note
● The needle can be damaged. a Needle bar...
Users Manual - English - Page 26

.... Raise the presser foot lever. To select a stitch, refer to release the presser foot. c
a Presser foot holder b Shank c Pin
Note
● The presser foot to be used with this machine.
a Presser foot lever
24 If you have been designed to turn it off the sewing machine, otherwise injuries may occur if the foot controller...
Users Manual - English - Page 27
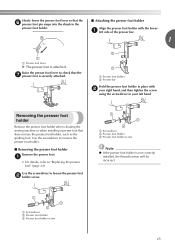
... b holder screw.
Removing the presser foot holder
Remove the presser foot holder when cleaning the sewing machine or when installing a presser foot that the g presser foot is securely attached.
Raise the... b Presser foot holder c Presser foot holder screw
25
a Presser foot holder b Presser bar
Hold the presser foot holder in your left side of the presser bar.
1
a Presser foot lever...
Users Manual - English - Page 47
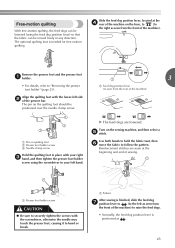
...positioned at .
45
X The feed dogs are sewn at the
d rear of the machine on the sewing machine, and then select a e stitch. a Pattern
After sewing is needed for free-motion quilting. a Feed dog position lever (as seen from
the front... dog
g position lever to
(to the left side b of sewing.
Use both hands to hold the fabric taut, then f move the fabric to follow the pattern.
Similar Questions

How To Install Brother Ce-5000prw Foot
(Posted by angel1t 9 years ago)

How To Thread A Bobbin On A Brother Ce-5000prw
(Posted by stgokko 9 years ago)

Where To Oil A Brother Ce-5000prw
(Posted by kidloBigboi 9 years ago)

How To Thread A Brother Ce-5000prw Sewing Machine
(Posted by nerandy0 10 years ago)
How To Thread A Brother Ce-5000prw
(Posted by Rhoaaalext 10 years ago)