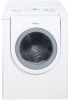
Bosch WTMC3321US Support Question
Bosch WTMC3321US Support Question
Find answers below for this question about Bosch WTMC3321US - Nexxt 500 Series Electric Dryer.Need a Bosch WTMC3321US manual? We have 2 online manuals for this item!
Question posted by AMANSNIGHTMARE on May 30th, 2017
Lost Without Start
i have bosch nexxt 500 series model# wtmc3321us the lint light is on i cant get it to start,ive cleaned all areas that are accessable and still cant get to work how do i take the front of dryer off to change the lint sensors or do i need to ?
Current Answers
Answer #1: Posted by Odin on May 30th, 2017 9:58 AM
Odin

Member since:
April 10th, 2010 Points: 41,236,660

Member since:
April 10th, 2010 Points: 41,236,660
A dirty filter extends the drying time and increases energy consumption, but it should not prevent a start. See https://www.repairclinic.com/RepairHelp/How-To-Fix-A-Dryer/1-129--V1RNQzMzMjFVUyA=/Bosch-Dryer-won-t-start.
Hope this is useful. Please don't forget to click the Accept This Answer button if you do accept it. My aim is to provide reliable helpful answers, not just a lot of them. See https://www.helpowl.com/profile/Odin.
Related Bosch WTMC3321US Manual Pages
Use & Care Manual (all languages) - Page 2
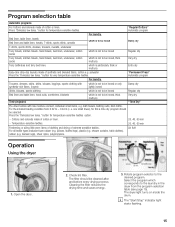
... table 15
Operation 15
Using the dryer 15
Using the dryer rack (Option 16
Cleaning and care 17
Cleaning the dryer 17
Cleaning the lint filter 18
Cleaning the exhaust duct 18
Cleaning the moisture sensor 18
Cleaning the bearing shield 18
Change the light bulb 18
Troubleshooting 19
SERVICE and REPAIR 20
STATEMENT OF WARRANTIES BOSCH CLOTHES DRYERS 20 Exclusions 20
2
Use & Care Manual (all languages) - Page 3
...of the dryer - Bosch dryers are instructed in your dryer. Do not tamper with Operating, Care and Installation Instructions.
2. Keep area around the exhaust opening and adjacent surrounding areas free from...some flammable substance(s) even after each load.
13. Clean lint screen before or after washing, which have been previously cleaned, washed, soaked, or spotted with cooking oils ...
Use & Care Manual (all languages) - Page 4

... the U.S.A., in a risk of the old appliance
d WARNING d
If appliance is properly grounded. Disposal of electric shock.
For U.S.A.
4
Your dryer comes without a power supply cord. Five feet long (minimum) For CANADA This appliance is equipped with this dryer until you are in accordance with the appliance. SAVE THESE INSTRUCTIONS
INSTALLATION INSTRUCTIONS
Introduction
Read...
Use & Care Manual (all languages) - Page 5
...dryer and level side to side and front to individual Branch Circuit. Ensure that the power supply cord is accessible when the dryer...Electrical connection
d WARNING d
Power cord must be connected by qualified persons only. in rooms which are to wall as a complete unit. The size of the installation area...contact your dealer. Check the dryer for the dryer must be clean, level and firm. The ...
Use & Care Manual (all languages) - Page 6
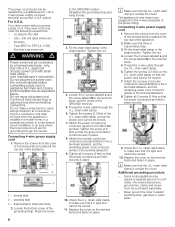
...ground. Use a 4Ćwire power supply cord (see electrical connection U.S.A. The power cord must have closed loop or upturned...and fasten in a new branch circuit installation or an area where the local codes do not permit grounding through the...) of the appliance.
1
2
3
1 - Tighten the nut.
4. Never ground the dryer to the terminal labeled N.
8. Tighten the nut.
4. Tighten all 3 screws (3 Nm)...
Use & Care Manual (all languages) - Page 7
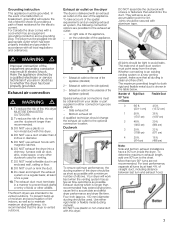
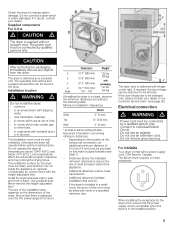
... for the electric current. DO NOT install a flexible duct in the table below. DO NOT crush or kink the duct. 9. The Bosch dryers are in ...doubt as an accumulation point for either rigid metal or flexible metal ducting material. To prevent buildĆup of moisture and accumulation of lint.
Exhaust air outlet on the dryer
The dryer is clean and free of lint...
Use & Care Manual (all languages) - Page 8
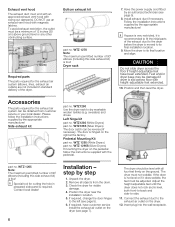
... installation instructions supplied by an authorized technician (see page 5). 6.
WTZ1260 (White Dryers) part no . part no . The dryer should be obtained from the drum. 3. Insert plug into the wall receptacle. ... The parts required for the exhaust air system can be a minimum of the dryer.
Accessories
The parts required for the exhaust air system (elbows, lines, exhaust air...
Use & Care Manual (all languages) - Page 9
... drum is connected to prevent them from
the exhaust air outlet on the dryer. 4.
q Switch the dryer to "OFF".
6. Switch the dryer to "Extra Dry" and then press the Start button. If the dryer does not work, switch the dryer to understand how your dryer operates.
4. Read the operating instructions to "OFF".
Rotate the program selector to transport...
Use & Care Manual (all languages) - Page 10
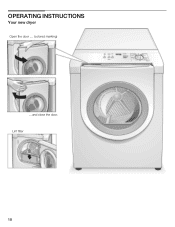
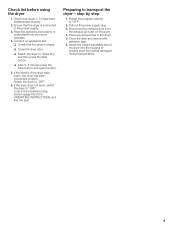
OPERATING INSTRUCTIONS
Your new dryer
Open the door .... (colored marking)
....and close the door. Lint filter
10
Use & Care Manual (all languages) - Page 11
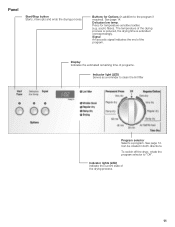
... addition to the program if required). See page 14. The temperature of the program. To switch off the dryer, rotate the program selector to clean the lint filter
Program selector Selects a program. Panel
Start/Stop button Starts, interrupts and ends the drying process. Buttons for temperatureĆsensitive textiles (e.g. acrylic fibers). Delicates low temp. Display...
Use & Care Manual (all languages) - Page 12
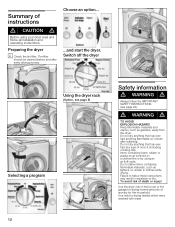
...! To avoid risk of laundry for the household. Use the dryer only in explosion or fire. Summary of instructions
d CAUTION d
Before using an air fluffĆcycle. Preparing the dryer
i Check the lint filter. Items containing foam, rubber or plastic must be cleaned before and after washing). Choose an option...
...and start the dryer. Do not dry...
Use & Care Manual (all languages) - Page 13
...;tight items.
- Do clean and inspect the exhaust system on the dryer. Check the dryer for the type of the dryer. If the dryer does not work, switch the dryer to dry in the air.
- Delicate fabrics (silk, synthetic curtains)
i Dry woolen or woolĆrich textiles
with the installation instructions (from pockets. Leave laundry to "Off".
Keep...
Use & Care Manual (all languages) - Page 14

...the indicator light Wrinkle block"
illuminates when the program selector is pressed. Automatic programs
There are automatic programs for different types of malfunction" is extended.
Signal
Type
Start
Short tone
... is reduced, the drying time is active in the laundry.
In the "Air fluff/No heat" stage the dryer runs on the textiles. Observe the care information or symbols...
Use & Care Manual (all languages) - Page 15
...lint filter. pillows, stuffed toys), plastic (e.g. backed rugs), sheer nylon, polypropylene. Open the door.
2. The dryer light turns on inside the drum. i The Start/Stop" indicator light
starts flashing.
15 button for temperatureĆsensitive textiles.
Regular/Cottons" Automatic program
For laundry...Operation
Using the dryer
1.
The filter should be cleaned after and before...
Use & Care Manual (all languages) - Page 16
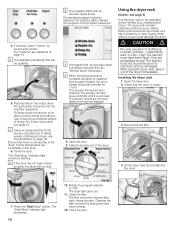
... prewashed shoes! i The estimated remaining time will not start. This prevent the laundry from creasing.
The dryer rack remains stationary while the drum rotates. Drying shoes without... page 13. The Start/Stop" indicator light continues flashing. Take the laundry out of shoes - Remove the lint filter.
4. Place laundry in the drum. 6.
Cleaning the filter reduces the drying...
Use & Care Manual (all languages) - Page 17
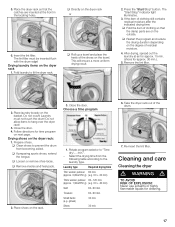
.... 1,9lbs/850 g) (e.g. 60 + 40 min)
Skirt
60-90 min.
Cleaning and care
Cleaning the dryer
d WARNING d
TO AVOID RISK OF EXPLOSION! The lint filter must not touch the drum! Place laundry loosely on the dryer rack
1. Small items (e.g. ReĆinsert the lint filter. Insert the lint filter.
q Clean shoes to prevent the drum from the following table according...
Use & Care Manual (all languages) - Page 18
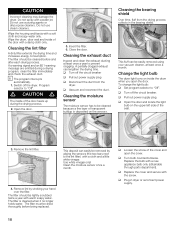
...removed using your hand over the filter.
Change the light bulb
The dryer light turns on the upper left side of the seal.
3. To change the light bulb: q Set program selector to Off".
...light
bulb on inside the drum when you open the cover. Remove the lint filter. The filter must be cleaned because a fine layer of the door with a cloth and a little white vinegar.
Cleaning the lint...
Use & Care Manual (all languages) - Page 19
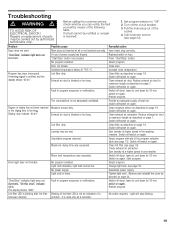
... table (see page 20). Drum light does not function.
Start/Stop" indicator light does not illuminate. Wrinkle block" indicator lights. Lint filter dirty.
Switch off /switch on page 18.
Switch off dryer, leave to cool down for 30 min, switch on page 18. Light will stop blinking.
19
No program selected. Clean filter as described on again.
A fuse...
Use & Care Manual (all languages) - Page 20
... or repairs to correct the installation of the front panel. The Bosch dryers require no special care other than what is normal and customary for purposes of your clothes dryer, to replace house fuses or correct plumbing or the electric wiring in your area and explain to repair any defects or damage arising from the...
Use & Care Manual (all languages) - Page 21
BE SURE TO PROVIDE YOUR CLOTHES DRYER'S MODEL, SERIAL NUMBER, PURCHASE DATE AND THE SELLER'S NAME, ADDRESS.AND A COPY OF THE SALES INVOICE.
21 HUNTINGTON BEACH CA 92649.
Similar Questions


Bosch Nxxt800 Electric Dryer. Power Is On. Lights Illuminated. Drum Won Roll?
(Posted by victor70901 10 years ago)

What Model # Pedestal Will Fit The Wtmc3321us Electric Dryer?
(Posted by LZCHIN 11 years ago)

Where Is The Light Bulb In A Bosch Dryer N Serie Model Wtvc5530uc/11
WHERE IS THE LIGHT BULB IN A BOSCH DRYER SERIE MODEL WTVC5530UC/11
WHERE IS THE LIGHT BULB IN A BOSCH DRYER SERIE MODEL WTVC5530UC/11
(Posted by MPTGRAVEN 11 years ago)

Bosch Dryer 500 Electric Dryer Gives Signal E-01 And Does Not Finish Drying.
We have cleaned out the Lint Filter and cleaned the bottom of the lint trap and we have checked the ...
We have cleaned out the Lint Filter and cleaned the bottom of the lint trap and we have checked the ...
(Posted by shermahargrove 13 years ago)