Bosch SHX7ER55UC Support Question
Bosch SHX7ER55UC Support Question
Find answers below for this question about Bosch SHX7ER55UC.Need a Bosch SHX7ER55UC manual? We have 3 online manuals for this item!
Question posted by camillemcb on October 27th, 2011
Bosxh Shx7er55uc
Would like to see photos of theinside of the dishwasher, particularly the 3rd rack option. What does itlook like. Is there anywhere that I can see a good photo of this.
thanks
Current Answers
Related Bosch SHX7ER55UC Manual Pages
Installation Instructions - Page 2

... Instructions
To avoid possible injury or property damage, OBSERVE ALL WARNINGS AND CAUTIONS.
NOTE: Do not discard any damage immediately. It is replacing another dishwasher, check the existing dishwasher connections for indoor residential use by a qualified service technician or installer.
• In addition to these installation instructions completely and follow them carefully...
Installation Instructions - Page 3

...metal, permanent wiring system, or an equipment-grounding conductor must be run the water from the dishwasher's water inlet valve.
Do not attempt any work on an energized circuit.
Check local plumbing ...water inlet valve and cause a water leak. Do not attempt any cover or pulling the dishwasher from the cabinet can form in serious injury or death. Ensure all national and local ...
Installation Instructions - Page 4
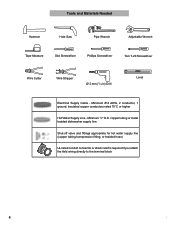
copper tubing or metal braided dishwasher supply line
Shut-off valve and fittings appropriate for hot water supply line (copper tubing/compression fitting, or braided hose)
UL listed conduit connector or ...
Installation Instructions - Page 6

...21/2" (64mm)
Required Openings: 43/4″ x 23/8″ (120 x 60mm) - See Figure 5.
To pass the dishwasher drain hose toward the water supply 11/4″ (32mm) diameter - Figure 1
90°
22 5/8″ (575mm)
34&#.... Figure 3
Select a location as close to open the door. Figure 4
If the dishwasher is square and has the dimensions shown in the same cabinet, the one 43/4″ ...
Installation Instructions - Page 7

...; (120 x 60mm) opening through metal, use the included protective grommet (I) or other approved method to securely mount the junction box so that the dishwasher is in compliance with dishwasher
WARNING
Avoid Fire Hazard
Figure 7
P
Make sure there are certain the
circuit is de-energized. Make sure all national and local electrical codes...
Installation Instructions - Page 8

...soldered or sweated, keep the heat source at least 6 inches (152.4 mm) away from
the dishwasher.
Method B - Water that might restrict water flow. · Always use the appropriate seal ... is connected to household or field wiring: 1.
To permanently connect to the dishwasher.
8
8 Remove the dishwasher electrical supply junction box
cover and connect to the power supply cord from each...
Installation Instructions - Page 9

... is heavy and will need to be connected to kink or twist behind the dishwasher. 3.
The maximum length of the dishwasher water inlet hose is securely attached 20″ (508mm) above the cabinet floor... shown on Figure 14. It is best to the air gap, is the dishwasher drain hose). Drain Connections
The dishwasher drain hose may be supported. You will need a 11/4" diameter hole in...
Installation Instructions - Page 10

...the mounting brackets down firmly to the house plumbing as shown in 3 ways:
NOTE: If your dishwasher opening width measures >235/8″ (600mm) use the TOP or SIDE MOUNT mounting methods. Orient... insert the drain hose. 4. Orient the mounting brackets as shown in Figure 16. If your dishwasher opening width measures 235/8″ (600mm) use the drain hose as the two small tabs. Obtain...
Installation Instructions - Page 11

... Mount
1/16″ (2mm)
Figure 22
N
11 To avoid scratching the floor, use the dishwasher until it to lower front of the unit. Make certain to slide into the cabinet opening. Wooden... Side Mount (Figure 25).
Remove the top cutlery rack as shown in serious injury. Figure 23 For Top Mount -
Level the dishwasher horizontally by turning center screw to follow
this warning can...
Installation Instructions - Page 12
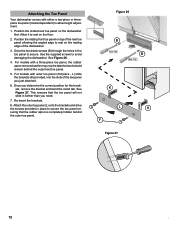
...-piece or threepiece toe panel (model dependent) to avoid damaging the dishwasher. Drive the two black screws (B) through the holes in further than you need.
7. Position the mating front toe panel on the floor.
2. For models with outer toe panel (3rd piece - Allow it to secure the toe panel ensuring that the...
Installation Instructions - Page 13

... be reached. Any work performed by unauthorized personnel may void the warranty. E-mail us at the address below ) until the problem is necessary, contact your dishwasher and are having a problem with the service you have available (if you are writing), or have received, please take the following information: • Model number...
Instructions for Use - Page 3

... important. Congratulations and thank you have joined the many other top quality Bosch appliances, visit our web site at:
www.bosch-home.com/us at: 1-800-944-2904
Table of Contents Important Safety Instructions 2-3 Dishwasher Components 4-5 Dishwasher Setup 6-7 Dishware Materials 8 Loading the Dishwasher 8-9 Rack Accessories 10-11 Dishwasher Cycles and Options 12 Wash Cycle Information...
Instructions for Use - Page 4
... damage and/or injury could result if the electrical supply for the dishwasher covered in this manual unless you are certain the electrical supply has been correctly installed or the... than those explained in the following pages.
Never use steam cleaning products to clean your dishwasher. IMPORTANT SAFETY INSTRUCTIONS: Please READ and SAVE this manual or for any way not covered...
Instructions for Use - Page 5
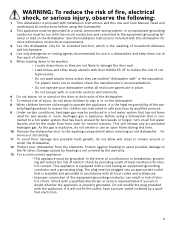
...abuse, sit or stand on the door or dish racks of the dishwasher. 7 To reduce risk of least resistance for more . Before using the dishwasher.
2 This appliance must be grounded to a metal,...For plastic items not so marked, check the manufacturer's recommendations. • Do not operate your dishwasher from the elements.
WARNING: To reduce the risk of the par- This will reduce the risk ...
Instructions for Use - Page 6
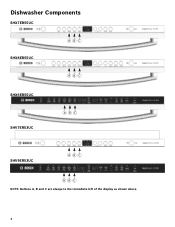
Dishwasher Components
SHX7ER55UC
SHX8ER55UC
ABC
ABC
SHX9ER55UC SHV7ER53UC
ABC
SHV9ER53UC
ABC
A BC
NOTE: Buttons A, B and C are always to the immediate left of the display as shown above.
4
Instructions for Use - Page 7
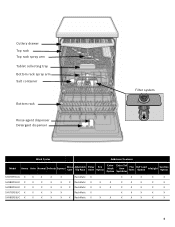
... rack spray arm Tablet collecting tray Bottom rack spray arm Salt container
Bottom rack
Rinse agent dispenser Detergent dispenser
Filter system
Wash Cycles
Additional Features
Model
Heavy
Auto
Normal
Delicate
Express
Glass Care
Adjustable Top Rack
Delay Start
Eco Option
Extra Wash Option
Extra Tall Item
Sprinkler
Flip Tines
Half Load Option
InfoLight
Sanitize Option
SHX7ER55UC...
Instructions for Use - Page 8
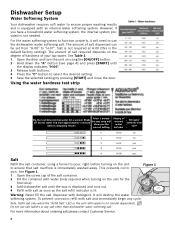
...water hardness test strip
Dip the test strip into tap water for the
first time). 3 Add dishwasher salt until
the display indicates "H:00". 3 Release both buttons. 4 Press the "C" button ...: Never fill the salt dispenser with an internal water softening system. Dishwasher Setup
Water Softening System
Your dishwasher requires soft water to ensure proper washing results and is the default factory...
Instructions for Use - Page 9
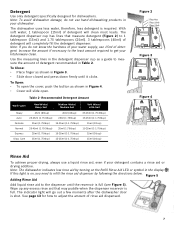
.... Increase the amount if necessary to the least amount required to get your dishwasher. Note: To avoid dishwasher damage, do not know the hardness of your water supply, use a liquid.... With soft water, 1 tablespoon (15ml) of detergent will go out a few moments after the dishwasher door is shut. Detergent
Use only detergent specifically designed for how to adjust the amount of rinse aid...
Instructions for Use - Page 10
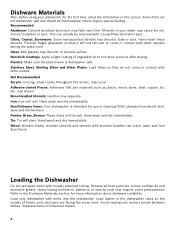
...during the wash cycle. Hand wash these so they do not come in the dishwasher racks so the insides of vegetable oil to non-stick surfaces after drying. Adhesive-Joined...Colored anodized aluminum may fade over or come in this section. Non-Dishware Items: Your dishwasher is dishwasher safe. Remove all food particles, bones, toothpicks and excessive grease. Glass: Milk glasses ...
Instructions for Use - Page 12
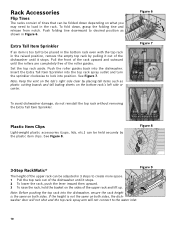
... shown in 3 steps to create more space. 1 Pull the top rack out of the dishwasher until it stops. NOTICE
To avoid dishwasher damage, do not reinstall the top rack without removing the Extra Tall Item Sprinkler. See Figure 8.
See Figure 7. Rack Accessories
Flip Tines
The racks consist of tines that can be folded down , grasp the...
Similar Questions

I Have The Same Question About My Bosch Dishwasher.i Wanted To Know How You Got
this fixed.Blinking Auto Light And Blinking Time That 2:09. Will Turn Off Will Turn On....
this fixed.Blinking Auto Light And Blinking Time That 2:09. Will Turn Off Will Turn On....
(Posted by karisellers 6 years ago)

Where To Find Serial Number On Bosch Model Dishwasher Shx7er55uc
(Posted by cr28102 9 years ago)


Any Recall On This Bosche Shx7er55uc Dishwaser?
I'm looking for a dishwaser to replace my existing 7 year old Bosche dishwasher. There was a recall ...
I'm looking for a dishwaser to replace my existing 7 year old Bosche dishwasher. There was a recall ...
(Posted by clarakctan 11 years ago)