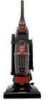
Bissell PowerForce Helix Turbo Bagless Support Question
Bissell PowerForce Helix Turbo Bagless Support Question
Find answers below for this question about Bissell PowerForce Helix Turbo Bagless.Need a Bissell PowerForce Helix Turbo Bagless manual? We have 2 online manuals for this item!
Question posted by cggymy on January 11th, 2017
The Inside Of The Bagless Container Doesn't Spin Location
Current Answers
Answer #1: Posted by Troubleshooter101 on January 11th, 2017 10:15 PM

Member since:
September 30th, 2015 Points: 2,927,040

a. Make sure the hose is firmly connected to the lower hose on back of vacuum.
b. Is the brush turning? If not, check out our FAQ troubleshooting on "Brush is not turning".
c. Is the lower hose clogged? If yes, see our "Clearing Clogs" FAQ.
2. If you don't have any suction at the end of your hose:
a. Check for suction at the back of vacuum after removing the hose where it attaches to the back of the vacuum (twist to the left to remove hose).
b. If there's suction at the back, check the hose for cracks or holes. If there is no suction at the back of the vacuum, see step d.
c. If there are none, the hose is probably clogged. Please see our "Clearing Clogs" FAQ.
d. If there's no suction in the back, check the area below for suction (without removing the small round filter). This is the locking lever for the dirt container. If there is suction, make sure all filters are clean and hose is clear as the unit itself does have suction.
3. Check the dirt cup to see if it is empty.
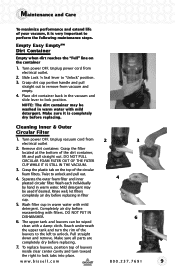
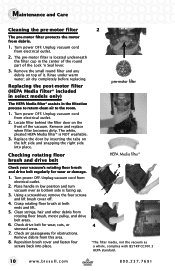
4. Check the inner and outer circular filters and the post-motor filter for debris. The inner and outer circular filters are located on the bottom portion of the dirt container. The post-motor filter is underneath the plastic grate just below the dirt container.
Note: The white Multi-Layer Post Motor Filter is not washable.
5. Check the upper-tank separator louvers (grey round plastic that looks like a filter but has no foam around it), as they may need to be rinsed. You can unscrew the separator and rinse it with water.
6. If you still can't get any suction, at this point it might be best to take your vacuum to a technician. You can find your nearest BISSELL® Authorized http://www.bissell.com/support/product-support/service-centers by clicking service-centers or by calling 1-800-237-7691 and choosing option #2, available 24 hours a day.
Thanks
Please respond to my effort to provide you with the best possible solution by using the "Acceptable Solution" and/or the "Helpful" buttons when the answer has proven to be helpful. Please feel free to submit further info for your question, if a solution was not provided. I appreciate the opportunity to serve you!
Troublshooter101
Related Bissell PowerForce Helix Turbo Bagless Manual Pages


Similar Questions


