Bissell Heavy Duty Vacuum Support Question
Bissell Heavy Duty Vacuum Support Question
Find answers below for this question about Bissell Heavy Duty Vacuum.Need a Bissell Heavy Duty Vacuum manual? We have 2 online manuals for this item!
Question posted by scottvandersteen on August 27th, 2014
How To Remove Bissell Heavy Duty Vacum Brush Motor And Reinstall It
how to reinstall the brush moter,a picture of a installed would help
Current Answers
Related Bissell Heavy Duty Vacuum Manual Pages
Warranty - Page 1
..., contact BISSELL Consumer Services.
OR CALL: BISSELL Consumer Services...BISSELL's liability will repair or replace (with a photocopy of purchase. (Your dated sales receipt is not covered.
If you .
*Exceptions and exclusions from the date of the product. will not exceed the purchase price of purchase by E-mail, telephone, or regular mail as filters, bags, belts, or brushes...
User Guide - English - Page 2
Thank you for buying a BISSELL Heavy Duty Vacuum
Everything we know about floor care went into the design and construction of high quality homecare products like your Heavy Duty Vacuum. Today, BISSELL is backed with a knowledgeable, dedicated Consumer Services department, so, should you ever have a question, you many years of us at BISSELL. Bissell President and Chief Executive Officer
22 ...
User Guide - English - Page 3
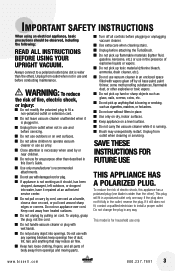
...outdoors or on wet surfaces.
■ Do not allow children to install a proper outlet. This plug will fit in a polarized outlet only ...to a polarized outlet (one way. Do not use only. www.bissell.com
800.237.7691
3
keep openings free of dust, lint,... a level surface. ■ Do not carry the vacuum cleaner while it is running. ■ Brush may reduce air flow.
■ Keep hair, loose...
User Guide - English - Page 4
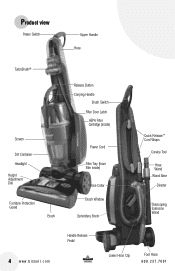
... Height Adjustment Dial
Furniture Protection Guard
Brush
Release Button Carrying Handle
Brush Switch Filter Door Latch
HEPA Filter Cartridge (inside)
Power Cord
Filter Tray (foam filter inside)
Hose Collar Brush Window
Upholstery Brush
Quick Release™ Cord Wraps
Crevice Tool
Hose Wand Wand Base
Diverter
Telescoping Extension Wand
4 www.bissell.com
Handle Release Pedal
Lower...
User Guide - English - Page 5
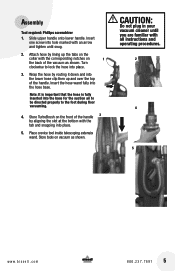
Attach hose by aligning the slot at the bottom with all instructions and operating procedures.
2
4
5
www.bissell.com
800.237.7691
5 Turn
clockwise to the foot during floor vacuuming.
4. Place crevice tool inside telescoping extension wand. Insert one screw into hole marked with the corresponding notches on the
collar with an arrow and...
User Guide - English - Page 6
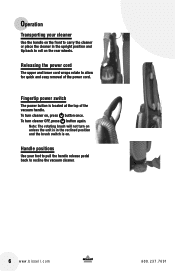
To turn cleaner on, press button once. Note: The rotating brush will not turn on unless the unit is in the upright position and tip back to ... cleaner in the reclined position and the brush switch is located at the top of the power cord. Releasing the power cord
The upper and lower cord wraps rotate to recline the vacuum cleaner.
6 www.bissell.com
800.237.7691 Operation
Transporting your ...
User Guide - English - Page 7
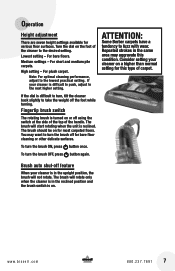
...weight off using the switch at the side of the top of the handle. The brush will start rotating when the unit is turned on or off the foot while turning. Medium settings ... higher setting. Lowest setting -
The brush should be on . To turn the brush OFF, press button again. Consider setting your cleaner is on for various floor surfaces. www.bissell.com
800.237.7691
7 For short...
User Guide - English - Page 8
...in the upright position.
2. to order, please refer to page 18-19.
8 www.bissell.com
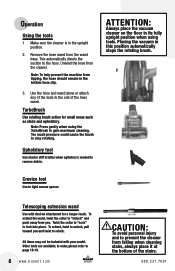
CAUTION:
To avoid personal injury and to prevent the cleaner from the cleaner. ...help prevent the machine from the wand base.
TurboBrush
Use rotating brush action for a longer reach.
Operation
Using the tools
1 Make sure the cleaner is needed to remove debris.
ATTENTION:
Always place the vacuum...
User Guide - English - Page 9

...:
Make sure vacuum cleaner has been switched off and unplugged before removing dirt container. ...remove the dirt container. 1
2. Close the bottom after
2a
the dirt empties. Empty the dirt container as soon as the dirt reaches the "Full" line on the side of the dirt container. Press the release button on cleaner by aligning the bottom and pushing back until it snaps into place.
3
www.bissell...
User Guide - English - Page 10
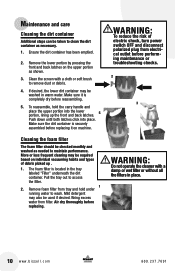
... performing maintenance or troubleshooting checks.
2
3
WARNING:
Do not operate the cleaner with a cloth or soft brush to remove dust or debris.
4. b i s s e l l . Clean the screen with a damp or wet...
running water to maintain performance. Mild detergent may be required based on individual vacuuming habits and types of electric shock, turn power switch OFF and disconnect polarized plug...
User Guide - English - Page 11
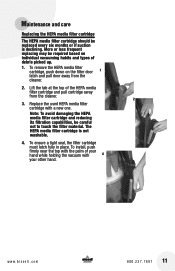
...replaced every six months or if suction is not washable.
4. To remove the HEPA media filter cartridge, push down on individual vacuuming habits and types of debris picked up.
1. Lift the tab at... ensure a tight seal, the filter cartridge
must latch fully in place. www.bissell.com
800.237.7691
11 To install, push
firmly near the top with the palm of the HEPA media filter cartridge...
User Guide - English - Page 12
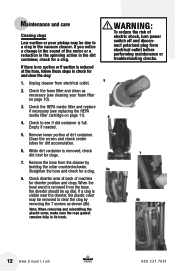
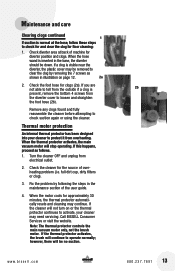
...diverter, the plastic cover may be due to a clog in the vacuum cleaner. If you notice a change in the sound of the motor or a reduction in the spinning action in its track.
WARNING... . Check to see replacing the HEPA media filter cartridge on page 10).
3.
Note: When removing and reinstalling the plastic cover, make sure the rope gasket remains fully in the dirt container, check for ...
User Guide - English - Page 13
...
3.
If a clog is visible near the
diverter, the plastic cover may be removed to activate, your cleaner to operate normally; If this happens, proceed as
shown ...vacuum motor only, not the brush motor. Check diverter area at the hose, follow these steps to check suction again or using the cleaner. Check the cleaner for clogs (2a). www.bissell.com
2b
800.237.7691
13
Call BISSELL...
User Guide - English - Page 14
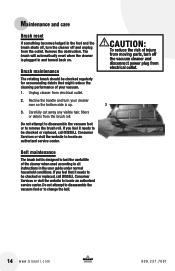
... your vacuum. 1.
c o m
800.237.7691 Brush maintenance
The rotating brush should be checked regularly for accumulating debris that it needs to be checked or replaced, call BISSELL Consumer... according to remove the brush roll. Remove the obstruction. Do not attempt to disassemble the vacuum foot or to locate an authorized service center.
b i s s e l l . The brush will automatically ...
User Guide - English - Page 15

... out of vacuum.
2. Replace the brush inside tab at the bottom to remove.
3. Maintenance and care
Changing the light bulb
2 1. Remove tool from hose or front of the socket. Remove the brush from electrical outlet.
2. Twist collar until
the bulb snaps into slots on the cover. Unplug cleaner from the belt and clean debris.
4. Remove the bulb...
User Guide - English - Page 16
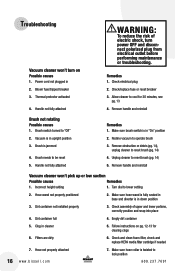
...base and diverter is in down position
3. Dirt container full
4. Remove handle and reinstall
Brush not rotating Possible causes
1. Dirt container not installed properly
3. Vacuum cleaner won 't pick up or low suction
Possible causes
Remedies
1. Thermal protector activated
3. Remove handle and reinstall
Vacuum cleaner won 't turn power OFF and disconnect polarized plug from...
User Guide - English - Page 17
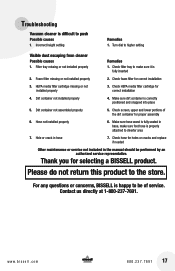
... not included in hose
7.
Turn dial to the store. Thank you for correct installation
3. Foam filter missing or not installed properly
2. Check foam filter for selecting a BISSELL product. For any questions or concerns, BISSELL is correctly
positioned and snapped into place
5. Troubleshooting
Vacuum cleaner is
fully inserted
2. Filter tray missing or not...
User Guide - English - Page 18

... 3606 Grand Rapids MI 49501
9 a.m. - 8 p.m. It provides proof of date of purchase in the event of cleaner available.
EST
ATTN: Consumer Services
Or visit the BISSELL website - Please record your Model Number Please record your Purchase Date
NOTE: Please keep your original sales receipt. See Warranty on page 20 for details...
User Guide - English - Page 19
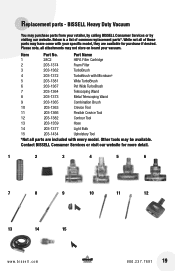
... Brush
10
203-1363
Crevice Tool
11
203-1366
Flexible Crevice Tool
12
203-1382
Contour Tool
13
203-1359
Hose
14
203-1377
Light Bulb
15
203-1434
Upholstery Tool
*Not all of common replacement parts*. Contact BISSELL Consumer Services or visit our website for purchase if desired. Item Part No. BISSELL Heavy Duty Vacuum...
User Guide - English - Page 20
... mail as filters, or brushes. This warranty applies to fans or routine maintenance components such as described below.
ET
Or write: BISSELL Homecare, Inc. Some states...i s s e l l . BISSELL Heavy Duty Vacuum
This warranty gives you specific legal rights, and you have other use not in your BISSELL product should require service: Contact BISSELL Consumer Services to state.
PO Box ...
Similar Questions

Where Online Can I View An Owners Manual For A Bissell Heavy Duty Vacuum 93z6
(Posted by BSesilver 9 years ago)


Where Are The 5 Screws On The Brush Cover To Install A New Drive Belt? I
I have a 98n4 series and only found 3 screws
I have a 98n4 series and only found 3 screws
(Posted by eflowww 9 years ago)

How To Take Apart Bissell Heavy Duty Vacuum
(Posted by basilus 10 years ago)

How To Remove Wheels On A Bissell Healthy Home Vacuum
(Posted by heilmph 10 years ago)