Amana NED7300WW Support Question
Amana NED7300WW Support Question
Find answers below for this question about Amana NED7300WW.Need a Amana NED7300WW manual? We have 4 online manuals for this item!
Question posted by mariaagilar on December 8th, 2014
Dryer Started Making A Screeching Sound.
The person who posted this question about this Amana product did not include a detailed explanation. Please use the "Request More Information" button to the right if more details would help you to answer this question.
Current Answers
Answer #1: Posted by majorapplirepair on December 11th, 2014 6:41 AM
majorapplirepair

Member since:
October 7th, 2011 Points: 139,880

Member since:
October 7th, 2011 Points: 139,880
Related Amana NED7300WW Manual Pages
Use and Care - Page 2
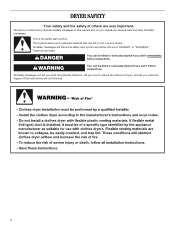
DRYER SAFETY
Your safety and the safety of injury, and tell you what the potential hazard is the safety alert symbol.
WARNING
You can be killed ...
Use and Care - Page 3
The dryer must be detected by a qualified installer, service agency, or the gas supplier.
do if you use a gas detector approved by UL or CSA. WARNING: Gas ...
Use and Care - Page 4

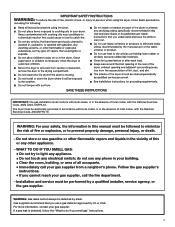
... can completely remove oil. In the State of Massachusetts, the following installation, see the QUICK START GUIDE on it (even after washing).
Failure to follow these instructions can result in death, ... dry anything flammable on it (including cooking oils). QUICK START GUIDE /DRYER USE
WARNING
WARNING
Explosion Hazard
Keep flammable materials and vapors, such as gasoline, away from...
Use and Care - Page 5
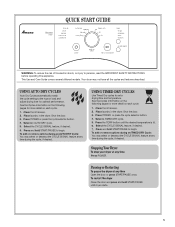
... selector button. Select a TIMED DRY cycle. Open the door or press START/PAUSE once. Place laundry in the dryer. Close the door and press and hold START/PAUSE to persons, read the IMPORTANT SAFETY INSTRUCTIONS before operating this appliance. Place laundry in the dryer. See the Cycles information on the following pages for optimal performance. Shut...
Use and Care - Page 6
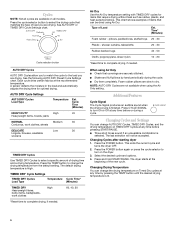
...the drying temperature from the default setting. This ends the current cycle and
turns the dryer OFF. 2. The dryer starts at the recommended temperature. A sensor detects the moisture in the load and ...default drying temperature is
selected. Additional Features
Cycle Signal The Cycle Signal produces an audible sound when the drying cycle is lit.
6 Cycles
NOTE: Not all cycles are available on...
Use and Care - Page 7

... exhaust hood and remove the lint. As needed cleaning Laundry detergent and fabric softener residue can cause longer drying times for an extended period of lint screen with your
fingers. Replace screen
in the door opening of the dryer. A screen blocked by a qualified person. Make a paste with a damp cloth. 4. Apply paste to remove...
Use and Care - Page 8
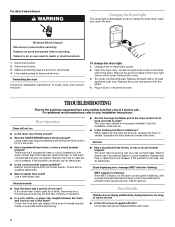
... firmly pressed? Large loads may require pressing and holding the Start button for small objects. To change the drum light 1. Turn bulb counterclockwise.
Replace the fuse or reset the circuit breaker. Make sure leveling legs are too long, or load is the dryer level front to back and side to vibrate. If the...
Use and Care - Page 9

...dryer located in the area where your new preset drying setting for 5-10 minutes. Changing the AUTO DRY Default Settings
IMPORTANT: Your dryness level settings can be contacting the moisture sensor strips. This change will change the default settings to different installations, environmental conditions or personal preference.
Press the START....
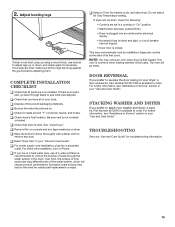
Level the dryer.
Lint on Automatic...
Dimension Guide - Page 1

... and most direct path outdoors.
Angled hood (acceptable)
The Vent system chart provides venting requirements that will need.
Ref. Exhaust venting: Exhaust your dryer to an individual branch circuit.
Dryer dimensions
27" (686 mm)
OVERALL DIMENSIONS
29" (736 mm)
481/8" (1238 mm) 471/8" (1197 mm)
35 3/8"
(899 mm)
Left or right side...
Installation Instruction - Page 2

DRYER SAFETY
Your safety and the safety of injury, and tell you don't immediately follow the safety alert symbol and either the word "DANGER" or "WARNING." ...
Installation Instruction - Page 3
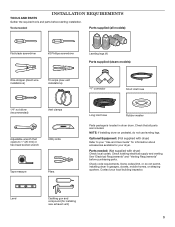
..." and "Venting Requirements" before starting installation.
Check existing electrical supply and venting.
Level
Caulking gun and compound (for your local building inspector. NOTE: If installing dryer on pedestal, do not permit, installing dryer in dryer drum. Optional Equipment: (Not supplied with dryer) Check local codes. Contact your dryer. Parts needed :
Parts supplied...
Installation Instruction - Page 4
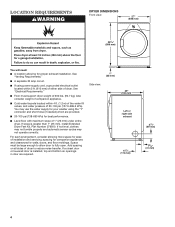
...water pressure of 200 lbs. (90.7 kg). Add spacing on all sides of installation and servicing; LOCATION REQUIREMENTS
DRYER DIMENSIONS Front view:
27" (686 mm)
35 3/8"
(899 mm)
You will need:
■■ ...provided.
■■ 20-100 psi (138-690 kPa) for ease of dryer to fully open. Space must support dryer weight of 20-100 psi (137.9-689.6 kPa). See "Venting Requirements."
&#...
Installation Instruction - Page 5

.../8" (1197 mm)
■■ Additional spacing should be considered on all sides of the dryer to reduce noise transfer.
■■ For closet installation, with tested spacing of 0" (0... times. Louvered doors with elbow. See "Venting Requirements." Lower temperatures may cause dryer not to water, weather, or at end of automatic sensor cycles, resulting in .2 (155 cm2)
1" ...
Installation Instruction - Page 6
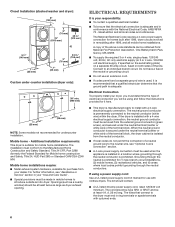
...is adequate and in conformance with a 3-wire electrical supply connection. Openings (such as dryer exhaust opening. The National Electrical Code requires a 4-wire power supply connection for purchase ...: ■■ Metal exhaust system hardware, available for homes built after 1996, dryer circuits involved in a location where grounding through the neutral conductors. latest edition and ...
Installation Instruction - Page 7

... into leg holes by a white cover.
GROUNDING INSTRUCTIONS
� For a grounded, cord-connected dryer: This dryer must be :
■■ Flexible armored cable or nonmetallic sheathed copper cable (with ground wire... by a qualified electrician. The plug must be either green or bare.
Slide the dryer until diamond marking is properly installed and grounded in a risk of NEMA Type 10-...
Installation Instruction - Page 9

... wire (E) and neutral wire (white or center) (C) of 3-wire connections. Connect ground wire
4-wire receptacle (NEMA type 14-30R)
4-prong plug
Spade terminals with the dryer cabinet and be in a horizontal position.
E B
A
Put power supply cord through the strain relief.
Connect neutral ground wire and neutral wire. The strain relief should...
Installation Instruction - Page 14
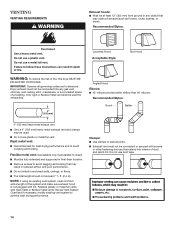
...305 mm) from entire length of the system and make sure exhaust hood is not plugged with rigid metal or flexible metal vents. Dryer exhaust must not be fully extended and supported in ... clamps may result in reduced airflow and poor performance.
■■ Do not install in final dryer location.
■■ Remove excess to avoid sagging and kinking that
may obstruct exhaust (such as...
Installation Instruction - Page 16

... drying times and increased energy usage. To determine maximum exhaust length, add one 90º turn inside the dryer. Install Vent System
1.
Avoid 90° turns.
Secure vent to dryer location using elbows or making turns, allow as much room as possible. Exhaust systems longer than those specified will:
■■ Shorten life...
Installation Instruction - Page 18

... level for leaks around "Y" connector, faucets, and hoses. Check for leaks
Move dryer to existing vent, make sure vent is in dryer. After dryer is clean. Connect Vent
1. Check that the water faucets are turned on cold water faucet
2. Turn on .
7. Move dryer to final location
Check that vent is secured to back. Avoid crushing...
Installation Instruction - Page 19
...make sure all of the water system, which will go back through the water system in a hard water area, use wrench to
remove any tape remaining on Power. q Check that you live in the dryer... or Service" section in a running or "On" position. • Start button has been pushed firmly. • Dryer is plugged into a grounded
outlet. Troubleshooting
See your "Use and Care Guide...
Similar Questions

Dryer Will Not Start
last night I started the dryer and went to bed, upon waking the clothes were still wet and it appear...
last night I started the dryer and went to bed, upon waking the clothes were still wet and it appear...
(Posted by madigonz3 7 years ago)

Why Is My Amana Ned4600yq1 Dryer Getting Too Hot?
After a few minutes drying the dryer starts smelling hot and it is really hot and is even getting th...
After a few minutes drying the dryer starts smelling hot and it is really hot and is even getting th...
(Posted by jsmh9198 8 years ago)

Model:yned7300ww2
HELLO MY AMANA DRYER IS NOT HEATING. I checked the elements and fuse. There is continuty in both ite...
HELLO MY AMANA DRYER IS NOT HEATING. I checked the elements and fuse. There is continuty in both ite...
(Posted by FLORENCEJLM777 9 years ago)

We Have An Amana Natural Gas Clothes Drier. It Is Not Heating.
Have an Amana Natural Gas Dryer, Model LG8319W2 Tring to figure out why it is not heating.
Have an Amana Natural Gas Dryer, Model LG8319W2 Tring to figure out why it is not heating.
(Posted by pbshank 10 years ago)

Tandem 7300 Blows Its Thermal Resistor...why? Has Done It Three Times.
dryer blowes its thermal resistor and shuts dryer down. had it replaced three times, after being rep...
dryer blowes its thermal resistor and shuts dryer down. had it replaced three times, after being rep...
(Posted by wmeleach 10 years ago)