Acer X1200 ED5200A Support Question
Acer X1200 ED5200A Support Question
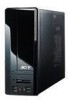
Find answers below for this question about Acer X1200 ED5200A - Aspire - 3 GB RAM.Need a Acer X1200 ED5200A manual? We have 1 online manual for this item!
Question posted by sk5ffex5 on June 3rd, 2011
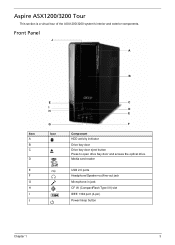
How To Remove The Hard Disk Acer Aspire X1200
Current Answers
Answer #1: Posted by bpshbp on June 3rd, 2011 8:26 AM

Member since:
November 18th, 2010 Points: 130,470

-
- 1
Review the contents of the hard drive and select any files you wish to transfer over to the new drive. Copy the selected files over to an external hard drive or burn them onto a blank CD or DVD. Eject any installed discs from the optical drive.
- 2
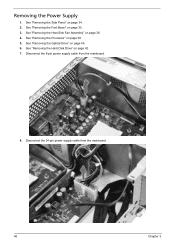
Exit any currently active applications and shut down the computer. Disconnect the power cord from the port on the rear of the computer's case. Unplug all cables attached to the computer's front and rear panels.
- 3
Inspect the rear panel of the computer and note the location of the interface ports. Remove the screws installed in the side panel located opposite of the interface ports. Slide the side panel towards the rear of the computer case, then lift the panel upwards until it comes free. Touch a nearby metal surface, such as the interior of the computer case, to discharge any static electricity.
- 4
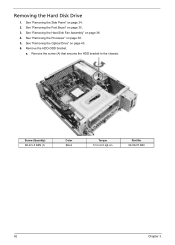
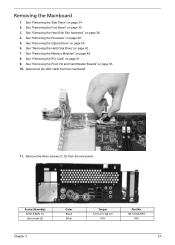
Unplug the power and data cables from the rear panel of the installed hard drive. Slide the hard drive frame free of the computer case. Separate the drive rails from the hard drive and hard drive frame. Remove the hard drive from the frame.
- 5
Examine the jumper configuration on the rear of the hard drive. Configure the replacement hard drive in a similar manner. Install the new hard drive in the frame. Reinstall the previously removed drive rails. Connect the power and data cables to the rear panel of the new hard drive. Reinstall the hard drive frame in the computer case.
- 6
Insert the tabs on the bottom edge of the side panel into slots on the bottom edge of the computer case. Slide the side panel towards the front of the computer. Reinstall the previously removed screws in the rear of the side panel.
- 7
Reconnect all of the computer's cables and turn on the power. Insert the operating system installation disc and follow the on-screen instructions. Install any required applications. Transfer over the data you previously saved onto an external hard drive or blank CD or DVD.
- 1
Related Acer X1200 ED5200A Manual Pages
Similar Questions


