Acer Aspire X1700 Support Question
Acer Aspire X1700 Support Question
Find answers below for this question about Acer Aspire X1700.Need a Acer Aspire X1700 manual? We have 1 online manual for this item!
Question posted by bitdann on May 3rd, 2014
How To Remove Hdd On Acer X1700
The person who posted this question about this Acer product did not include a detailed explanation. Please use the "Request More Information" button to the right if more details would help you to answer this question.
Current Answers
Related Acer Aspire X1700 Manual Pages
Aspire X1700 / Veriton X270 Service Guide - Page 1
for more information,
please refer to http://csd.acer.com.tw
PRINTED IN TAIWAN Acer Aspire X1700 and Veriton X270
Service Guide
Service guide files and updates are available on the ACER/CSD web;
Aspire X1700 / Veriton X270 Service Guide - Page 7
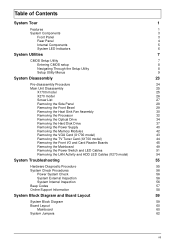
... Optical Drive
34
Removing the Hard Disk Drive
37
Removing the Power Supply
40
Removing the Memory Modules
42
Removing the VGA Card (X1700 model)
43
Removing the TV Tuner Card (X1700 model)
44
Removing the Front I/O and Card Reader Boards
45
Removing the Mainboard
49
Removing the Power Switch and LED Cables
51
Removing the LAN Activity and HDD LED Cables...
Aspire X1700 / Veriton X270 Service Guide - Page 9
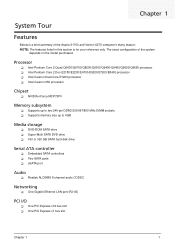
... LAN port (RJ-45)
PCI I/O
One PCI Express x16 bus slot One PCI Express x1 bus slot
Chapter 1
1 The exact configuration of the Aspire X1700 and Veriton X270 computer's many feature: NOTE: The features listed in this section is a brief summary of the system
depends on the model purchased.
Chapter...
Aspire X1700 / Veriton X270 Service Guide - Page 11

.../Speaker-out/line-out jack
8
Microphone-in jack
9
IEEE 1394 port (4-pin)
10
USB 2.0 port
11
X1700 model: Power button/power indicator
X270 model: LAN activity indicator
12
HDD activity indicator
13
Power button/power indicator
Chapter 1
3 Front Panel
X1700 model
X270 model
No. System Components
This section includes a virtual tour of the...
Aspire X1700 / Veriton X270 Service Guide - Page 13
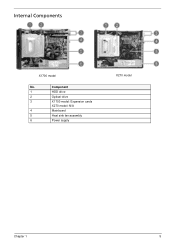
Internal Components
X1700 model
No. Component
1
HDD drive
2
Optical drive
3
X1700 model: Expansion cards
X270 model: N/A
4
Mainboard
5
Heat sink fan assembly
6
Power supply
X270 model
Chapter 1
5
Aspire X1700 / Veriton X270 Service Guide - Page 31
...
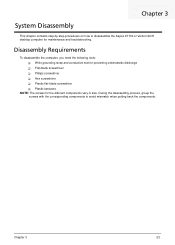
NOTE: The screws for maintenance and troubleshooting. Chapter 3
23 During the disassembly process, group the screws with the corresponding components to disassemble the Aspire X1700 or Veriton X270 desktop computer for the different components vary in size.
System Disassembly
Chapter 3
This chapter contains step-by-step procedures on how to avoid mismatch when...
Aspire X1700 / Veriton X270 Service Guide - Page 33
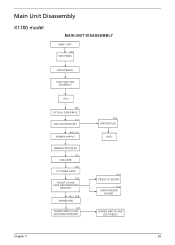
Main Unit Disassembly
X1700 model
MAIN UNIT DISASSEMBLY
MAIN UNIT
Ax2 SIDE PANEL
FRONT BEZEL
HEAT SINK FAN ASSEMBLY
CPU
Bx1 OPTICAL DISK DRIVE
Cx1 HDD-ODD BRACKET
Ax3, Cx1 POWER SUPPLY
MEMORY MODULES
Ex1 VGA CARD
Ex1 TV TUNER CARD
Dx2 FRONT I/O AND CARD READER BOARD
BRACKET
Bx1, Cx6 MAINBOARD
...
Aspire X1700 / Veriton X270 Service Guide - Page 36

... from the server and put it aside for reinstallation later. Remove the two screws (A) located on page 24. 2. Slide the side panel toward the back of the chassis until the tabs on the cover disengage with the slots on the chassis.
4. X1700 model
X270 model
Screw (Quantity) #6-32 L5 BZN (2)
Color Black...
Aspire X1700 / Veriton X270 Service Guide - Page 37

Pull the bezel away from the chassis interior. Removing the Front Bezel
1. X1700 model 3. X270 model
X1700 model
X270 model
Chapter 3
29 Remove the side panel. Release the front bezel retention tabs from the chassis. Refer to the previous section for instructions. 2.
Aspire X1700 / Veriton X270 Service Guide - Page 38
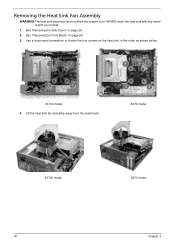
... Side Panel" on the heat sink, in the order as shown below. X1700 model 4. Use a long-nosed screwdriver to loosen the four screws on page 28. 2. Lift the heat sink fan assembly away from the mainboard. See "Removing the Front Bezel" on .
NEVER touch the heat sink with any metal or with...
Aspire X1700 / Veriton X270 Service Guide - Page 39
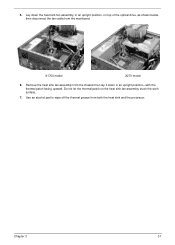
5. Remove the heat sink fan assembly from the chassis then lay it down the heat sink fan assembly, in an upright position-with the thermal... thermal patch on top of the optical drive, as shown below, then disconnect the fan cable from both the heat sink and the processor. X1700 model
X270 model
6. Use an alcohol pad to wipe off the thermal grease from the mainboard. Chapter 3
31
Aspire X1700 / Veriton X270 Service Guide - Page 42
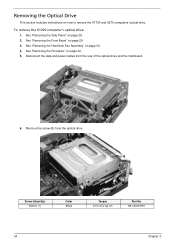
... Side Panel" on page 30. 4. To remove the X1700 computer's optical drive:
1. See "Removing the Heat Sink Fan Assembly" on page 28. 2. Screw (Quantity) M3xL5 (1)
Color Black
Torque 5.5 to remove the X1700 and X270 computers' optical drive. Disconnect the data and power cables from the optical drive. Remove the screw (B) from the rear of the optical...
Aspire X1700 / Veriton X270 Service Guide - Page 45
... up and turn it over. Remove the HDD-ODD bracket. X1700 model
Screw (Quantity) #6-32 L6 BZN (1)
Color Silver
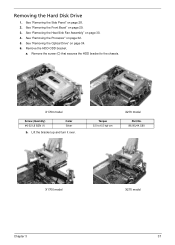
b. See "Removing the Processor" on page 30. 4. Removing the Hard Disk Drive
1. See "Removing the Side Panel" on page 34. 6. See "Removing the Optical Drive" on page 28. 2.
Remove the screw (C) that secures the HDD bracket to 6.5 kgf-cm
X270...
Aspire X1700 / Veriton X270 Service Guide - Page 47
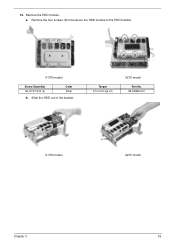
Remove the four screws (D) that secure the HDD module to 6.5 kgf-cm
X270 model
Part No. 86.5A5B6.012
X1700 model
X270 model
Chapter 3
39 Remove the HDD module. a. X1700 model
Screw (Quantity) #6-32*3/16 NI (4)
Color Silver
b. 10.
Slide the HDD out of the bracket. Torque 5.5 to the HDD bracket.
Aspire X1700 / Veriton X270 Service Guide - Page 48
... Disk Drive" on page 32. 5. X270 model
Screw (Quantity) #6-32 L6 BZN (1)
Color Silver
Torque 5.7 to the chassis. See "Removing the Processor" on page 37. 7. X1700 model 8. See "Removing the Optical Drive" on page 28. 2. Remove the screw (C) that secures the power supply to 6.3 kgf-cm
Part No. 86.00J44.C60
40
Chapter 3 See...
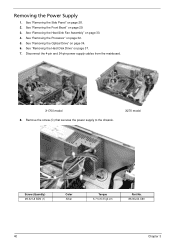
Aspire X1700 / Veriton X270 Service Guide - Page 49

Torque 5.5 to the rear panel. Screw (Quantity) #6-32 L5 BZN (3)
Color Black
10.
Lift the power supply module out of the chassis. 9.
Remove the three screws (A) that secure the power supply to 6.5 kgf-cm
Part No. 86.00J07.B60
X1700 model
X270 model
Chapter 3
41
Aspire X1700 / Veriton X270 Service Guide - Page 55
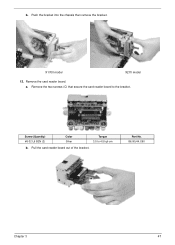
Remove the two screws (C) that secure the card reader board to 4.5 kgf-cm
b. Pull the card reader board out of the bracket. Push the bracket into the chassis then remove the bracket. Part No. 86.00J44.C60
Chapter 3
47 Remove the card reader board.
Screw (Quantity) #6-32 L6 BZN (2)
Color Silver
Torque 3.5 to the bracket.
X1700 model
X270 model
12. a. b.
Aspire X1700 / Veriton X270 Service Guide - Page 62
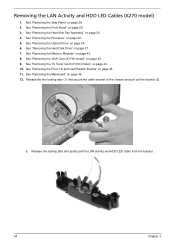
... cable bracket to the chassis and pull out the bracket (2). See "Removing the Mainboard" on page 43. 9. See "Removing the VGA Card (X1700 model)" on page 49. 12. Release the locking tabs and gently pull the LAN activity and HDD LED cable from the bracket.
54
Chapter 3 c. See "Removing the Side Panel" on page 28. 2.
Aspire X1700 / Veriton X270 Service Guide - Page 66
... Announcement Bulletins (TABs) For these purposes, we have any suggestions or comments, please do not hesitate to communicate these to facilitate a hassle-free downloading of Acer notebook, desktop and server models including:
Service guides for all of our technical materials. We are a distributor, dealer, ASP or TPM, please refer your technical...
Aspire X1700 / Veriton X270 Service Guide - Page 72
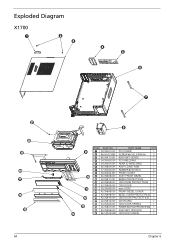
Exploded Diagram
X1700
ITEM PART NO. 33.3V001.001 86.00J07.B60 60.3V411.001 34.3V002.001 34....
1
ASSY LCASE-ASM
1
RUBBER 80X10X5.5
2
FRONT IO BKT
1
ASSY FRONT BEZEL
1
BEZEL PROTECTFILM
1
ODD KNOB PROTECTFILM 1
ODD DOOR
1
acer LOGO
1
FRONT BEZEL COVER
1
BEZEL COVER PROTECTFILM 1
ODD DOOR PROTECTFILM 1
DOOR ARM
1
ODD DOOR SPRING
1
POWER BUTTOM PROTECTFILM 1
ASSY BKT ODD...
Similar Questions

Cannot Remove Hdd Password On Acer Veriton
what is the proper key sequence for restoring my Acer Veriton N281G
what is the proper key sequence for restoring my Acer Veriton N281G
(Posted by autoinsurer 9 years ago)


