Get support for Acer Aspire V5-431

Acer Aspire V5-431 Support Question

Acer Aspire V5-431 Support Question

Find answers below for this question about Acer Aspire V5-431.
Need a Acer Aspire V5-431 manual? We have 1 online manual for this item!
Question posted by llamp84795 on June 4th, 2014

How Do I Remove The Back Of My Laptop? I Removed All Screws. But It Won't Come O

I need to replace the hard drive.

Current Answers

Answer #1: Posted by kshitij24 on June 4th, 2014 11:34 AM
This answer was accepted by the poster of the original question.
kshitij24

Member since:
November 22nd, 2013

Points: 62,680
1,100
points
hello !

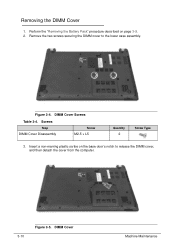
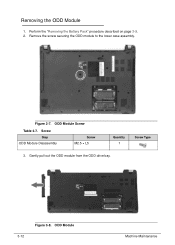
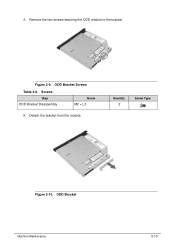
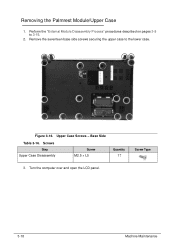
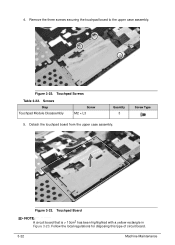
you cannot simply remoe the back of your laptop. you will need to tkke of the disk tray first, then you will have to get rid of the keyboard. then you will eventually find your way to the base of the body where it can be totally saperated.

please support my effort of research by accepting the solution to your question . It will be very kind and helpful of you to do so. For more accurate information please submit more details here and I will get

right back to you.
thankyou for asking!


Will give my best in what I can
@kshitijrathour
Answer #2: Posted by BusterDoogen on June 4th, 2014 10:31 AM
BusterDoogen

Member since:
October 30th, 2011

Points: 28,565,437
100
points
I can't find a disassembly video but go here  for the SM to guide you.

I hope this is helpful to you!

Please respond to my effort to provide you with the best possible solution by using the "Acceptable Solution" and/or the "Helpful" buttons when the answer has proven to be helpful. Please feel free to submit further info for your question, if a solution was not provided. I appreciate the opportunity to serve you!

Related Acer Aspire V5-431 Manual Pages

Acer V5-471 Notebook Service Guide - Page 6

... Machine Disassembly and Replacement 3-5 Recommended Equipment 3-5 Replacement Requirements 3-5 Pre-disassembly Instructions 3-6 Disassembly Process 3-7 External Module Disassembly Process 3-8 External Modules Disassembly Flowchart 3-8 Removing the Battery Pack 3-9 Removing the DIMM Cover 3-10 Removing the DIMM Modules 3-11 Removing the ODD Module 3-12 Removing the Keyboard 3-15...
Acer V5-471 Notebook Service Guide - Page 83

... paths and positioning may not represent the final product color or configuration. During the disassembly process, group the screws with the corresponding components to be applied during the replacement and reassembly process. During the removal and installation of the components, ensure all available cable channels and clips are used and that the cables...
Acer V5-471 Notebook Service Guide - Page 85

...want to any of the hardware components. Table 3-1. Main Screw List Screw M2 x L3 M2 x L3 (black) M2.5 x L5 M2 x 3 Thermal Screw Quantity 10 10 27 1 5 Acer Part Number 86....9A552.3R0 86.00J40.323 86.00J51.535 N/A Machine Maintenance 3-7 Observe the order of the sequence to avoid damage to remove the main board, you must first remove...
Acer V5-471 Notebook Service Guide - Page 88

..., and then detach the cover from the computer. 3-10 Figure 3-5. Insert a non-marring plastic scribe on page 3-9. 2. Figure 3-4. Screws Step DIMM Cover Disassembly Screw M2.5 × L5 Quantity 2 Screw Type 3. DIMM Cover Machine Maintenance Perform the "Removing the Battery Pack" procedure described on the base door's notch to the lower case assembly. DIMM Cover...
Acer V5-471 Notebook Service Guide - Page 90

... 3-7. ODD Module Machine Maintenance ODD Module Screw Table 3-7. Screw Step ODD Module Disassembly Screw M2.5 × L5 Quantity 1 Screw Type 3. Removing the ODD Module 0 1. Remove the screw securing the ODD module to the lower case assembly. Gently pull out the ODD module from the ODD drive bay. 3-12 Figure 3-8. Perform the "Removing the Battery Pack" procedure described on...
Acer V5-471 Notebook Service Guide - Page 91

4. Quantity 2 Screw Type Figure 3-10. Figure 3-9. Detach the bracket from the module. ODD Bracket Machine Maintenance 3-13 Screws Step ODD Bracket Disassembly Screw M2 × L3 5. ODD Bracket Screws Table 3-9. Remove the two screws securing the ODD module to the bracket.
Acer V5-471 Notebook Service Guide - Page 93

... procedure described on page 3-9. 2. Remove the screw securing the keyboard to use excessive force when removing. 1. Figure 3-12. Perform the "Removing the Battery Pack" procedure described on page 3-12. 3. Upper Case Screw - Take care not to the lower case. Screw Step Keyboard Disassembly Screw M2.5 × L5 Quantity 1 Screw Type 4. Removing the Keyboard 0 + IMPORTANT: The...
Acer V5-471 Notebook Service Guide - Page 96

Upper Case Screws - Screws Step Upper Case Disassembly Screw M2.5 × L5 Quantity 17 Screw Type 3. Remove the seventeen base side screws securing the upper case to 3-15. 2. Turn the computer over and open the LCD panel. 3-18 Machine Maintenance Perform the "External Module Disassembly Process" procedures ...
Acer V5-471 Notebook Service Guide - Page 97

Remove the three screws securing the upper case to the lower case assembly. Figure 3-18. Top Side Table 3-18. Release the connector latches from the mainboard (1), then disconnect the power button and touchpad cables (2). Power Button and Touchpad Cables 5. Upper Case Screws - Screws Step Upper Case Disassembly Screw M2.5 × L5 Quantity 3 Screw Type Machine Maintenance 3-19...
Acer V5-471 Notebook Service Guide - Page 100

... of circuit board. 3-22 Machine Maintenance Touchpad Board NOTE: NOTE: A circuit board that is > 10cm2 has been highlighted with a yellow rectangle in Figure 3-23. 4. Touchpad Screws Table 3-22. Detach the touchpad board from the upper case assembly. Remove the three screws securing the touchpad board to the upper case assembly.
Acer V5-471 Notebook Service Guide - Page 101

Remove the screw securing the power button board to the upper case. Figure 3-25. Screw Step Power Button Board Disassembly Screw M2 × L3 Machine Maintenance Quantity 1 Screw Type 3-23 Figure 3-24. Release the connector latch from the power button board (1), then disconnect the power button cable (2). Power Button Board Screw Table 3-25. Power Button Cable 3. Turn...
Acer V5-471 Notebook Service Guide - Page 104

... machine reassembly, note which cable color corresponds to the mainboard. Figure 3-30. WLAN Module Screw Table 3-30. Perform the "Removing the Palmrest Module/Upper Case" procedure described on page 3-18. 2. Screw Step WLAN Module Disassembly Screw M2 × L3 3-26 Quantity 1 Screw Type Machine Maintenance Figure 3-29. Unplug the two (2) antenna cables from the WLAN...
Acer V5-471 Notebook Service Guide - Page 107

.... Mainboard Machine Maintenance 3-29 Figure 3-35. Screw Step Mainboard Disassembly Screw M2 × L3 Quantity 1 Screw Type NOTE: NOTE: A circuit board that is > 10cm2 has been highlighted with a yellow rectangle in Figure 3-34. Follow the local regulations for disposing this type of circuit board. 10. 9. Remove the screw securing the mainboard to the lower case...
Acer V5-471 Notebook Service Guide - Page 109

Fan Cable 3. Machine Maintenance Quantity 5 Screw Type - 3-31 Perform the "Removing the Mainboard" procedure described on the preceding on Figure 3-38. Thermal Module Screws Table 3-38. Screws Step Thermal Module Disassembly Screw - Follow the screw sequence indicated on page 3-28. 2. Disconnect the thermal module fan cable from the mainboard. Figure 3-37. Figure 3-38. ...
Acer V5-471 Notebook Service Guide - Page 112

... battery connector to the lower case assembly. Screws Step Battery Connector Disassembly Screw M2.5 × L5 Quantity 2 Screw Type 3. Detach the battery connector from the lower case assembly. 3-34 Figure 3-42. Perform the "Removing the Mainboard" procedure described on the preceding on page 3-28. 2. Battery Connector Screws Table 3-41. Figure 3-41. Battery Connector Machine...
Acer V5-471 Notebook Service Guide - Page 113

... Step Speakers Disassembly Screw M2 × L3 Machine Maintenance Quantity 4 Screw Type 3-35 Detach the speaker cables from lower case assembly. Figure 3-44. Removing the Speaker Module 0 1. Perform the "Removing the Mainboard" procedure described on page 3-28. 2. Figure 3-43. Remove the four screws securing the Speaker Module to the lower case assembly. Speaker Screws Table 3-44.
Acer V5-471 Notebook Service Guide - Page 115

Gently pull out the WLAN antenna cables from the latches. Removing the LCD Module 0 1. Figure 3-46. WLAN Antenna Cables - LCD Module Hinge Screws Table 3-47. Screws Step LCD Module Disassembly Screw M2 ×3 M2.5 ×L5 Machine Maintenance Quantity 1 1 Screw Type 3-37 Latches and Adhesive Tapes 3. remove the adhesive tapes securing the cables and release the cables...
Acer V5-471 Notebook Service Guide - Page 120

... LCD Bezel" procedure described on page 3-40. 2. Remove the four screws securing the LCD panel to the LCD back cover. Screws Step LCD Panel Disassembly Screw M2 x L3 Quantity 4 Screw Type 3. LCD Cable Machine Maintenance Release the LCD cable from the latch located near the hinge (1), then gently lift the LCD panel (2). 3-42 Figure 3-54...
Acer V5-471 Notebook Service Guide - Page 122

... Bracket Disassembly Screw M2 × L3 3. Quantity 6 Screw Type Figure 3-58. Removing the LCD Brackets 0 1. Perform the "Removing the LCD Panel" procedure described on page 3-42. 2. LCD Bracket Screws Table 3-57. Remove the six screws securing the left and right LCD brackets to the LCD back cover. LCD Bracket 3-44 Machine Maintenance Figure 3-57. Detach the LCD...
Acer V5-471 Notebook Service Guide - Page 132

... the Speaker Module to the lower case assembly using four screws. Figure 3-76. Figure 3-75. Speakers 3. Reinstalling the Speaker Module 0 1. Perform the "Removing the Mainboard" procedure described on page 3-28. 2. Place the Speaker Module into the lower case assembly. Screws Step Speakers Reassembly Screw M2 × L3 Quantity 4 Screw Type 3-54 Machine Maintenance Speaker...

Similar Questions

Acer Ao725-0845 Battery Removal
How can I remove the battery from Acer AO 725-0845
(Posted by moyege 10 years ago)
How To Remove Bios Password
When i press power boutan a new screen is comeing in lcd password /unlock key unlock hint key 45d6...
(Posted by pandeyavanish15 11 years ago)
Ask a New Question
Use the box below to post a new question about this Acer product .
Points & Prizes
  • You can earn points for nearly everything you do on HelpOwl.com
  • You can trade in those points for gift cards at leading retailers such as Amazon.com and Walmart
  • It's that simple!
See How it Works
Create a Free Account

Acer Manuals

Find free Acer Aspire V5-431 manuals and user guides available at ManualOwl.com. Try out our unique manual viewer allowing you to interact with manuals from directly within your browser!

Acer Reviews

View thousands of Acer user reviews and customer ratings available at ReviewOwl.com.

Contact Information

Complete Acer customer service contact information including steps to reach representatives, hours of operation, customer support links and more from ContactHelp.com.

Scoreboard Ratings

See detailed Acer customer service rankings, employee comments and much more from our sister site.

Acer Recalls

Find comprehensive Acer recall information updated hourly on RecallOwl.com.