Acer Aspire E1-531 Support Question
Acer Aspire E1-531 Support Question
Find answers below for this question about Acer Aspire E1-531.Need a Acer Aspire E1-531 manual? We have 1 online manual for this item!
Question posted by per7817 on June 26th, 2014
How Do I I Push Out The Cdrw
how do i push out the cdrw
Current Answers
Answer #1: Posted by BusterDoogen on June 26th, 2014 10:05 AM
BusterDoogen

Member since:
October 30th, 2011 Points: 28,565,447

Member since:
October 30th, 2011 Points: 28,565,447
take a straightened paper clip & locate the pinhole on or around the tray faceplate. push it in & the tray will eject just enough that you can gently pull it out.
I hope this is helpful to you!
Please respond to my effort to provide you with the best possible solution by using the "Acceptable Solution" and/or the "Helpful" buttons when the answer has proven to be helpful. Please feel free to submit further info for your question, if a solution was not provided. I appreciate the opportunity to serve you!
Related Acer Aspire E1-531 Manual Pages
Acer Aspire E1-531 and E1-571 Notebook Service Guide - Page 4
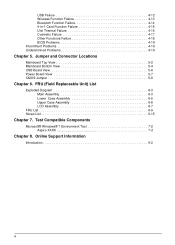
... 6-6 LCD Assembly 6-7
FRU List 6-9 Screw List 6-15
Chapter 7. Online Support Information
Introduction 8-2
iii Test Compatible Components
Microsoft® Windows® 7 Environment Test 7-2 Aspire XXXX 7-2
Chapter 8. Jumper and Connector Locations
Mainboard Top View 5-2 Mainboard Bottom View 5-4 USB Board View 5-6 Power Board View 5-7 CMOS Jumper 5-8
Chapter 6. USB Failure...
Acer Aspire E1-531 and E1-571 Notebook Service Guide - Page 44
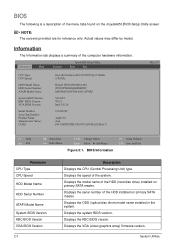
... Number: Product Name: Manufacturer Name: UUID:
Intel (R) Pentium (R) CPU B970 @ 2.30GHz 2.30GHz
Hitachi HTS545032B9A300 091023PBH306Q6DBBJDV MATSHITADVD-RAM UJ870BJ
V0.22F1 V0.21 Intel V2126
123456789
Aspire E1 Acer F0CC9FDD27BF11E187CADC0EA129FAC0
Rev. 3.7
F1 Help Esc Exit
Select Item Select Menu
F5/F6 Change Values Enter Select Sub-Menu
Figure 2:1. BIOS Information
F9 Setup Defaults...
Acer Aspire E1-531 and E1-571 Notebook Service Guide - Page 76
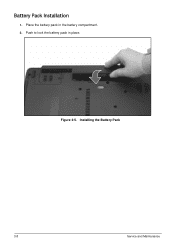
Place the battery pack in place.
Installing the Battery Pack
3-8
Service and Maintenance Push to lock the battery pack in the battery compartment. 2. Figure 3:5. Battery Pack Installation
1.
Acer Aspire E1-531 and E1-571 Notebook Service Guide - Page 77
Removing the Dummy Card
Service and Maintenance
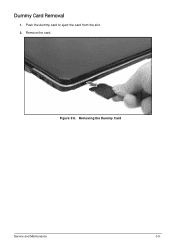
3-9 Dummy Card Removal
1. Figure 3:6. Push the dummy card to eject the card from the slot. 2.
Remove the card.
Acer Aspire E1-531 and E1-571 Notebook Service Guide - Page 78
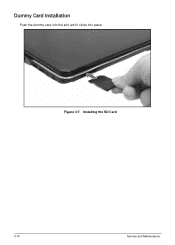
Installing the SD Card
3-10
Service and Maintenance Figure 3:7. Dummy Card Installation
Push the dummy card into the slot until it clicks into place.
Acer Aspire E1-531 and E1-571 Notebook Service Guide - Page 81
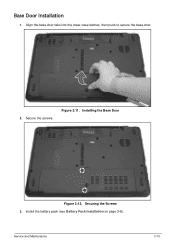
Figure 3:11.
Securing the Screws 3. Installing the Base Door
Figure 3:12.
Base Door Installation
1. Install the battery pack (see Battery Pack Installation on page 3-8). Secure the screws. Service and Maintenance
3-13 Align the base door tabs into the lower case latches, then push to secure the base door.
2.
Acer Aspire E1-531 and E1-571 Notebook Service Guide - Page 86
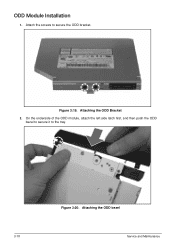
On the underside of the ODD module, attach the left side latch first, and then push the ODD bezel to secure it to secure the ODD bracket. Figure 3:20.
Attaching the ODD bezel
3-18
Service and Maintenance Attach the screws to the tray. Figure 3:19. Attaching the ODD Bracket
2. ODD Module Installation
1.
Acer Aspire E1-531 and E1-571 Notebook Service Guide - Page 89
Service and Maintenance
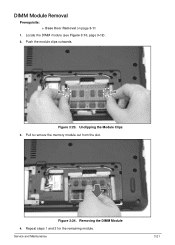
3-21 Unclipping the Module Clips 3. Repeat steps 1 and 2 for the remaining module. DIMM Module Removal
Prerequisite: Base Door Removal on page 3-11
1. Figure 3:23. Removing the DIMM Module
4. Pull to remove the memory module out from the slot.
Push the module clips outwards.
Figure 3:24. Locate the DIMM module (see Figure 3:10, page 3-12). 2.
Acer Aspire E1-531 and E1-571 Notebook Service Guide - Page 90
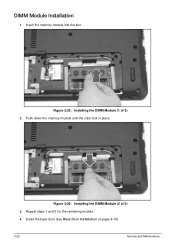
Installing the DIMM Module (1 of 2) 3. Repeat steps 1 and 2 for the remaining module. 4. Install the base door (see Base Door Installation on page 3-13).
3-22
Service and Maintenance Figure 3:25. Installing the DIMM Module (2 of 2) 2. Push down the memory module until the clips lock in place.
Figure 3:26. DIMM Module Installation
1. Insert the memory module into the slot.
Acer Aspire E1-531 and E1-571 Notebook Service Guide - Page 92
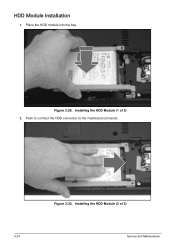
Place the HDD module into the bay.
Figure 3:29. Push to connect the HDD connector to the mainboard connector.
Installing the HDD Module (2 of 2) 2. Installing the HDD Module (1 of 2)
3-24
Service and Maintenance Figure 3:30. HDD Module Installation
1.
Acer Aspire E1-531 and E1-571 Notebook Service Guide - Page 98

... the keyboard, pull the keyboard to slightly release the keyboard from the upper case. Keyboard Removal
Prerequisite:
Battery Pack Removal on page 3-7
1. Using a plastic pry, push the six (6) latches circled below to detach it from the upper case. Figure 3:38.
Acer Aspire E1-531 and E1-571 Notebook Service Guide - Page 99

3. Figure 3:40. Disconnecting the Keyboard Cable
Service and Maintenance
3-31 Under the bottom side of the keyboard, push the connector locks upwards to remove the keyboard cable connector from the mainboard connector.
Acer Aspire E1-531 and E1-571 Notebook Service Guide - Page 100
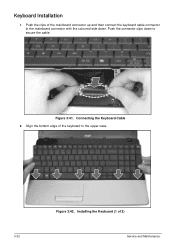
Figure 3:41.
Installing the Keyboard (1 of the keyboard to secure the cable. Push the connector clips down . Connecting the Keyboard Cable 2. Align the bottom edge of 2)
3-32
Service and Maintenance Keyboard Installation
1. Push the clips of the mainboard connector up and then connect the keyboard cable connector to the mainboard connector with the...
Acer Aspire E1-531 and E1-571 Notebook Service Guide - Page 101

Installing the Keyboard (2 of the upper case.
3. Figure 3:43. Install the battery (see Battery Pack Installation on page 3-8). Push to secure the keyboard to the latches of 2) 4. Service and Maintenance
3-33
Acer Aspire E1-531 and E1-571 Notebook Service Guide - Page 102
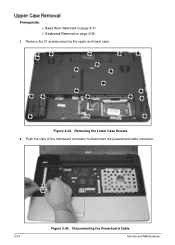
Remove the 21 screws securing the upper and lower case. Push the clips of the mainboard connector to disconnect the powerboard cable connector. Figure 3:44.
Figure 3:45. Removing the Lower Case Screws 2. Disconnecting the Powerboard Cable
3-34
Service and Maintenance Upper Case Removal
Prerequisite: Base Door Removal on page 3-11 Keyboard Removal on page 3-30
1.
Acer Aspire E1-531 and E1-571 Notebook Service Guide - Page 106
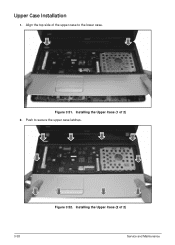
Push to the lower case. Figure 3:52. Align the top side of the upper case to secure the upper case latches. Installing the Upper Case (1 of 2)
3-38
Service and Maintenance
Upper Case Installation
1. Installing the Upper Case (2 of 2) 2.
Figure 3:51.
Acer Aspire E1-531 and E1-571 Notebook Service Guide - Page 107
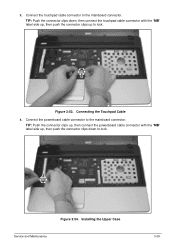
... connector clips up, then connect the powerboard cable connector with the "MB" label side up, then push the connector clips up , then push the connector clips down , then connect the touchpad cable connector with the "MB" label side up to lock. 3.
Connect the powerboard cable connector to the ...
Acer Aspire E1-531 and E1-571 Notebook Service Guide - Page 109
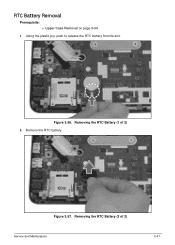
Using the plastic pry, push to release the RTC battery from its slot. Removing the RTC Battery (1 of 2)
Service and Maintenance
3-41 Remove the RTC battery. Figure 3:57.
Figure 3:56. Removing the RTC Battery (2 of 2) 2.
RTC Battery Removal
Prerequisite: Upper Case Removal on page 3-34
1.
Acer Aspire E1-531 and E1-571 Notebook Service Guide - Page 203
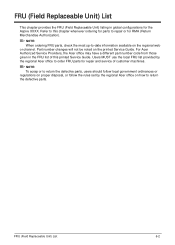
... local FRU list provided by the regional Acer office on how to repair or for repair and service of this chapter whenever ordering for the Aspire XXXX. NOTE: When ordering FRU parts, check the most up-to order FRU parts for RMA (Return Merchandise Authorization).
FRU (Field Replaceable Unit) List
6-2
NOTE...
Acer Aspire E1-531 and E1-571 Notebook Service Guide - Page 218
... Li-Ion 3S2P SONY 6 cell 4400mAh Main COMMON ID:AS10D41
BT.00603.124 BT.00604.049
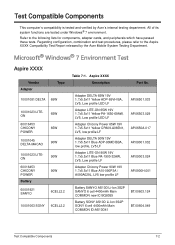
Test Compatible Components
7-2 Microsoft® Windows® 7 Environment Test
Aspire XXXX
Vendor Adapter
Type
10001081 DELTA 65W
10001023 LITEON
60016453 CHICONY POWER
10001045 DELTA-MACAO
65W 65W 90W
10001023 LITEON
60016453 CHICONY POWER
Battery
60001921...
Similar Questions

My Acer Laptop Aspire E1-531 Is Locked,i Can Not Enter A Password So How Do I
unlock it?
unlock it?
(Posted by Stjaczed 9 years ago)

How To Increase The Volume Of My Acer E1-531 Laptop?
How to increase the volume of my laptop Acer E1-531
How to increase the volume of my laptop Acer E1-531
(Posted by parshav27 9 years ago)

Where Is Wifi Button On Acer Laptop Aspire 5542g
(Posted by appolo876 10 years ago)
Manual For Ei-531with Win8
HOW CAN I GET A FREE DOWNLOAD OF THE WIN 8, 32, MANUAL -for my laptop aspire
HOW CAN I GET A FREE DOWNLOAD OF THE WIN 8, 32, MANUAL -for my laptop aspire
(Posted by bajo2 10 years ago)

Acer Laptop Aspire 5749z-4840
Hi, the a,caps lock and shift botton on the key board is not working, what's the problem please
Hi, the a,caps lock and shift botton on the key board is not working, what's the problem please
(Posted by ceelocke76 11 years ago)