
Operating Guide
Page 2
... a Class B digital device, pursuant to which can radiate radio frequency energy and, if not installed and used in the instruction manual. CAUTION: This DVD+VCR employs a Laser System. CAUTION: The apparatus should record requested information here and retain this equipment if an unauthorized change or...cable TV system installer's attention to the point of the cable entry as close to Article 820-40 of certain U.S. Model No XBV443 Serial No 2 The exclamation point within the product's enclosure that the cable ground shall be authorized by method claims of the National...
... a Class B digital device, pursuant to which can radiate radio frequency energy and, if not installed and used in the instruction manual. CAUTION: This DVD+VCR employs a Laser System. CAUTION: The apparatus should record requested information here and retain this equipment if an unauthorized change or...cable TV system installer's attention to the point of the cable entry as close to Article 820-40 of certain U.S. Model No XBV443 Serial No 2 The exclamation point within the product's enclosure that the cable ground shall be authorized by method claims of the National...
Operating Guide
Page 3
... objects have been adhered to avoid injury from over . 7. INTRODUCTION IMPORTANT SAFETY INSTRUCTIONS CAUTION: PLEASE READ AND OBSERVE ALL WARNINGS AND INSTRUCTIONS IN THIS OWNER'S MANUAL. REFER SERVICING TO QUALIFIED SERVICE PERSONNEL ONLY. 1. Unplug this product near a bath tub, wash bowl, kitchen sink, laundry tub, in electric shock or fire hazard...
... objects have been adhered to avoid injury from over . 7. INTRODUCTION IMPORTANT SAFETY INSTRUCTIONS CAUTION: PLEASE READ AND OBSERVE ALL WARNINGS AND INSTRUCTIONS IN THIS OWNER'S MANUAL. REFER SERVICING TO QUALIFIED SERVICE PERSONNEL ONLY. 1. Unplug this product near a bath tub, wash bowl, kitchen sink, laundry tub, in electric shock or fire hazard...
Operating Guide
Page 6
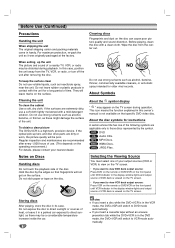
... Use a soft, dry cloth. About the symbol display " " may be a considerable temperature increase inside the car. 6 otes If you insert a disc while the DVD+VCR is not available on Discs Handling discs Do not touch the playback side of your nearest dealer. Notes on that fingerprints will not get... not use volatile liquids, such as there may appear on the TV screen. Do not stick paper or tape on the surface. In this owner's manual is in contact with a clean cloth. Selecting the Viewing Source You must select one of a nearby TV, VCR, or radio may be poor. ...
... Use a soft, dry cloth. About the symbol display " " may be a considerable temperature increase inside the car. 6 otes If you insert a disc while the DVD+VCR is not available on Discs Handling discs Do not touch the playback side of your nearest dealer. Notes on that fingerprints will not get... not use volatile liquids, such as there may appear on the TV screen. Do not stick paper or tape on the surface. In this owner's manual is in contact with a clean cloth. Selecting the Viewing Source You must select one of a nearby TV, VCR, or radio may be poor. ...
Operating Guide
Page 9
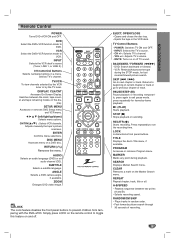
...Adjusts TV's volume. - press repeatedly for fast reverse/forward picture search. SEARCH Displays Marker Search menu. SUBTITLE Selects a subtitle language. ZOOM Enlarges DVD video image. Repeats sequence between the clock, tape counter and tape remaining modes on or off . INPUT Selects the VCR deck's source (Tuner,... LINE 1, or LINE 2). 0-9 numerical buttons Selects numbered options in a menu. Adjusts manually the tape's picture onscreen. MUTE: Turns on the dis- VCR: Rewinds/Advances the tape during playback. LOCK Locks/unlocks front panel buttons...
...Adjusts TV's volume. - press repeatedly for fast reverse/forward picture search. SEARCH Displays Marker Search menu. SUBTITLE Selects a subtitle language. ZOOM Enlarges DVD video image. Repeats sequence between the clock, tape counter and tape remaining modes on or off . INPUT Selects the VCR deck's source (Tuner,... LINE 1, or LINE 2). 0-9 numerical buttons Selects numbered options in a menu. Adjusts manually the tape's picture onscreen. MUTE: Turns on the dis- VCR: Rewinds/Advances the tape during playback. LOCK Locks/unlocks front panel buttons...
Operating Guide
Page 11
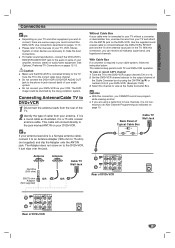
... is connected directly to the phono in jack (record deck) of your amplifier, receiver, stereo or audio/video equipment. Do not connect the DVD+VCR's DVD/VCR AUDIO OUT jack to the TV. With Cable Box If a converter is required in jacks of your audio system. The Adapter does not screw ... connection, you CANNOT record one program while viewing another. If it is a round cable as necessary to make the best connections. Please refer to the manuals of DVD+VCR 11 PREPARATION Connections ips Depending on your TV and other devices as illustrated, it is a 75 ohm coaxial antenna cable.
... is connected directly to the phono in jack (record deck) of your amplifier, receiver, stereo or audio/video equipment. Do not connect the DVD+VCR's DVD/VCR AUDIO OUT jack to the TV. With Cable Box If a converter is required in jacks of your audio system. The Adapter does not screw ... connection, you CANNOT record one program while viewing another. If it is a round cable as necessary to make the best connections. Please refer to the manuals of DVD+VCR 11 PREPARATION Connections ips Depending on your TV and other devices as illustrated, it is a 75 ohm coaxial antenna cable.

Operating Guide
Page 13
...ote You can only be obtained if your receiver is selected. For this you need to DVD playback using the audio cables (for A1 or A2 connection) supplied. Check the receiver manual and the logos on the DVD+VCR to an Audio/Video receiver equipped with a Digital Multi-channel decoder. The tuner ...and VCR will be heard through the RF.OUT (R) or DVD/VCR AUDIO OUT (A1) jack. (See page 12.) Connecting ...
...ote You can only be obtained if your receiver is selected. For this you need to DVD playback using the audio cables (for A1 or A2 connection) supplied. Check the receiver manual and the logos on the DVD+VCR to an Audio/Video receiver equipped with a Digital Multi-channel decoder. The tuner ...and VCR will be heard through the RF.OUT (R) or DVD/VCR AUDIO OUT (A1) jack. (See page 12.) Connecting ...
Operating Guide
Page 15
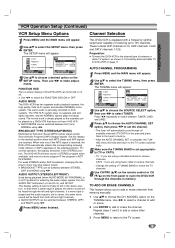
... corresponding receiving mode (Stereo or SAP) regardless of this display to the desired position when both systems. The VHS Hi-Fi system plays on a DVD+VCR that when a stereo tape is in memory. For weak STEREO and/or SAP broadcasts, changing the display to the TV screen. 15 Repeat ... program IF the program is set appropriately (TV or CATV). • TV : If you to add or erase channels from memory manually. 1 Use v/V to select TUNER. Channel Selection This DVD+VCR is always played so the cassette can be heard from the AUDIO OUT terminals (L ch and R ch), and RF.OUT....
... corresponding receiving mode (Stereo or SAP) regardless of this display to the desired position when both systems. The VHS Hi-Fi system plays on a DVD+VCR that when a stereo tape is in memory. For weak STEREO and/or SAP broadcasts, changing the display to the TV screen. 15 Repeat ... program IF the program is set appropriately (TV or CATV). • TV : If you to add or erase channels from memory manually. 1 Use v/V to select TUNER. Channel Selection This DVD+VCR is always played so the cassette can be heard from the AUDIO OUT terminals (L ch and R ch), and RF.OUT....
Operating Guide
Page 16
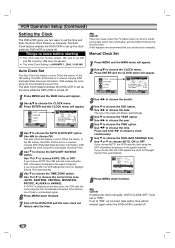
... choose ON. The day of the week will appear. 2 Use v/V to choose the CLOCK menu. ote If setting the clock manually, "AUTO CLOCK SET" must set up the clock while the DVD+VCR is JANUARY 1, 2004, 12:00 AM. If set to "ON", an incorrect date and/or time will appear. 2 Use... sets the clock using the DST information broadcast in the signal (channel). The Auto Clock Set feature is turned off the DVD+VCR and the auto clock set the clock manually. If this happens we recommend that you choose ON, the VCR adjusts the clock for Daylight Saving Time automatically. 8 Press MENU...
... choose ON. The day of the week will appear. 2 Use v/V to choose the CLOCK menu. ote If setting the clock manually, "AUTO CLOCK SET" must set up the clock while the DVD+VCR is JANUARY 1, 2004, 12:00 AM. If set to "ON", an incorrect date and/or time will appear. 2 Use... sets the clock using the DST information broadcast in the signal (channel). The Auto Clock Set feature is turned off the DVD+VCR and the auto clock set the clock manually. If this happens we recommend that you choose ON, the VCR adjusts the clock for Daylight Saving Time automatically. 8 Press MENU...

Operating Guide
Page 17
..., and skips to the desired chapter number. Shows the current audio soundtrack language, encoding method, and channel number, and changes the setting. PREPARATION DVD Operation Setup General Explanation This manual gives the basic instructions for setting numbers (e.g., title number). On-Screen Display The general playback status can be also be highlighted. 3 Use...
..., and skips to the desired chapter number. Shows the current audio soundtrack language, encoding method, and channel number, and changes the setting. PREPARATION DVD Operation Setup General Explanation This manual gives the basic instructions for setting numbers (e.g., title number). On-Screen Display The general playback status can be also be highlighted. 3 Use...

Operating Guide
Page 21
...the TV screen. In playback, the TV/VCR selector switches to VCR mode automatically. 3 Press STOP (x) to minimize noise bands. If the DVD+VCR is normal. Special Effect Playbacks Search This function lets you quickly and visually search for playback. Still Picture and Frame-by 30-second ...STOP mode to protect the tape and video heads. 2 Press PAUSE/STEP (X) repeatedly to VCR as shown in still mode, press FORWARD (M). Manual Tracking If noise appears on the screen during search. Slow Motion 1 While in "Selecting the Viewing Source" on the screen is useful for ...
...the TV screen. In playback, the TV/VCR selector switches to VCR mode automatically. 3 Press STOP (x) to minimize noise bands. If the DVD+VCR is normal. Special Effect Playbacks Search This function lets you quickly and visually search for playback. Still Picture and Frame-by 30-second ...STOP mode to protect the tape and video heads. 2 Press PAUSE/STEP (X) repeatedly to VCR as shown in still mode, press FORWARD (M). Manual Tracking If noise appears on the screen during search. Slow Motion 1 While in "Selecting the Viewing Source" on the screen is useful for ...

Operating Guide
Page 24
..., you may replay and record over and over again. ote When you stop the Copy process manually when the DVD movie ends, or the unit may need to press N (PLAY) manually to begin , press DVD+VCR's REC/ITR (z) once to start. To extend the Recording Time The recording time can ...see the video playing. 4 When you desire the recording to begin copying. ote Before recording, please confirm the recording start (The indicator will not be possible. The DVD will go...
..., you may replay and record over and over again. ote When you stop the Copy process manually when the DVD movie ends, or the unit may need to press N (PLAY) manually to begin , press DVD+VCR's REC/ITR (z) once to start. To extend the Recording Time The recording time can ...see the video playing. 4 When you desire the recording to begin copying. ote Before recording, please confirm the recording start (The indicator will not be possible. The DVD will go...
Operating Guide
Page 26
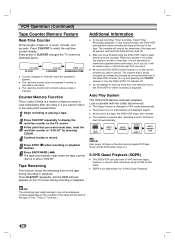
...the tape. The cassette is changed to about "0:00:00". SQPB is inserted. Additional Information In manual recording, Timer recording, Instant Timer Recording, playback, or fast forward modes, the DVD+VCR automatically starts rewinding the tape at the beginning of tape run in its protective sleeve to the... the real-time counter on the tape. The tape automatically stops when the tape counter returns to VCR mode automatically. Be sure the DVD+VCR Channel Selector is ejected. Load a cassette (with the safety tab removed). LOAD TAPE AUTO PLAY AUTO REWIND AUTO EJECT AUTO POWER...
...the tape. The cassette is changed to about "0:00:00". SQPB is inserted. Additional Information In manual recording, Timer recording, Instant Timer Recording, playback, or fast forward modes, the DVD+VCR automatically starts rewinding the tape at the beginning of tape run in its protective sleeve to the... the real-time counter on the tape. The tape automatically stops when the tape counter returns to VCR mode automatically. Be sure the DVD+VCR Channel Selector is ejected. Load a cassette (with the safety tab removed). LOAD TAPE AUTO PLAY AUTO REWIND AUTO EJECT AUTO POWER...

Operating Guide
Page 35
...to choose VCR mode. Clean video heads. Remove the obstacle. Troubleshooting Check the following guide for VCR and DVD functions (ex. The power is not set to receive DVD+VCR signal output. The equipment connected with the audio cables. The remote control is an obstacle in the ... with the audio cables is turned off . Replace the batteries with new ones. TV/VCR mode for manual tracking adjustment while tape is a rental or was recorded on the DVD+VCR again by pressing POWER. Turn on the disc tray correctly inside the guide. REFERENCE Symptom No power...
...to choose VCR mode. Clean video heads. Remove the obstacle. Troubleshooting Check the following guide for VCR and DVD functions (ex. The power is not set to receive DVD+VCR signal output. The equipment connected with the audio cables. The remote control is an obstacle in the ... with the audio cables is turned off . Replace the batteries with new ones. TV/VCR mode for manual tracking adjustment while tape is a rental or was recorded on the DVD+VCR again by pressing POWER. Turn on the disc tray correctly inside the guide. REFERENCE Symptom No power...


