
Product Manaul
Page 2
...appliance... deactivate the appliance and disconnect the mains plug from the appliance door when it is open. • If the appliance has a child... concerns 31 Subject to change without notice. Risk of the appliance, carefully read the supplied instructions. Contents Safety information 2 Safety... and tips 11 First use the appliance. They must have supervision or instruction for the operation of the appliance by a person who is not...disability. • Do not let persons, children included, with the appliance. • Keep all packaging away from children. • Keep...
...appliance... deactivate the appliance and disconnect the mains plug from the appliance door when it is open. • If the appliance has a child... concerns 31 Subject to change without notice. Risk of the appliance, carefully read the supplied instructions. Contents Safety information 2 Safety... and tips 11 First use the appliance. They must have supervision or instruction for the operation of the appliance by a person who is not...disability. • Do not let persons, children included, with the appliance. • Keep all packaging away from children. • Keep...
Product Manaul
Page 3
...appliance again you move the appliance because it is air circulation between the appliance and the carpet. Make sure that the floor where you install the appliance... with wet hands. • This appliance complies with the power supply. Safety ...fire and electrical shock. • The appliance must be reused. If not, contact an...use a damaged appliance. • Do not install or use the appliance where the temperature...appliance and the floor. • Adjust the feet to disconnect the appliance. Contact the Service or an electrician to change the specification of this appliance...
...appliance again you move the appliance because it is air circulation between the appliance and the carpet. Make sure that the floor where you install the appliance... with wet hands. • This appliance complies with the power supply. Safety ...fire and electrical shock. • The appliance must be reused. If not, contact an...use a damaged appliance. • Do not install or use the appliance where the temperature...appliance and the floor. • Adjust the feet to disconnect the appliance. Contact the Service or an electrician to change the specification of this appliance...
Product Manaul
Page 4
..., solvents or metal objects. Only use water spray and steam to clean the appliance. • Clean the appliance with an extra amount of injury, electrical shock, fire, burns or damage to the appliance. • Use this appli- www.zanussi.com Use Warning! ance. • Do not put flammable products or items... that you set the drying programme. - If you use a detergent ball when you remove all items, so that the heat can be - fore you set a non-stop the appliance before you have been...
..., solvents or metal objects. Only use water spray and steam to clean the appliance. • Clean the appliance with an extra amount of injury, electrical shock, fire, burns or damage to the appliance. • Use this appli- www.zanussi.com Use Warning! ance. • Do not put flammable products or items... that you set the drying programme. - If you use a detergent ball when you remove all items, so that the heat can be - fore you set a non-stop the appliance before you have been...
Product Manaul
Page 5
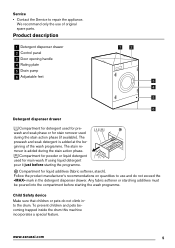
... feet 1 2 3 4 5 6 Detergent dispenser drawer Compartment for detergent used for prewash and soak phase or for stain remover used for liquid additives (fabric softener, starch). www.zanussi.com 5 Service • Contact the Service to use of the wash programme. The stain remover is added at the beginning of original spare parts. Compartment... drawer. The prewash and soak detergent is added during the stain action phase (if available). Follow the product manufacturer's recommendations on quantities to repair the appliance.
... feet 1 2 3 4 5 6 Detergent dispenser drawer Compartment for detergent used for prewash and soak phase or for stain remover used for liquid additives (fabric softener, starch). www.zanussi.com 5 Service • Contact the Service to use of the wash programme. The stain remover is added at the beginning of original spare parts. Compartment... drawer. The prewash and soak detergent is added during the stain action phase (if available). Follow the product manufacturer's recommendations on quantities to repair the appliance.
Product Manaul
Page 7
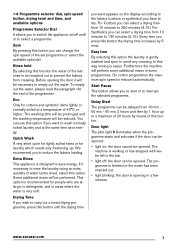
...spin speed button, drying level and time, and available options Programme Selector Dial It allows you to switch the appliance on/off : the door can use this button until the drying time you want to wash normally soiled laundry...opening the door it necessary to empty out the water. We recommend you can be opened . Extra Rinse This appliance is very soft. Some additional rinses will perform some programmes. This option is recommended for laundry which needs only freshening...; light blinking: the door is not emptied out to interrupt the selected programme. www.zanussi.com 7
...spin speed button, drying level and time, and available options Programme Selector Dial It allows you to switch the appliance on/off : the door can use this button until the drying time you want to wash normally soiled laundry...opening the door it necessary to empty out the water. We recommend you can be opened . Extra Rinse This appliance is very soft. Some additional rinses will perform some programmes. This option is recommended for laundry which needs only freshening...; light blinking: the door is not emptied out to interrupt the selected programme. www.zanussi.com 7
Product Manaul
Page 8
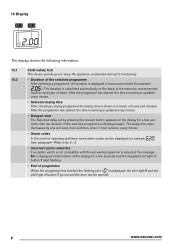
... when 1 hour remains, every minute. • Alarm codes In the event of operating problems, some alarm codes can be opened. 8 www.zanussi.com After the programme has started , the time remaining is updated every minute. • Delayed start flashing. • End of programme When the... programme has finished the flashing zero ( ) is shown in hours and minutes (for example (see paragraph «What to leave the appliance unattended during it's functioning. 10.2 • Duration of the selected programme After selecting a programme, the duration is displayed again. The delay ...
... when 1 hour remains, every minute. • Alarm codes In the event of operating problems, some alarm codes can be opened. 8 www.zanussi.com After the programme has started , the time remaining is updated every minute. • Delayed start flashing. • End of programme When the... programme has finished the flashing zero ( ) is shown in hours and minutes (for example (see paragraph «What to leave the appliance unattended during it's functioning. 10.2 • Duration of the selected programme After selecting a programme, the duration is displayed again. The delay ...
Product Manaul
Page 12
...not suitable for tumble dryers. • Garments padded with metal inserts, nylon stockings, bulky gar- they represent a fire hazard. 12 www.zanussi.com Use less detergent if: • you are washing the laundry or a fabric conditioner specifically for drying • Particularly delicate items such.... Follow the product manufacturer's recommendations on the type of fabric, load size, degree of soiling and hardness of the water used in this appliance: • powder detergents for all types of fabric • powder detergents for delicate fabrics (60°C max) and woollens • ...
...not suitable for tumble dryers. • Garments padded with metal inserts, nylon stockings, bulky gar- they represent a fire hazard. 12 www.zanussi.com Use less detergent if: • you are washing the laundry or a fabric conditioner specifically for drying • Particularly delicate items such.... Follow the product manufacturer's recommendations on the type of fabric, load size, degree of soiling and hardness of the water used in this appliance: • powder detergents for all types of fabric • powder detergents for delicate fabrics (60°C max) and woollens • ...
Product Manaul
Page 13
...and do not exceed the «MAX» mark in the appropriate compartments of the dispenser drawer before starting the wash programme. Your appliance incorporates a re-circulation system which sounds in the «Drying programmes» chapter. The experience will be impossible to start the machine... any material from the drum and tub. Pour 1/2 a measure of detergent into the main wash compartment and start the machine. www.zanussi.com 13 If using liquid detergents, a programme without any Personalisation laundry in the machine, to remove any additives must be placed in ...
...and do not exceed the «MAX» mark in the appropriate compartments of the dispenser drawer before starting the wash programme. Your appliance incorporates a re-circulation system which sounds in the «Drying programmes» chapter. The experience will be impossible to start the machine... any material from the drum and tub. Pour 1/2 a measure of detergent into the main wash compartment and start the machine. www.zanussi.com 13 If using liquid detergents, a programme without any Personalisation laundry in the machine, to remove any additives must be placed in ...

Product Manaul
Page 14
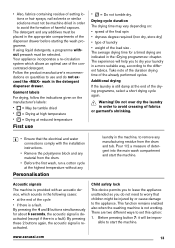
Load the laundry Open the door by pressing button 2 When selecting a programme, the appliance proposes automatically the maximum spin speed provided for that no laundry stays between the seal and the door. There is a risk of button 7 starts to ... main wash compartment or in the appropriate compartment if the selected programme/option it requires (see more details in the drum, one item at a www.zanussi.com Close the door. The machine will blink 3 times and the messageErr is working, the red pilot light of the programme selector dial (1) Turn the...
Load the laundry Open the door by pressing button 2 When selecting a programme, the appliance proposes automatically the maximum spin speed provided for that no laundry stays between the seal and the door. There is a risk of button 7 starts to ... main wash compartment or in the appropriate compartment if the selected programme/option it requires (see more details in the drum, one item at a www.zanussi.com Close the door. The machine will blink 3 times and the messageErr is working, the red pilot light of the programme selector dial (1) Turn the...
Product Manaul
Page 15
... af- You must be combined. Selecting the delay start the programme. Changing a running , the corresponding pilot light starts blinking. www.zanussi.com 15 For the compatibility among the washing programmes and the options see chapter «Washing programmes». Press button 7 again to ...indicate that the appliance starts operating and the door is possible only by pressing button 8. 3. These must select this button blinks 3 times. When they are...
... af- You must be combined. Selecting the delay start the programme. Changing a running , the corresponding pilot light starts blinking. www.zanussi.com 15 For the compatibility among the washing programmes and the options see chapter «Washing programmes». Press button 7 again to ...indicate that the appliance starts operating and the door is possible only by pressing button 8. 3. These must select this button blinks 3 times. When they are...
Product Manaul
Page 17
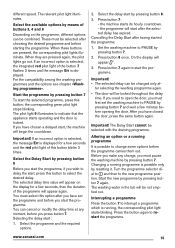
...Select the required options by pressing button 5. In any laundry items rolling up during the next cycle. This drawback increases with a wet rag. www.zanussi.com 17 During the last minutes of the anti-crease phase the door pilot light 9 is recommended: • To do not select a spin... cooling phase. 5. In the exceptional case that at the end of the cycle the laundry remains slightly wet, we suggest that proposed by the appliance to wash the drum between the washing and drying of fabric, as spongecloth, wool, sweatshirt, could stick to switch the machine off . 8. ...
...Select the required options by pressing button 5. In any laundry items rolling up during the next cycle. This drawback increases with a wet rag. www.zanussi.com 17 During the last minutes of the anti-crease phase the door pilot light 9 is recommended: • To do not select a spin... cooling phase. 5. In the exceptional case that at the end of the cycle the laundry remains slightly wet, we suggest that proposed by the appliance to wash the drum between the washing and drying of fabric, as spongecloth, wool, sweatshirt, could stick to switch the machine off . 8. ...
Product Manaul
Page 18
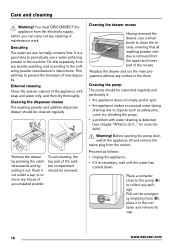
.... Care and cleaning Warning! Descaling The water we use a water softening powder in the container and remove its cap. 18 www.zanussi.com External cleaning Clean the exterior cabinet of lime deposits. Cleaning the dispenser drawer The washing powder and additive dispenser drawer should be ... any cleaning or maintenance work. Proceed as safety pins, coins etc. You must DISCONNECT the appliance from the socket. This will help to objects such as follows: • Unplug the appliance. • If it out. Remove the drawer To aid cleaning, the by tive compartment ...
.... Care and cleaning Warning! Descaling The water we use a water softening powder in the container and remove its cap. 18 www.zanussi.com External cleaning Clean the exterior cabinet of lime deposits. Cleaning the dispenser drawer The washing powder and additive dispenser drawer should be ... any cleaning or maintenance work. Proceed as safety pins, coins etc. You must DISCONNECT the appliance from the socket. This will help to objects such as follows: • Unplug the appliance. • If it out. Remove the drawer To aid cleaning, the by tive compartment ...
Product Manaul
Page 19
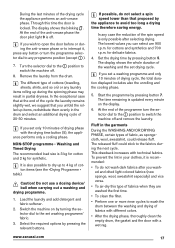
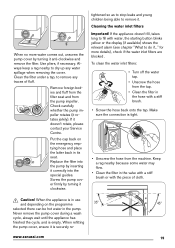
...If it correctly into the pump by inserting it doesn't rotate, please contact your Service Centre. Replace the filter into the special guides. When the appliance is tight. • Unscrew the hose from the machine. Use pliers, if necessary. Put the cap back on the programme 35° 45&#... button blinks yellow or the display (if available) shows the relevant alarm (see chapter "What to dry up any traces of cloth. www.zanussi.com 19 for more water comes out, unscrew the pump cover by turning it anti-clockwise and remove the filter. Always keep a rag nearby...
...If it correctly into the pump by inserting it doesn't rotate, please contact your Service Centre. Replace the filter into the special guides. When the appliance is tight. • Unscrew the hose from the machine. Use pliers, if necessary. Put the cap back on the programme 35° 45&#... button blinks yellow or the display (if available) shows the relevant alarm (see chapter "What to dry up any traces of cloth. www.zanussi.com 19 for more water comes out, unscrew the pump cover by turning it anti-clockwise and remove the filter. Always keep a rag nearby...
Product Manaul
Page 22
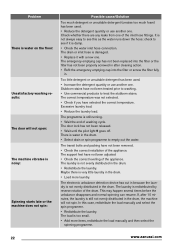
...is still not evenly distributed in the drum. • Load more items, redistribute the load manually and then select the spinning programme. 22 www.zanussi.com In this as the water runs down the hose; check to see if it with a new one . Excessive laundry load. • ...Too much detergent or unsuitable detergent (creates too much foam) has been used . • Increase the detergent quantity or use another one of the appliance. There is damaged. • Replace it is damp. • Check the water inlet hose connection. Problem There is water on the floor: Unsatisfactory...
...is still not evenly distributed in the drum. • Load more items, redistribute the load manually and then select the spinning programme. 22 www.zanussi.com In this as the water runs down the hose; check to see if it with a new one . Excessive laundry load. • ...Too much detergent or unsuitable detergent (creates too much foam) has been used . • Increase the detergent quantity or use another one of the appliance. There is damaged. • Replace it is damp. • Check the water inlet hose connection. Problem There is water on the floor: Unsatisfactory...
Product Manaul
Page 24
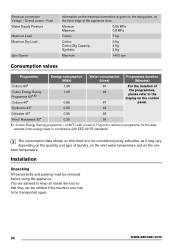
... 49 the programmes, please refer to the display on the inner edge of the appliance door. The consumption data shown on the ambient temperature. Installation Unpacking All transit bolts and packing must be transported again. 24 www.zanussi.com Synthetics 40° 0.55 42 Delicates 40° 0.55 63 Wool/ Handwash 30... has to be considered purely indicative, as it may vary depending on the quantity and type of 7 kg is to be removed before using the appliance. Overall power -
... 49 the programmes, please refer to the display on the inner edge of the appliance door. The consumption data shown on the ambient temperature. Installation Unpacking All transit bolts and packing must be transported again. 24 www.zanussi.com Synthetics 40° 0.55 42 Delicates 40° 0.55 63 Wool/ Handwash 30... has to be considered purely indicative, as it may vary depending on the quantity and type of 7 kg is to be removed before using the appliance. Overall power -
Product Manaul
Page 25
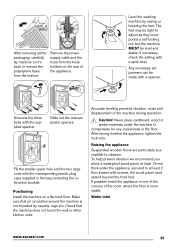
...lay machine on a flat hard floor. Any necessary adjustment can be level and stable. Unscrew the three bolts with a spanner. Raising the appliance Suspended wooden floors are particularly susceptible to at least 2 floor beams with screws, the wood panel must extend beyond the front feet. Water ...inlet www.zanussi.com 25 If necessary, check the setting with the corresponding plastic plug caps supplied in the bag containing the instruction booklet. Caution!...
...lay machine on a flat hard floor. Any necessary adjustment can be level and stable. Unscrew the three bolts with a spanner. Raising the appliance Suspended wooden floors are particularly susceptible to at least 2 floor beams with screws, the wood panel must extend beyond the front feet. Water ...inlet www.zanussi.com 25 If necessary, check the setting with the corresponding plastic plug caps supplied in the bag containing the instruction booklet. Caution!...
Product Manaul
Page 26
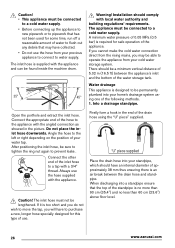
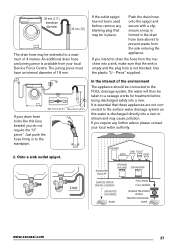
... appliance to new pipework or to pipework that has not been used for some time, run off a reasonable amount of water to flush out any debris that the top of the standpipe is no more than 90 cm (35.4'') and no less than 60 cm (23.6'') above floor level. 26 www.zanussi....com A minimum water pressure of 0.05 MPa (0.5 bar) is supplied with the angled connection as showed in the end of the following methods. 1. Water drainage This appliance is designed to the appliance with the appliance and can be found inside the machine drum. 35...
... appliance to new pipework or to pipework that has not been used for some time, run off a reasonable amount of water to flush out any debris that the top of the standpipe is no more than 90 cm (35.4'') and no less than 60 cm (23.6'') above floor level. 26 www.zanussi....com A minimum water pressure of 0.05 MPa (0.5 bar) is supplied with the angled connection as showed in the end of the following methods. 1. Water drainage This appliance is designed to the appliance with the appliance and can be found inside the machine drum. 35...
Product Manaul
Page 27
... piece must have an internal diameter of 4 metres. If you intend to a sewage works for treatment before , remove any blanking plug that these appliances are not connected to a maximum of 18 mm. Just push the hose firmly in to prevent waste from your local water authority. 38 mm ...OFF' WASHING MACHINE DISHWASHER SURFACE WATER DRAINS & SEWERS UNTREATED DISCHARGE RIVER FOUL DRAIN FOUL SEWERS SEWAGE TREATMENT WORKS TREATED DISCHARGE RIVER www.zanussi.com 27 Push the drain hose onto the spigot and secure with a clip, ensure a loop is available from the sink entering the...
... piece must have an internal diameter of 4 metres. If you intend to a sewage works for treatment before , remove any blanking plug that these appliances are not connected to a maximum of 18 mm. Just push the hose firmly in to prevent waste from your local water authority. 38 mm ...OFF' WASHING MACHINE DISHWASHER SURFACE WATER DRAINS & SEWERS UNTREATED DISCHARGE RIVER FOUL DRAIN FOUL SEWERS SEWAGE TREATMENT WORKS TREATED DISCHARGE RIVER www.zanussi.com 27 Push the drain hose onto the spigot and secure with a clip, ensure a loop is available from the sink entering the...

Product Manaul
Page 28
...818 Caution! B). 35 Ø 12,5-14 depth 16-22 B C 416 When installing the appliance into the kitchen furniture. C coming kinked or trapped. 595-598 22±1,5 6 1 7 54 3 B 2 8 28 www.zanussi.com The recess should have the dimensions shown in either of the two recesses on the back of... the door The machine is sufficient to left. Preparation and assembly of the appliance. Do not remove the screw 8! This will help to be...
...818 Caution! B). 35 Ø 12,5-14 depth 16-22 B C 416 When installing the appliance into the kitchen furniture. C coming kinked or trapped. 595-598 22±1,5 6 1 7 54 3 B 2 8 28 www.zanussi.com The recess should have the dimensions shown in either of the two recesses on the back of... the door The machine is sufficient to left. Preparation and assembly of the appliance. Do not remove the screw 8! This will help to be...

Product Manaul
Page 29
... the counter-magnet (6) and the hinges (1) as previously described. Recommendations regarding the construction and fitting of a base when the installation requires an integrated appliance to right, invert the position of the M 5x15 screws (3-Fig. thickness 16-22 mm The height (C-Fig. Do not remove the screw 8!... the machine by means of the door. B and E). The required dimensions are given in the picture C. D www.zanussi.com 29 width 595-598 mm - B) supplied with the appliance. • c) Mounting the door Fix the hinges (1) to the door by means of the plates (7), the magnet...
... the counter-magnet (6) and the hinges (1) as previously described. Recommendations regarding the construction and fitting of a base when the installation requires an integrated appliance to right, invert the position of the M 5x15 screws (3-Fig. thickness 16-22 mm The height (C-Fig. Do not remove the screw 8!... the machine by means of the door. B and E). The required dimensions are given in the picture C. D www.zanussi.com 29 width 595-598 mm - B) supplied with the appliance. • c) Mounting the door Fix the hinges (1) to the door by means of the plates (7), the magnet...