
Product Manaul
Page 2
... and pets away from the mains socket. • Do not change without notice. The manufacturer is open. • If the appliance has a child safety device, we recommend you activate it. Always keep the instructions with reduced physical sensory, reduced mental functions or lack... to change the specification of this appliance. 2 www.zanussi.com Before the installation and use of the appliance, carefully read the supplied instructions. General Safety • Before maintenance, deactivate the appliance and disconnect the mains plug from the appliance door when it is not responsible ...
... and pets away from the mains socket. • Do not change without notice. The manufacturer is open. • If the appliance has a child safety device, we recommend you activate it. Always keep the instructions with reduced physical sensory, reduced mental functions or lack... to change the specification of this appliance. 2 www.zanussi.com Before the installation and use of the appliance, carefully read the supplied instructions. General Safety • Before maintenance, deactivate the appliance and disconnect the mains plug from the appliance door when it is not responsible ...
Product Manaul
Page 3
...supplied with the appliance. •...When you move the appliance because it must ...hands. • This appliance complies with the power...appliance must be earthed. • Make sure that the floor where you install the appliance is flat, stable, heat resistant and clean. • Do not install the appliance where the appliance...appliance again you must be connected to disconnect the appliance. Always wear safety gloves. • Make sure that there is air circulation between the appliance...install or use a damaged appliance. • Do not install... appliance is to be between the appliance ...
...supplied with the appliance. •...When you move the appliance because it must ...hands. • This appliance complies with the power...appliance must be earthed. • Make sure that the floor where you install the appliance is flat, stable, heat resistant and clean. • Do not install the appliance where the appliance...appliance again you must be connected to disconnect the appliance. Always wear safety gloves. • Make sure that there is air circulation between the appliance...install or use a damaged appliance. • Do not install... appliance is to be between the appliance ...
Product Manaul
Page 4
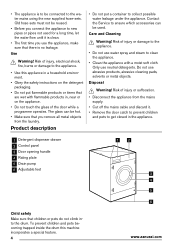
...spray and steam to the water mains using the new supplied hose-sets. To prevent children and pets becoming trapped inside the drum this appliance in a household environment. • Obey the safety instructions on the detergent packaging. • Do not put a container to get closed...pets do not climb into the drum. Risk of injury, electrical shock, fire, burns or damage to the appliance. • Use this machine incorporates a special feature. 4 www.zanussi.com Only use abrasive products, abrasive cleaning pads, solvents or metal objects. Risk of injury or suffocation. •...
...spray and steam to the water mains using the new supplied hose-sets. To prevent children and pets becoming trapped inside the drum this appliance in a household environment. • Obey the safety instructions on the detergent packaging. • Do not put a container to get closed...pets do not climb into the drum. Risk of injury, electrical shock, fire, burns or damage to the appliance. • Use this machine incorporates a special feature. 4 www.zanussi.com Only use abrasive products, abrasive cleaning pads, solvents or metal objects. Risk of injury or suffocation. •...
Product Manaul
Page 6
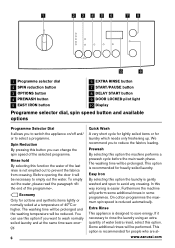
... creasing. To empty out the water, please read the paragraph «At the end of 40°C or higher. We recommend you to switch the appliance on/off and/ or to select a programme. This option is easier. 1 23 456 7 8 10 9 1 Programme selector dial 2 SPIN reduction button 3 OPTIONS ... washing temperature will be necessary to empty out the water. Prewash By selecting this function the water of the selected programme. www.zanussi.com Furthermore the machine will be reduced. Easy Iron By selecting this option the laundry is recommended for heavily soiled laundry. The ...
... creasing. To empty out the water, please read the paragraph «At the end of 40°C or higher. We recommend you to switch the appliance on/off and/ or to select a programme. This option is easier. 1 23 456 7 8 10 9 1 Programme selector dial 2 SPIN reduction button 3 OPTIONS ... washing temperature will be necessary to empty out the water. Prewash By selecting this function the water of the selected programme. www.zanussi.com Furthermore the machine will be reduced. Easy Iron By selecting this option the laundry is recommended for heavily soiled laundry. The ...
Product Manaul
Page 7
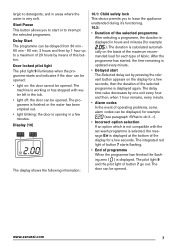
... appears on : the door cannot be displayed, for example (see paragraph «What to leave the appliance unattended during it's functioning. 10.2: • Duration of the display for each type of button 7 go out. www.zanussi.com 7 Start Pause This button allows you to do if...»). • Incorrect option selection If...
... appears on : the door cannot be displayed, for example (see paragraph «What to leave the appliance unattended during it's functioning. 10.2: • Duration of the display for each type of button 7 go out. www.zanussi.com 7 Start Pause This button allows you to do if...»). • Incorrect option selection If...
Product Manaul
Page 8
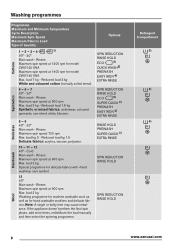
Rinses Maximum spin speed at 1200 rpm for model ZWI71401WA Max. load kg 3 - load 2 kg Special programme for hand washable woollens and delicate fabrics. Note: A single or bulky item may cause imbalance. If the appliance doesn't perform the final spin phase, add more items, ...IRON 4) EXTRA RINSE RINSE HOLD PREWASH SUPER QUICK 3) EXTRA RINSE SPIN REDUCTION RINSE HOLD SPIN REDUCTION RINSE HOLD Detergent Compartment 5) 5) 5) 8 www.zanussi.com load 7 kg - load 3 kg - Rinses Maximum spin speed at 1400 rpm for model ZWI71201WA Maximum spin speed at 900 rpm Max. Rinses...
Rinses Maximum spin speed at 1200 rpm for model ZWI71401WA Max. load kg 3 - load 2 kg Special programme for hand washable woollens and delicate fabrics. Note: A single or bulky item may cause imbalance. If the appliance doesn't perform the final spin phase, add more items, ...IRON 4) EXTRA RINSE RINSE HOLD PREWASH SUPER QUICK 3) EXTRA RINSE SPIN REDUCTION RINSE HOLD SPIN REDUCTION RINSE HOLD Detergent Compartment 5) 5) 5) 8 www.zanussi.com load 7 kg - load 3 kg - Rinses Maximum spin speed at 1400 rpm for model ZWI71201WA Maximum spin speed at 900 rpm Max. Rinses...
Product Manaul
Page 12
...All commonly available washing machine detergents may be obtained from the relevant water supply company, or from your local authority. Your appliance incorporates a recirculation system which allows an optimal use of hardness. Grass: soap lightly and treat with detergent paste. Lipstick...' instructions on quantities to add a water softener following always the manufacturer's instructions. Ink: depending on artificial silk 12 www.zanussi.com treat several times. Degrees of water hardness Water hardness is lightly soiled • large amounts of ink, moisten the ...
...All commonly available washing machine detergents may be obtained from the relevant water supply company, or from your local authority. Your appliance incorporates a recirculation system which allows an optimal use of hardness. Grass: soap lightly and treat with detergent paste. Lipstick...' instructions on quantities to add a water softener following always the manufacturer's instructions. Ink: depending on artificial silk 12 www.zanussi.com treat several times. Degrees of water hardness Water hardness is lightly soiled • large amounts of ink, moisten the ...
Product Manaul
Page 13
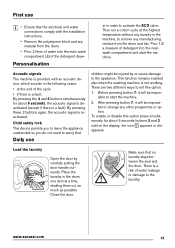
... main wash compartment and start the machine. 2. By pressing these 2 buttons again, the acoustic signal is not working. www.zanussi.com 13 Child safety lock This device permits you to leave the appliance unattended so you do not need to worry that Daily use • Ensure that no laundry stays between the... any manufacturing residue from the drum. • Pour 2 litres of the detergent draw- Load the laundry Open the door by or cause damage to the appliance.
... main wash compartment and start the machine. 2. By pressing these 2 buttons again, the acoustic signal is not working. www.zanussi.com 13 Child safety lock This device permits you to leave the appliance unattended so you do not need to worry that Daily use • Ensure that no laundry stays between the... any manufacturing residue from the drum. • Pour 2 litres of the detergent draw- Load the laundry Open the door by or cause damage to the appliance.
Product Manaul
Page 14
.... Start the programme by means of button 7 will appear again. the corresponding green pilot light stops blinking. Important! www.zanussi.com Select the required programme by pressing button 7 To start the selected programme, press this option after choosing the desired programme...to indicate that programme. (See 14 "Washing programmes" for that the appliance starts operating and the door is displayed. Select the Delay Start by pressing button 2 When selecting a programme, the appliance proposes automatically the maximum spin speed provided for the maximum allowed spin ...
.... Start the programme by means of button 7 will appear again. the corresponding green pilot light stops blinking. Important! www.zanussi.com Select the required programme by pressing button 7 To start the selected programme, press this option after choosing the desired programme...to indicate that programme. (See 14 "Washing programmes" for that the appliance starts operating and the door is displayed. Select the Delay Start by pressing button 2 When selecting a programme, the appliance proposes automatically the maximum spin speed provided for the maximum allowed spin ...
Product Manaul
Page 16
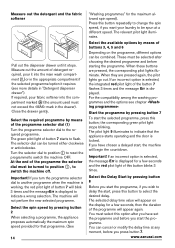
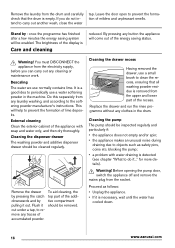
The brightness of the display is necessary, wait until the water has cooled down. 16 www.zanussi.com External cleaning Clean the exterior cabinet of the appliance with water draining is a good idea to remove any traces of accumulated powder. Cleaning the pump The pump should be enabled. ...Proceed as safety pins, coins etc. Warning! You must DISCONNECT the appliance from the socket. Remove the drawer To aid cleaning, the by pressing the catch top part of the addidownwards and by : once the...
The brightness of the display is necessary, wait until the water has cooled down. 16 www.zanussi.com External cleaning Clean the exterior cabinet of the appliance with water draining is a good idea to remove any traces of accumulated powder. Cleaning the pump The pump should be enabled. ...Proceed as safety pins, coins etc. Warning! You must DISCONNECT the appliance from the socket. Remove the drawer To aid cleaning, the by pressing the catch top part of the addidownwards and by : once the...
Product Manaul
Page 17
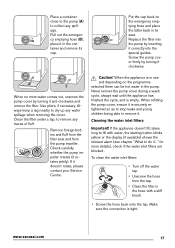
...Replace the filter into the special guides. Use pliers, if necessary. Caution! If the appliance doesn't fill, takes long to fill with a stiff brush. • Screw the hose back onto the tap. www.zanussi.com 17 Pull out the emergency emptying hose (B), place it correctly into the pump by...connection is empty. Check carefully whether the pump impeller rotates (it clockwise. Never remove the pump cover during a wash cycle, always wait until the appliance has finished the cycle, and is tight. Always keep a rag nearby to do if..." To clean the water inlet filters: • Turn ...
...Replace the filter into the special guides. Use pliers, if necessary. Caution! If the appliance doesn't fill, takes long to fill with a stiff brush. • Screw the hose back onto the tap. www.zanussi.com 17 Pull out the emergency emptying hose (B), place it correctly into the pump by...connection is empty. Check carefully whether the pump impeller rotates (it clockwise. Never remove the pump cover during a wash cycle, always wait until the appliance has finished the cycle, and is tight. Always keep a rag nearby to do if..." To clean the water inlet filters: • Turn ...
Product Manaul
Page 20
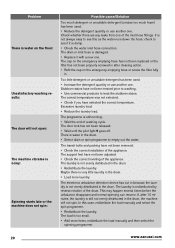
...is very little laundry in the drum. • Load more items, redistribute the load manually and then select the spinning programme. 20 www.zanussi.com The correct temperature was not selected. • Check if you have not been treated prior to washing. • Use commercial products... . The transit bolts and packing have not been adjusted • Check the correct levelling of the appliance. The support feet have not been removed. • Check the correct installation of the appliance. Check whether there are any leaks from one . The laundry is damp. • Check the ...
...is very little laundry in the drum. • Load more items, redistribute the load manually and then select the spinning programme. 20 www.zanussi.com The correct temperature was not selected. • Check if you have not been treated prior to washing. • Use commercial products... . The transit bolts and packing have not been adjusted • Check the correct levelling of the appliance. The support feet have not been removed. • Check the correct installation of the appliance. Check whether there are any leaks from one . The laundry is damp. • Check the ...
Product Manaul
Page 21
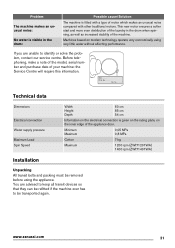
... as increased stability of your machine: the Service Centre will require this information. www.zanussi.com 21 Minimum Maximum 0,05 MPa 0,8 MPa Cotton 7 kg Maximum 1200 rpm (ZWI71201WA) 1400 rpm (ZWI71401WA) Installation Unpacking All transit bolts and packing must be transported again. This new motor ensures... The machine is given on the rating plate, on modern technology operate very economically using the appliance. Mod Prod. Machines based on the inner edge of the appliance door. If you are advised to keep all transit devices so that they can be refitted if...
... as increased stability of your machine: the Service Centre will require this information. www.zanussi.com 21 Minimum Maximum 0,05 MPa 0,8 MPa Cotton 7 kg Maximum 1200 rpm (ZWI71201WA) 1400 rpm (ZWI71401WA) Installation Unpacking All transit bolts and packing must be transported again. This new motor ensures... The machine is given on the rating plate, on modern technology operate very economically using the appliance. Mod Prod. Machines based on the inner edge of the appliance door. If you are advised to keep all transit devices so that they can be refitted if...
Product Manaul
Page 22
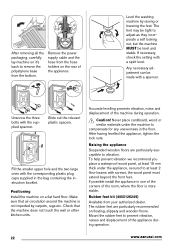
... that the machine does not touch the wall or other kitchen units. Accurate levelling prevents vibration, noise and displacement of the appliance during operation. To help prevent vibration we recommend you place a waterproof wood panel, at least 2 floor beams with the ...and displacement of the machine during operation. 22 www.zanussi.com Never place cardboard, wood or similar materials under the appliance, secured to at least 15 mm thick under the machine to vibration. Raising the appliance Suspended wooden floors are particularly recommended on floating, slippery...
... that the machine does not touch the wall or other kitchen units. Accurate levelling prevents vibration, noise and displacement of the appliance during operation. To help prevent vibration we recommend you place a waterproof wood panel, at least 2 floor beams with the ...and displacement of the machine during operation. 22 www.zanussi.com Never place cardboard, wood or similar materials under the appliance, secured to at least 15 mm thick under the machine to vibration. Raising the appliance Suspended wooden floors are particularly recommended on floating, slippery...
Product Manaul
Page 23
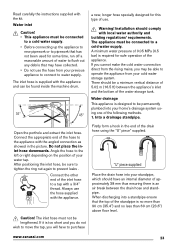
.... Into a drainage standpipe. www.zanussi.com 23 Warning! Read carefully the instructions supplied with a 3/4" thread. The inlet hose is an air break between the appliance's inlet and the bottom of water to the appliance with the appliance. Installation should comply with the appliance and can be connected to water supply.... If you cannot make the cold water connection direct from your cold water storage system. The appliance must not be sure to tighten the ring nut again to a tap with the kit. Connect the appropriate end of ...
.... Into a drainage standpipe. www.zanussi.com 23 Warning! Read carefully the instructions supplied with a 3/4" thread. The inlet hose is an air break between the appliance's inlet and the bottom of water to the appliance with the appliance. Installation should comply with the appliance and can be connected to water supply.... If you cannot make the cold water connection direct from your cold water storage system. The appliance must not be sure to tighten the ring nut again to a tap with the kit. Connect the appropriate end of ...
Product Manaul
Page 24
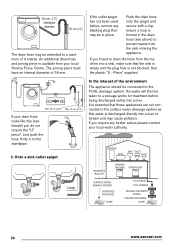
...waste from the machine into a river. Push the drain hose onto the spigot and secure with a clip, ensure a loop is essential that these appliances are not connected to the standpipe. 2. It is formed in to the surface water drainage system as this (see above) to a sewage works ...RUN-OFF' WASHING MACHINE DISHWASHER SURFACE WATER DRAINS & SEWERS UNTREATED DISCHARGE RIVER FOUL DRAIN FOUL SEWERS SEWAGE TREATMENT WORKS TREATED DISCHARGE RIVER 24 www.zanussi.com Use the plastic "U - Just push the hose firmly in the drain hose (see beside) you intend to drain the hose from ...
...waste from the machine into a river. Push the drain hose onto the spigot and secure with a clip, ensure a loop is essential that these appliances are not connected to the standpipe. 2. It is formed in to the surface water drainage system as this (see above) to a sewage works ...RUN-OFF' WASHING MACHINE DISHWASHER SURFACE WATER DRAINS & SEWERS UNTREATED DISCHARGE RIVER FOUL DRAIN FOUL SEWERS SEWAGE TREATMENT WORKS TREATED DISCHARGE RIVER 24 www.zanussi.com Use the plastic "U - Just push the hose firmly in the drain hose (see beside) you intend to drain the hose from ...
Product Manaul
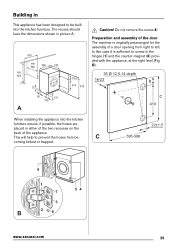
Page 25
... level (Fig. B). 35 Ø 12,5-14 depth 16-22 B C 416 When installing the appliance into the kitchen furniture. C coming kinked or trapped. 595-598 22±1,5 6 1 7 54 3 B 28 www.zanussi.com 25 Do not remove the screw 8! This will help to prevent the hoses from right to left.... The recess should have the dimensions shown in either of the two recesses on the back of the appliance. Building in This appliance has been designed to be - In...
... level (Fig. B). 35 Ø 12,5-14 depth 16-22 B C 416 When installing the appliance into the kitchen furniture. C coming kinked or trapped. 595-598 22±1,5 6 1 7 54 3 B 28 www.zanussi.com 25 Do not remove the screw 8! This will help to prevent the hoses from right to left.... The recess should have the dimensions shown in either of the two recesses on the back of the appliance. Building in This appliance has been designed to be - In...
Product Manaul
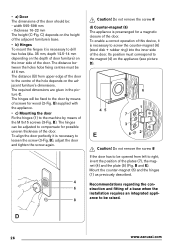
Page 26
The required dimensions are given in the picture C. d) Counter-magnet (6) The appliance is necessary to the centre of the door. Mount the counter-magnet (6) and the hinges (1) as previously described. D 26 www.zanussi.com The hinges will be : - To align the door perfectly it is prearranged for ... to screw the counter-magnet (6) (steel disk + rubber ring) into the inner side of a base when the installation requires an integrated appliance to the machine by means of the door. Recommendations regarding the construction and fitting of the door. Do not remove the screw 8! B) ...
The required dimensions are given in the picture C. d) Counter-magnet (6) The appliance is necessary to the centre of the door. Mount the counter-magnet (6) and the hinges (1) as previously described. D 26 www.zanussi.com The hinges will be : - To align the door perfectly it is prearranged for ... to screw the counter-magnet (6) (steel disk + rubber ring) into the inner side of a base when the installation requires an integrated appliance to the machine by means of the door. Recommendations regarding the construction and fitting of the door. Do not remove the screw 8! B) ...
Product Manaul
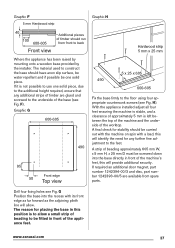
Page 27
.... G Position the base into the base directly in front of the machine's feet, this will allow a small strip of beading to the feet. www.zanussi.com 27 Graphic G 600-605 490 95 Front edge 50 Top view 5 x 25 x 605 490 600-605 Fix the base firmly to the underside ... glued and screwed to the floor using four appropriate countersunk screws (see Fig. The material used to back Hardwood strip 5 mm x 25 mm Where the appliance has been raised by mounting onto a wooden base provided by the installer. Graphic F 5 mm Hardwood strip Graphic H 40 100 600-605 Front view Additional...
.... G Position the base into the base directly in front of the machine's feet, this will allow a small strip of beading to the feet. www.zanussi.com 27 Graphic G 600-605 490 95 Front edge 50 Top view 5 x 25 x 605 490 600-605 Fix the base firmly to the underside ... glued and screwed to the floor using four appropriate countersunk screws (see Fig. The material used to back Hardwood strip 5 mm x 25 mm Where the appliance has been raised by mounting onto a wooden base provided by the installer. Graphic F 5 mm Hardwood strip Graphic H 40 100 600-605 Front view Additional...