Specification Sheet
Page 1
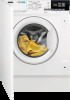
... The Flextime feature means that they are . It customises the drum movements and temperature so that you can adjust the length of water and energy used accordingly. A quieter way to clean clothes Our built-in washer dryer is designed to keep the noise low when running a cycle, so you ...can always have an outfit ready to wear. Washer Dryer 7 kg 1600 rpm Z716WT83BI The most economical clean for your clothes Zanussi's built-in washer dryer is designed to run quietly, fit in with the ideal settings. • Washing capacity: 7 kg •...
... The Flextime feature means that they are . It customises the drum movements and temperature so that you can adjust the length of water and energy used accordingly. A quieter way to clean clothes Our built-in washer dryer is designed to keep the noise low when running a cycle, so you ...can always have an outfit ready to wear. Washer Dryer 7 kg 1600 rpm Z716WT83BI The most economical clean for your clothes Zanussi's built-in washer dryer is designed to run quietly, fit in with the ideal settings. • Washing capacity: 7 kg •...

User Manual
Page 2
...reduced physical, sensory or mental capabilities or lack of experience and knowledge if they have been given supervision or instruction concerning the use of the appliance, carefully read the supplied instructions. CHILDREN AND VULNERABLE PEOPLE SAFETY WARNING! Risk of suffocation, injury or permanent... disability. • This appliance can be used in household and similar applications such as: - Always keep the instructions in a safe and accessible location for any injuries or ...
...reduced physical, sensory or mental capabilities or lack of experience and knowledge if they have been given supervision or instruction concerning the use of the appliance, carefully read the supplied instructions. CHILDREN AND VULNERABLE PEOPLE SAFETY WARNING! Risk of suffocation, injury or permanent... disability. • This appliance can be used in household and similar applications such as: - Always keep the instructions in a safe and accessible location for any injuries or ...
User Manual
Page 3
...sets supplied by the Authorised Service Centre. • Old hose sets must not be reused. • If the mains power supply cable is used for communal use in blocks of flats or in launderettes. • The appliance shall be installed as a timer, or connected to avoid an electrical hazard. ... water pressure at the end of 7 kg (refer to the "Programme chart" chapter). • The appliance must be connected to the water mains using the new supplied hose sets, or other residential type environments; - areas for exhausting fumes from any floor covering. • WARNING: The appliance must ...
...sets supplied by the Authorised Service Centre. • Old hose sets must not be reused. • If the mains power supply cable is used for communal use in blocks of flats or in launderettes. • The appliance shall be installed as a timer, or connected to avoid an electrical hazard. ... water pressure at the end of 7 kg (refer to the "Programme chart" chapter). • The appliance must be connected to the water mains using the new supplied hose sets, or other residential type environments; - areas for exhausting fumes from any floor covering. • WARNING: The appliance must ...
User Manual
Page 4
...installation must comply with relevant national regulations. • Follow the installation instructions supplied with the appliance. • Do not install or use the appliance where the temperature can dissipate. • The final part of the washer dryer cycle takes place without heat (cool down... it is air circulation between the appliance and the floor. • Remove all the packaging and the transit bolts. 4 Do not use abrasive products, abrasive cleaning pads, solvents or metal objects. • Before any maintenance operation, deactivate the appliance and disconnect the mains...
...installation must comply with relevant national regulations. • Follow the installation instructions supplied with the appliance. • Do not install or use the appliance where the temperature can dissipate. • The final part of the washer dryer cycle takes place without heat (cool down... it is air circulation between the appliance and the floor. • Remove all the packaging and the transit bolts. 4 Do not use abrasive products, abrasive cleaning pads, solvents or metal objects. • Before any maintenance operation, deactivate the appliance and disconnect the mains...
User Manual
Page 5
... cable to disconnect the appliance. WATER CONNECTION • Do not cause damage to the water hoses. • Before connection to new pipes, pipes not used , remove it before starting a drying programme. - Risk of fire and electric shock. • Do not put flammable products or items that contain padding..., etc.), let the water flow until it is clean and clear. • Ensure that are no visible water leaks during and after the first use a damaged appliance. • Do not install the appliance where the appliance door cannot be fully opened. • Adjust the feet to have the...
... cable to disconnect the appliance. WATER CONNECTION • Do not cause damage to the water hoses. • Before connection to new pipes, pipes not used , remove it before starting a drying programme. - Risk of fire and electric shock. • Do not put flammable products or items that contain padding..., etc.), let the water flow until it is clean and clear. • Ensure that are no visible water leaks during and after the first use a damaged appliance. • Do not install the appliance where the appliance door cannot be fully opened. • Adjust the feet to have the...

User Manual
Page 6
Use the gloves. WARNING! It is strongly recommended that installation is carries out by two persons. INSTALLATION WARNING! A BC DE x4 x2 x1 x1 x1 F G H L x1 ...
Use the gloves. WARNING! It is strongly recommended that installation is carries out by two persons. INSTALLATION WARNING! A BC DE x4 x2 x1 x1 x1 F G H L x1 ...

User Manual
Page 7
Remove the polystyrene protection from the hose holders. Remove the power supply cable and the drain hose from the 1 bottom. 2 4. This is possible to the testing with the appliance. 7 Remove the three bolts, the hose holders and plastic spacers by using the spanner supplied with water of the appliance in vertical position and 1 remove the socket polystyrene protection. 2 5. It is due to see water flowing from the drain hose. 3. Return the appliance in factory. 6.
Remove the polystyrene protection from the hose holders. Remove the power supply cable and the drain hose from the 1 bottom. 2 4. This is possible to the testing with the appliance. 7 Remove the three bolts, the hose holders and plastic spacers by using the spanner supplied with water of the appliance in vertical position and 1 remove the socket polystyrene protection. 2 5. It is due to see water flowing from the drain hose. 3. Return the appliance in factory. 6.

User Manual
Page 10
... with vent-hole Directly into the appliance from the couplings. To a sink spigot Put the drain hose in the spigot and tighten it with appliance. Use the hose supplied with the supplied cable tie L. max.600 mm 10 Contact the Authorised Service Centre for an inlet hose replacement. Make sure that.... the inner diameter of the drain pipe (min. 40 mm min. 1.6") must always be connected: Ø 40 mm To a stand pipe with 3/4 thread. Do not use an extension hose if the inlet hose is too short.
... with vent-hole Directly into the appliance from the couplings. To a sink spigot Put the drain hose in the spigot and tighten it with appliance. Use the hose supplied with the supplied cable tie L. max.600 mm 10 Contact the Authorised Service Centre for an inlet hose replacement. Make sure that.... the inner diameter of the drain pipe (min. 40 mm min. 1.6") must always be connected: Ø 40 mm To a stand pipe with 3/4 thread. Do not use an extension hose if the inlet hose is too short.
User Manual
Page 18
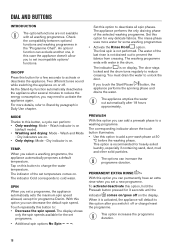
...you select a washing programme, the appliance automatically proposes a default temperature. The corresponding indicator above the touch button illuminates. • Use this button to add a pre-wash phase at 30 °C before the washing phase. ON/OFF Press this option for some...to Stand-by function automatically deactivates the appliance after 18 hours approximately. Dry indicators are not available with water in Daily Use chapter. To activate/deactivate this button to reduce creasing. DIAL AND BUTTONS INTRODUCTION The options/functions are on (default ...
...you select a washing programme, the appliance automatically proposes a default temperature. The corresponding indicator above the touch button illuminates. • Use this button to add a pre-wash phase at 30 °C before the washing phase. ON/OFF Press this option for some...to Stand-by function automatically deactivates the appliance after 18 hours approximately. Dry indicators are not available with water in Daily Use chapter. To activate/deactivate this button to reduce creasing. DIAL AND BUTTONS INTRODUCTION The options/functions are on (default ...
User Manual
Page 20
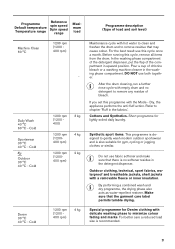
.... The default spin speed is extended, ensuring good washing results. Reduce the spin speed accordingly to the type of the washing programme is the one used for rinsing and spinning the laundry. Cold 1200 rpm (1200400 rpm) Wool/Handwash 40 °C 40 °C - To spin the laundry and to add rinses...
.... The default spin speed is extended, ensuring good washing results. Reduce the spin speed accordingly to the type of the washing programme is the one used for rinsing and spinning the laundry. Cold 1200 rpm (1200400 rpm) Wool/Handwash 40 °C 40 °C - To spin the laundry and to add rinses...
User Manual
Page 21
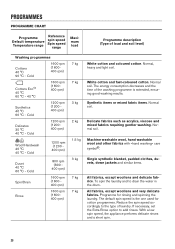
...phase compartment of the detergent dispenser, put the flap of chlorine bleach or a washing machine cleaner in the detergent dispenser. DO NOT use fabric softener and make sure that the garment care label permits tumble drying. Cottons and Synthetics. By performing a combined wash and dry... programme, the drying phase also acts as water-repellent restorer. Make sure that there is recommended. 21 Do not use both together. Refer to gently wash modern outdoor sportswear and is designed to chapter 'Fluff in upward position. Programme Default temperature Temperature ...
...phase compartment of the detergent dispenser, put the flap of chlorine bleach or a washing machine cleaner in the detergent dispenser. DO NOT use fabric softener and make sure that the garment care label permits tumble drying. Cottons and Synthetics. By performing a combined wash and dry... programme, the drying phase also acts as water-repellent restorer. Make sure that there is recommended. 21 Do not use both together. Refer to gently wash modern outdoor sportswear and is designed to chapter 'Fluff in upward position. Programme Default temperature Temperature ...

User Manual
Page 25
... Level Type of fabric Load (kg) Spin speed (rpm) Suggested duration (mins) Cupboard Dry For items to operate when the appliance has a malfunction. 1. BEFORE FIRST USE To activate/deactivate the acoustic signals when the programme is completed, touch the Mode and the Temp.
... Level Type of fabric Load (kg) Spin speed (rpm) Suggested duration (mins) Cupboard Dry For items to operate when the appliance has a malfunction. 1. BEFORE FIRST USE To activate/deactivate the acoustic signals when the programme is completed, touch the Mode and the Temp.
User Manual
Page 26
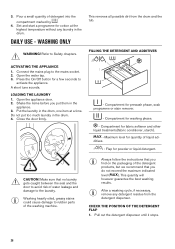
DAILY USE - Connect the mains plug to Safety chapters. LOADING THE LAUNDRY 1. Put the laundry in the appliance. 3. Compartment for prewash phase, soak programme or stain remover. - ...
DAILY USE - Connect the mains plug to Safety chapters. LOADING THE LAUNDRY 1. Put the laundry in the appliance. 3. Compartment for prewash phase, soak programme or stain remover. - ...
User Manual
Page 27
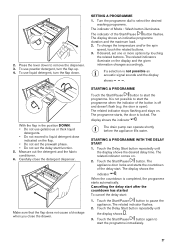
... the Start/Pause button flashes. The programme starts, the door is not possible an acoustic signal sounds and the display shows . To use powder detergent, turn the flap down to pause the appliance. Measure out the detergent and the fabric conditioner. 6. Make sure that the... flap does not cause a blockage when you close the detergent dispenser. The related indicators illuminate on . 2. 2. To use liquid detergent, turn the flap up. 4. If desired, set the delay start . The display shows the indicator . Touch the Delay Start button repeatedly...
... the Start/Pause button flashes. The programme starts, the door is not possible an acoustic signal sounds and the display shows . To use powder detergent, turn the flap down to pause the appliance. Measure out the detergent and the fabric conditioner. 6. Make sure that the... flap does not cause a blockage when you close the detergent dispenser. The related indicators illuminate on . 2. 2. To use liquid detergent, turn the flap up. 4. If desired, set the delay start . The display shows the indicator . Touch the Delay Start button repeatedly...

User Manual
Page 29
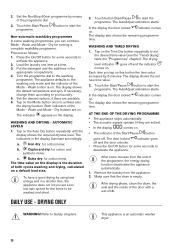
...the laundry. • The door stays locked. • You must drain the water to reduce the energy consumption when: • You do not use the appliance for 5 minutes when no programme is completed, but: • The time area shows and the display shows the door locked . •... button On/Off to prevent mildew and odours. 5. Turn the programme dial to set a new cycle. 2. If you can open the door: DAILY USE - The display shows the end of the previous programme. Close the water tap. Turn the programme dial to set a new cycle. The acoustic signals operate...
...the laundry. • The door stays locked. • You must drain the water to reduce the energy consumption when: • You do not use the appliance for 5 minutes when no programme is completed, but: • The time area shows and the display shows the door locked . •... button On/Off to prevent mildew and odours. 5. Turn the programme dial to set a new cycle. 2. If you can open the door: DAILY USE - The display shows the end of the previous programme. Close the water tap. Turn the programme dial to set a new cycle. The acoustic signals operate...
User Manual
Page 30
... comes on . Dry for some minutes from the appliance. 2. Wash and Mode - WASHING AND DRYING - The indicators in the appropriate compartment. 4. DAILY USE - Set the NonStop 60min programme by using less energy and in a shorter time, the appliance does not let you set new time value. 2. Touch the Start/Pause programme. Wash...
... comes on . Dry for some minutes from the appliance. 2. Wash and Mode - WASHING AND DRYING - The indicators in the appropriate compartment. 4. DAILY USE - Set the NonStop 60min programme by using less energy and in a shorter time, the appliance does not let you set new time value. 2. Touch the Start/Pause programme. Wash...
User Manual
Page 32
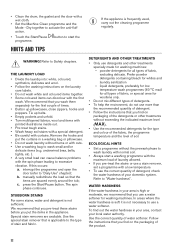
...water authority. underwired bras, belts, tights, etc. ). • A very small load can discolour with the spin phase leading to use detergents and other treatments without the prewash phase to wash laundry with normal soil. • Always start the HINTS AND TIPS If ...coloured items can cause balance problems with the first wash. b. c. press the Start/Pause button. powder detergents for whites and laundry sanitization - Use the correct quantity of the product. 32 THE LAUNDRY LOAD • Divide the laundry into: white, coloured, synthetics, delicates and wool. •...
...water authority. underwired bras, belts, tights, etc. ). • A very small load can discolour with the spin phase leading to use detergents and other treatments without the prewash phase to wash laundry with normal soil. • Always start the HINTS AND TIPS If ...coloured items can cause balance problems with the first wash. b. c. press the Start/Pause button. powder detergents for whites and laundry sanitization - Use the correct quantity of the product. 32 THE LAUNDRY LOAD • Divide the laundry into: white, coloured, synthetics, delicates and wool. •...

User Manual
Page 33
... is at reduced temperature CARE AND CLEANING • = The item can not be tumble dried. MAINTENANCE WASH The repeated and prolonged use alcohol, solvents or chemical products. WARNING! CAUTION! CAUTION! DRYING CYCLE DURATION The drying time can cause detergent deposits, fluff residues,... water tap. • Check if the drain hose is completed remove the laundry promptly. When the drying programme is connected properly. Use fabric conditioner in your area is still damp, set a drying programme for this laundry: • Synthetic curtains. • Pieces ...
... is at reduced temperature CARE AND CLEANING • = The item can not be tumble dried. MAINTENANCE WASH The repeated and prolonged use alcohol, solvents or chemical products. WARNING! CAUTION! CAUTION! DRYING CYCLE DURATION The drying time can cause detergent deposits, fluff residues,... water tap. • Check if the drain hose is completed remove the laundry promptly. When the drying programme is connected properly. Use fabric conditioner in your area is still damp, set a drying programme for this laundry: • Synthetic curtains. • Pieces ...

User Manual
Page 34
... special double lip trap in the porthole seal, where they can be drained out with the water, in a while carry out the following cleaning procedure: 1. Use a small brush to remove any left residues. 3. Regularly examine the seal and remove all objects from the upper and lower part of the cycle. CLEANING...
... special double lip trap in the porthole seal, where they can be drained out with the water, in a while carry out the following cleaning procedure: 1. Use a small brush to remove any left residues. 3. Regularly examine the seal and remove all objects from the upper and lower part of the cycle. CLEANING...
User Manual
Page 38
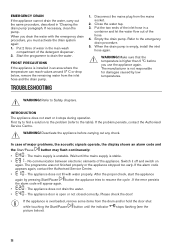
... display shows an alarm code and the Start/Pause button may flash continuously: • - The appliance does not fill with the emergency drain procedure, you use the appliance again. If the error persists the alarm code will appear again. • - Please check the door! WARNING! The appliance door is installed in...
... display shows an alarm code and the Start/Pause button may flash continuously: • - The appliance does not fill with the emergency drain procedure, you use the appliance again. If the error persists the alarm code will appear again. • - Please check the door! WARNING! The appliance door is installed in...


