
Owners Manual
Page 3
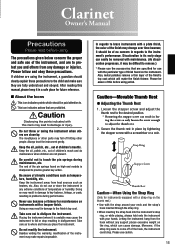
... regards to the desired position. * Removing the stopper screw can cause damage. Loosen the stopper screw and adjust the thumb rest to the instrument's performance. Clarinet Owner's Manual Precautions Please read before using polish. If children are specified for maintenance on the instrument. Doing so may make sure they are close...
... regards to the desired position. * Removing the stopper screw can cause damage. Loosen the stopper screw and adjust the thumb rest to the instrument's performance. Clarinet Owner's Manual Precautions Please read before using polish. If children are specified for maintenance on the instrument. Doing so may make sure they are close...
Owners Manual
Page 4
... surface with the keys facing up. ● After use a cleaning swab to direct sunlight for long periods of time. The wooden clarinet is extremely weather resistant). Precautions The wooden clarinet's body is made of natural Grenadilla (other models are made of ABS resin which it is attached. 14 To keep your instrument...
... surface with the keys facing up. ● After use a cleaning swab to direct sunlight for long periods of time. The wooden clarinet is extremely weather resistant). Precautions The wooden clarinet's body is made of natural Grenadilla (other models are made of ABS resin which it is attached. 14 To keep your instrument...
Owners Manual
Page 5
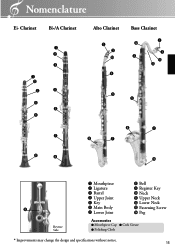
Nomenclature Eb Clarinet Bb/A Clarinet q w e q w e r t t y u Alto Clarinet q w !0 r Bass Clarinet q !2 w r !1 !3 t t i u i u i i !4 q Mouthpiece i Bell w Ligature o Register Key e Barrel !0 Neck r Upper Joint !1 Upper Neck t Key !2 Lower Neck o y Main Body !3 Fastening Screw u Lower Joint !4 Peg Reverse Side Accessories ● Mouthpiece Cap ● Cork Grease ● Polishing Cloth * Improvements may change the design and specifications without notice. 15
Nomenclature Eb Clarinet Bb/A Clarinet q w e q w e r t t y u Alto Clarinet q w !0 r Bass Clarinet q !2 w r !1 !3 t t i u i u i i !4 q Mouthpiece i Bell w Ligature o Register Key e Barrel !0 Neck r Upper Joint !1 Upper Neck t Key !2 Lower Neck o y Main Body !3 Fastening Screw u Lower Joint !4 Peg Reverse Side Accessories ● Mouthpiece Cap ● Cork Grease ● Polishing Cloth * Improvements may change the design and specifications without notice. 15

Owners Manual
Page 6
... made of cork grease to the receiver side as shown in your left hand as well. ■ Assembly Bb/A Clarinet 1. When holding and assembling the instrument, take care not to raise the bridge key. To link the upper and lower joint bridge keys together, hold ... the keys. bridge key 2. Also, if you have difficulty attaching the joints together when assembling the instrument, apply a thin coat of the bridge key. Eb Clarinet 1. After connecting the upper and lower joints together, attach the mouthpiece. 2. Attach the barrel to the upper joint and the bell to the lower joint...
... made of cork grease to the receiver side as shown in your left hand as well. ■ Assembly Bb/A Clarinet 1. When holding and assembling the instrument, take care not to raise the bridge key. To link the upper and lower joint bridge keys together, hold ... the keys. bridge key 2. Also, if you have difficulty attaching the joints together when assembling the instrument, apply a thin coat of the bridge key. Eb Clarinet 1. After connecting the upper and lower joints together, attach the mouthpiece. 2. Attach the barrel to the upper joint and the bell to the lower joint...
Owners Manual
Page 7
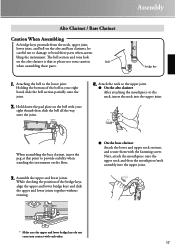
.../neck assembly into the upper joint. * Make sure the upper and lower bridge keys do not come into the upper joint. Assembly Alto Clarinet / Bass Clarinet Caution When Assembling As bridge keys protrude from the neck, upper joint, lower joint, and bell on the floor. 3. When assembling the bass...hole on the bell with your right hand, slide the bell section partially onto the joint. 2. Hold down the pad plate on the alto clarinet is thin so please use extra caution Bell when assembling these parts when assem- Assemble the upper and lower joints. Attaching the bell to ...
.../neck assembly into the upper joint. * Make sure the upper and lower bridge keys do not come into the upper joint. Assembly Alto Clarinet / Bass Clarinet Caution When Assembling As bridge keys protrude from the neck, upper joint, lower joint, and bell on the floor. 3. When assembling the bass...hole on the bell with your right hand, slide the bell section partially onto the joint. 2. Hold down the pad plate on the alto clarinet is thin so please use extra caution Bell when assembling these parts when assem- Assemble the upper and lower joints. Attaching the bell to ...
Owners Manual
Page 8
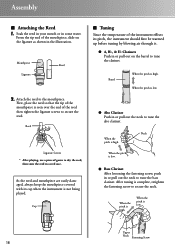
...Cap ■ Tuning Since the temperature of the mouthpiece is low. When the pitch is seen over the end of gauze to tune the bass clarinet. Mouthpiece Reed Ligature 2. As the reed and mouthpiece are easily damaged, always keep the mouthpiece covered with its pitch, the instrument should first be ...warmed up before tuning by blowing air through it. ● A, Bb, & Eb Clarinets Push in or pull out on the ligature as shown in a reed case. When the pitch is not being played. Upper Neck Fastening Screw 18...
...Cap ■ Tuning Since the temperature of the mouthpiece is low. When the pitch is seen over the end of gauze to tune the bass clarinet. Mouthpiece Reed Ligature 2. As the reed and mouthpiece are easily damaged, always keep the mouthpiece covered with its pitch, the instrument should first be ...warmed up before tuning by blowing air through it. ● A, Bb, & Eb Clarinets Push in or pull out on the ligature as shown in a reed case. When the pitch is not being played. Upper Neck Fastening Screw 18...
Owners Manual
Page 9
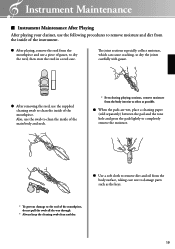
... the swab all the way through. * Always keep the cleaning swab clean and dry. 19 Instrument Maintenance ■ Instrument Maintenance After Playing After playing your clarinet, use the following procedures to remove moisture and dirt from the inside of the instrument. ● After playing, remove the reed from the body surface...
... the swab all the way through. * Always keep the cleaning swab clean and dry. 19 Instrument Maintenance ■ Instrument Maintenance After Playing After playing your clarinet, use the following procedures to remove moisture and dirt from the inside of the instrument. ● After playing, remove the reed from the body surface...

