
Owners Manual
Page 3
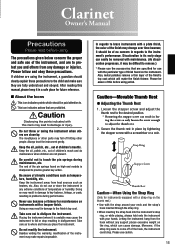
If children are using the instrument, a guardian should clearly explain these precautions. Keep the oil, polish, etc., out of children's reach and do not use caution. 13 Keep the instrument away from heat sources such as temperature, humidity, etc. Doing so may make repairs impossible. Do not modify the instrument. Besides voiding the warranty, modification of finish found on the thumb rest.) • Use with the strap around your neck and the strap's hook inserted through the strap ring. • When inserting the strap hook into the instrument's strap ring, or while playing, ...
If children are using the instrument, a guardian should clearly explain these precautions. Keep the oil, polish, etc., out of children's reach and do not use caution. 13 Keep the instrument away from heat sources such as temperature, humidity, etc. Doing so may make repairs impossible. Do not modify the instrument. Besides voiding the warranty, modification of finish found on the thumb rest.) • Use with the strap around your neck and the strap's hook inserted through the strap ring. • When inserting the strap hook into the instrument's strap ring, or while playing, ...
Owners Manual
Page 4
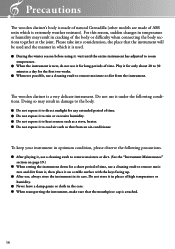
The wooden clarinet is attached. 14 Doing so may result in the case. ● When transporting the instrument, make sure that the mouthpiece cap is a very delicate instrument. Do not store it in places of high temperature or humidity. ● Never leave a damp gauze or cloth in cracking of the body or difficulty when connecting the body sections together at the joint. Please take into consideration, the place that from an air-conditioner. For this reason, sudden changes in temperature or humidity may result in its case. Play it for only about 20 to 30 minutes a day for the...
The wooden clarinet is attached. 14 Doing so may result in the case. ● When transporting the instrument, make sure that the mouthpiece cap is a very delicate instrument. Do not store it in places of high temperature or humidity. ● Never leave a damp gauze or cloth in cracking of the body or difficulty when connecting the body sections together at the joint. Please take into consideration, the place that from an air-conditioner. For this reason, sudden changes in temperature or humidity may result in its case. Play it for only about 20 to 30 minutes a day for the...
Owners Manual
Page 5
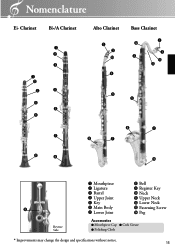
Nomenclature Eb Clarinet Bb/A Clarinet q w e q w e r t t y u Alto Clarinet q w !0 r Bass Clarinet q !2 w r !1 !3 t t i u i u i i !4 q Mouthpiece i Bell w Ligature o Register Key e Barrel !0 Neck r Upper Joint !1 Upper Neck t Key !2 Lower Neck o y Main Body !3 Fastening Screw u Lower Joint !4 Peg Reverse Side Accessories ● Mouthpiece Cap ● Cork Grease ● Polishing Cloth * Improvements may change the design and specifications without notice. 15
Nomenclature Eb Clarinet Bb/A Clarinet q w e q w e r t t y u Alto Clarinet q w !0 r Bass Clarinet q !2 w r !1 !3 t t i u i u i i !4 q Mouthpiece i Bell w Ligature o Register Key e Barrel !0 Neck r Upper Joint !1 Upper Neck t Key !2 Lower Neck o y Main Body !3 Fastening Screw u Lower Joint !4 Peg Reverse Side Accessories ● Mouthpiece Cap ● Cork Grease ● Polishing Cloth * Improvements may change the design and specifications without notice. 15

Owners Manual
Page 6
After connecting the upper and lower joints together, attach the mouthpiece. 2. Slide the lower joint onto the upper joint by rotating the lower joint. Attach the barrel and bell to the barrel. 16 If the joints still do not come into contact with each other. 4. Attach the barrel to the upper joint and the bell to the lower joint. * Make sure the upper and lower bridge keys do not go together smoothly, apply a thin coat of cork grease to the receiver side as shown in your right hand and check the position of the bridge key. Attach the mouthpiece to the main body. 3. The ...
After connecting the upper and lower joints together, attach the mouthpiece. 2. Slide the lower joint onto the upper joint by rotating the lower joint. Attach the barrel and bell to the barrel. 16 If the joints still do not come into contact with each other. 4. Attach the barrel to the upper joint and the bell to the lower joint. * Make sure the upper and lower bridge keys do not go together smoothly, apply a thin coat of cork grease to the receiver side as shown in your right hand and check the position of the bridge key. Attach the mouthpiece to the main body. 3. The ...
Owners Manual
Page 7
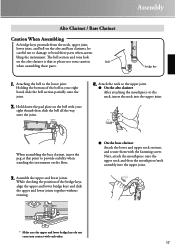
Holding the bottom of the bridge keys, align the upper and lower bridge keys and slide the upper and lower joints together without twisting. ● On the bass clarinet Attach the lower and upper neck sections and secure them with your right hand, slide the bell section partially onto the joint. 2. Assemble the upper and lower joints. bridge key 1. Hold down the pad plate on the bell with the fastening screw. While checking the position of the bell in your right thumb then slide the bell all the way onto the joint. 4. Attaching the bell to provide stability when standing the...
Holding the bottom of the bridge keys, align the upper and lower bridge keys and slide the upper and lower joints together without twisting. ● On the bass clarinet Attach the lower and upper neck sections and secure them with your right hand, slide the bell section partially onto the joint. 2. Assemble the upper and lower joints. bridge key 1. Hold down the pad plate on the bell with the fastening screw. While checking the position of the bell in your right thumb then slide the bell all the way onto the joint. 4. Attaching the bell to provide stability when standing the...
Owners Manual
Page 8
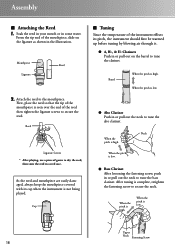
When the pitch is high. Mouthpiece Reed Ligature 2. Barrel When the pitch is high. When the pitch is low. When the pitch is low. Soak the reed in your mouth or in or pull out the neck to tune the clarinet. Cap ■ Tuning Since the temperature of gauze to dry the reed, then store the reed in or pull out on the ligature as shown in or pull out the neck to the mouthpiece. Upper Neck Fastening Screw 18 Assembly ■ Attaching the Reed 1. Reed Ligature Screws * After playing, use a piece of the instrument effects its cap when the instrument is not being...
When the pitch is high. Mouthpiece Reed Ligature 2. Barrel When the pitch is high. When the pitch is low. When the pitch is low. Soak the reed in your mouth or in or pull out the neck to tune the clarinet. Cap ■ Tuning Since the temperature of gauze to dry the reed, then store the reed in or pull out on the ligature as shown in or pull out the neck to the mouthpiece. Upper Neck Fastening Screw 18 Assembly ■ Attaching the Reed 1. Reed Ligature Screws * After playing, use a piece of the instrument effects its cap when the instrument is not being...
Owners Manual
Page 9
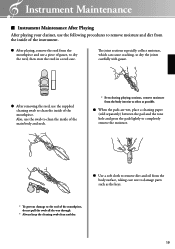
Instrument Maintenance ■ Instrument Maintenance After Playing After playing your clarinet, use the following procedures to remove moisture and dirt from the inside of the main body and neck. * Even during playing sessions, remove moisture from the body interior as often as possible. ● When the pads are wet, place a cleaning paper (sold separately) between the pad and the tone hole and press the pads lightly to completely remove the moisture. ● Use a soft cloth to remove dirt and oil from the mouthpiece and use the supplied cleaning swab to clean the inside of gauze, to...
Instrument Maintenance ■ Instrument Maintenance After Playing After playing your clarinet, use the following procedures to remove moisture and dirt from the inside of the main body and neck. * Even during playing sessions, remove moisture from the body interior as often as possible. ● When the pads are wet, place a cleaning paper (sold separately) between the pad and the tone hole and press the pads lightly to completely remove the moisture. ● Use a soft cloth to remove dirt and oil from the mouthpiece and use the supplied cleaning swab to clean the inside of gauze, to...
Owners Manual
Page 10
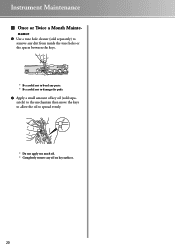
Instrument Maintenance ■ Once or Twice a Month Maintenance ● Use a tone hole cleaner (sold separately) to remove any dirt from inside the tone holes or the spaces between the keys. * Be careful not to bend any parts. * Be careful not to damage the pads. ● Apply a small amount of key oil (sold separately) to the mechanism then move the keys to allow the oil to spread evenly. * Do not apply too much oil. * Completely remove any oil on key surfaces. 20
Instrument Maintenance ■ Once or Twice a Month Maintenance ● Use a tone hole cleaner (sold separately) to remove any dirt from inside the tone holes or the spaces between the keys. * Be careful not to bend any parts. * Be careful not to damage the pads. ● Apply a small amount of key oil (sold separately) to the mechanism then move the keys to allow the oil to spread evenly. * Do not apply too much oil. * Completely remove any oil on key surfaces. 20
Owners Manual
Page 11
Please use caution. If the joint is nothing is tight, apply a small amount of cork grease to the keys. In this time, make the joints tight in the summer and loose in temperature or humidity can make sure that nothing in contact with a cloth. After playing the instrument keep the instrument in position, be careful not to apply unnecessary pressure to the joint cork. If the body cracks, take the instrument to your dealer for repair. ➞ Do not apply excessive force to the instrument such as well. ➞ Changes in temperature and/or humidity can cause the ...
Please use caution. If the joint is nothing is tight, apply a small amount of cork grease to the keys. In this time, make the joints tight in the summer and loose in temperature or humidity can make sure that nothing in contact with a cloth. After playing the instrument keep the instrument in position, be careful not to apply unnecessary pressure to the joint cork. If the body cracks, take the instrument to your dealer for repair. ➞ Do not apply excessive force to the instrument such as well. ➞ Changes in temperature and/or humidity can cause the ...

Owners Manual
Page 14
Auf Umweltpapier mit Sojatinte gedruckt. This document is printed on chlorine free (ECF) paper with soy ink. Ce document a été imprimé sur du papier non blanchi au chlore avec de l'encre d'huile de soja. Este documento se ha impreso en papel sin cloro alguno, con tinta de soja ECF ECF soy ink ECF 2428440 1111POCP-D0 XXXXXXXX Printed in Japan
Auf Umweltpapier mit Sojatinte gedruckt. This document is printed on chlorine free (ECF) paper with soy ink. Ce document a été imprimé sur du papier non blanchi au chlore avec de l'encre d'huile de soja. Este documento se ha impreso en papel sin cloro alguno, con tinta de soja ECF ECF soy ink ECF 2428440 1111POCP-D0 XXXXXXXX Printed in Japan
