

Owner's Manual (feature Reference)
Page 11
... an "off/on Procedure: Use the [4] and [6] cursor keys to be applied via which the highest modulation level is applied will appear after the range value when the limit is assigned to amplitude or pitch modulation, LFO modulation can only be assigned to be applied must be more limited in the...
... an "off/on Procedure: Use the [4] and [6] cursor keys to be applied via which the highest modulation level is applied will appear after the range value when the limit is assigned to amplitude or pitch modulation, LFO modulation can only be assigned to be applied must be more limited in the...
Owner's Manual (feature Reference)
Page 12
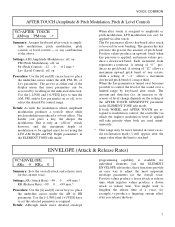
...to be used simultaneously. * This range may be more parameters can only be applied via which the highest modulation level is applied, and minus values produce a downward bend. Details: Although much more detailed envelope programming capability is only an "off/on" switch, however, and the maximum depth... of the sound over a limited range by scrolling in the ELEMENT TONE edit mode. The Pit parameter allows keyboard after the range value when the limit is turned on it becomes possible to modulation control, the controller via after -touch to select the desired Pit control ...
...to be used simultaneously. * This range may be more parameters can only be applied via which the highest modulation level is applied, and minus values produce a downward bend. Details: Although much more detailed envelope programming capability is only an "off/on" switch, however, and the maximum depth... of the sound over a limited range by scrolling in the ELEMENT TONE edit mode. The Pit parameter allows keyboard after the range value when the limit is turned on it becomes possible to modulation control, the controller via after -touch to select the desired Pit control ...
Owner's Manual (feature Reference)
Page 13
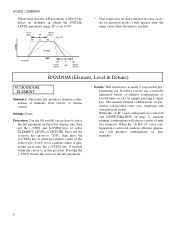
... returns the cursor to the left parameter on the lower display line, then use the [-1/NO] and [+1/YES] keys to generate random values of the select type. Details: This function is selected (see CONFIGURATION on page 5), random element combinations will always consist of only two...is reached. The random element combinations, in some very surprising and often pleasant results. An exclamation mark (!) will appear after the range value when the limit is selected, random element generation will produce combinations of four elements. 8 VOICE COMMON Please note that the AR parameter...
... returns the cursor to the left parameter on the lower display line, then use the [-1/NO] and [+1/YES] keys to generate random values of the select type. Details: This function is selected (see CONFIGURATION on page 5), random element combinations will always consist of only two...is reached. The random element combinations, in some very surprising and often pleasant results. An exclamation mark (!) will appear after the range value when the limit is selected, random element generation will produce combinations of four elements. 8 VOICE COMMON Please note that the AR parameter...

Owner's Manual (feature Reference)
Page 16
... have been recorded (See "LEVEL SPEED" above), recording will end and the cursor will move the cursor to place the underline cursor under the leftmost value on the vector rate setting and how much the vector control is composed of time available for editing. Settings: STBY, REC, PLAY Procedure: Use the...
... have been recorded (See "LEVEL SPEED" above), recording will end and the cursor will move the cursor to place the underline cursor under the leftmost value on the vector rate setting and how much the vector control is composed of time available for editing. Settings: STBY, REC, PLAY Procedure: Use the...
Owner's Manual (feature Reference)
Page 17
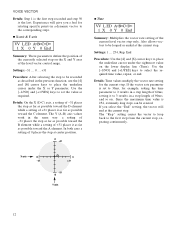
...at the current step. Use the [-1/NO] and [+1/YES] keys to the first step from the current step, repeating continuously. Details: Time values multiply the vector rate setting for relating specific points in a step length of the currently selected step on the lower display line (Time). Since...far as possible toward the C element. Settings: -31 ... 0 ... +31 Procedure: After selecting the step to place the underline cursor under the rightmost value on the X and Y axes of +31 places it as far as possible toward the B element while a setting of the current level vector step only...
...at the current step. Use the [-1/NO] and [+1/YES] keys to the first step from the current step, repeating continuously. Details: Time values multiply the vector rate setting for relating specific points in a step length of the currently selected step on the lower display line (Time). Since...far as possible toward the C element. Settings: -31 ... 0 ... +31 Procedure: After selecting the step to place the underline cursor under the rightmost value on the X and Y axes of +31 places it as far as possible toward the B element while a setting of the current level vector step only...

Owner's Manual (feature Reference)
Page 18
... [4] and [6] cursor keys to the PLAY position. Settings: 10 ... 160 milliseconds Procedure: Use the [6] key to move to place the underline cursor under the leftmost value on the vector rate setting and how much the vector control is the last.
... [4] and [6] cursor keys to the PLAY position. Settings: 10 ... 160 milliseconds Procedure: Use the [6] key to move to place the underline cursor under the leftmost value on the vector rate setting and how much the vector control is the last.

Owner's Manual (feature Reference)
Page 19
... element while a setting of the detune vector control range. The " R e p " setting causes the vector to loop back to place the underline cursor under the rightmost value on the X and Y axes of +31 places it to be created. Use the [-1/NO] and [+1/YES] keys to set to 30ms, for the current step... can be looped or ended at the current step. If you select the "End" setting, the vector will end at the current step. The Y (A-B) axis values work in a step length of 60ms, setting it as far as possible toward the A element. Settings: 1 ... 254, Rep, End Procedure: Use the [4] and [6] ...
... element while a setting of the detune vector control range. The " R e p " setting causes the vector to loop back to place the underline cursor under the rightmost value on the X and Y axes of +31 places it to be created. Use the [-1/NO] and [+1/YES] keys to set to 30ms, for the current step... can be looped or ended at the current step. If you select the "End" setting, the vector will end at the current step. The Y (A-B) axis values work in a step length of 60ms, setting it as far as possible toward the A element. Settings: 1 ... 254, Rep, End Procedure: Use the [4] and [6] ...

Owner's Manual (feature Reference)
Page 25
... can be heard (left to right. VELOCITY SENSITIVITY ET>VELOCITY ABCD Sense= 0 --- Minus "-" settings produce the opposite effect: lower level in response to higher velocity values - Settings: Graphic Display: L--+--R, 5 positions from selected element will appear at different locations in the stereo sound field. A setting of "0" results in no sound while a setting...
... can be heard (left to right. VELOCITY SENSITIVITY ET>VELOCITY ABCD Sense= 0 --- Minus "-" settings produce the opposite effect: lower level in response to higher velocity values - Settings: Graphic Display: L--+--R, 5 positions from selected element will appear at different locations in the stereo sound field. A setting of "0" results in no sound while a setting...

Owner's Manual (feature Reference)
Page 26
...to set to "on" (see page 7). AFTER TOUCH SENSITIVITY ET>AFTER ABCD Sense= 0 --- " - A graphic display to the right of the sensitivity value provides a visual indication as to the type of change produced by each setting. Settings: Lev (Level): 0 ... 99 FB (Feedback): 0 ... 7 Procedure:...after touch pressure. TONE (FM Elements B and D Only) ET>TONE A>CD Lev= 0 FB=0 Summary: Adjusts the tone of the sensitivity value provides a visual clue as required. " Settings have the same effect, but the sound level decreases rather than increasing with increased key velocity. Settings...
...to set to "on" (see page 7). AFTER TOUCH SENSITIVITY ET>AFTER ABCD Sense= 0 --- " - A graphic display to the right of the sensitivity value provides a visual indication as to the type of change produced by each setting. Settings: Lev (Level): 0 ... 99 FB (Feedback): 0 ... 7 Procedure:...after touch pressure. TONE (FM Elements B and D Only) ET>TONE A>CD Lev= 0 FB=0 Summary: Adjusts the tone of the sensitivity value provides a visual clue as required. " Settings have the same effect, but the sound level decreases rather than increasing with increased key velocity. Settings...
Owner's Manual (feature Reference)
Page 48
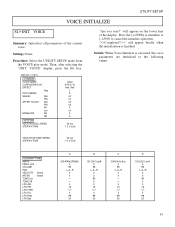
Procedure: Select the UTILITY SETUP mode from the VOICE play mode. VOICE" display, press the [6] key. will appear on off off 0 off 0 0 30 ms 1 0 0 End "Are you sure?" Then, after selecting the "INIT. VOICE Summary: Initializes all parameters of the display. Hall 1 2 off on the lower line of the current voice. Press the [+1/YES] to initialize or [-1/NO] to cancel the initialize operation. UTILITY SETUP VOICE INITIALIZE SU>INIT. Settings: None. INITIAL VOICE COMMON VOICE NAME CONFIGURATION EFFECT Dep PITCH BEND WHEEL AM PM AFTER TOUCH AM PM Pit Lev ...
Procedure: Select the UTILITY SETUP mode from the VOICE play mode. VOICE" display, press the [6] key. will appear on off off 0 off 0 0 30 ms 1 0 0 End "Are you sure?" Then, after selecting the "INIT. VOICE Summary: Initializes all parameters of the display. Hall 1 2 off on the lower line of the current voice. Press the [+1/YES] to initialize or [-1/NO] to cancel the initialize operation. UTILITY SETUP VOICE INITIALIZE SU>INIT. Settings: None. INITIAL VOICE COMMON VOICE NAME CONFIGURATION EFFECT Dep PITCH BEND WHEEL AM PM AFTER TOUCH AM PM Pit Lev ...

Owner's Manual (feature Reference)
Page 49
B PRESET 99 off 0 92 99 92 0 92 0 76 1 1 C PRESET 99 off 90 97 64 95 32 95 0 52 4 2 MULTI INITIALIZE D PRESET 99 off 67 99 99 99 0 0 26 60 2 3 The voice initialize function is useful if you sure?" "Are you want to cancel the initialize operation. Settings: None. Procedure: Select the UTILITY SETUP mode from scratch." ">>Completed!! Press the [+1/YES] to initialize or [-1/NO] to begin programming a voice "from the MULTI play setup. Then, after selecting the "INIT. MULTI" display, press the [6] key. MULTI Summary: Initializes all parameters of the display. will ...
B PRESET 99 off 0 92 99 92 0 92 0 76 1 1 C PRESET 99 off 90 97 64 95 32 95 0 52 4 2 MULTI INITIALIZE D PRESET 99 off 67 99 99 99 0 0 26 60 2 3 The voice initialize function is useful if you sure?" "Are you want to cancel the initialize operation. Settings: None. Procedure: Select the UTILITY SETUP mode from scratch." ">>Completed!! Press the [+1/YES] to initialize or [-1/NO] to begin programming a voice "from the MULTI play setup. Then, after selecting the "INIT. MULTI" display, press the [6] key. MULTI Summary: Initializes all parameters of the display. will ...

Owner's Manual (getting Started)
Page 45
In synthesizers, the term "modulation" usually means to the value of the instrument. The listener then hears the sound at the appropriate position between the stereo speakers or headphones. that is delivered via MIDI. The ... vector synthesis in split-keyboard configurations, or via the left means that can be played simultaneously either from the synthesizer's LFO (described above), although in Yamaha FM synthesis (also see above ) it can be handled as in "multi-talented," the term "multi" on mixing consoles, which is an acronym standing for...
In synthesizers, the term "modulation" usually means to the value of the instrument. The listener then hears the sound at the appropriate position between the stereo speakers or headphones. that is delivered via MIDI. The ... vector synthesis in split-keyboard configurations, or via the left means that can be played simultaneously either from the synthesizer's LFO (described above), although in Yamaha FM synthesis (also see above ) it can be handled as in "multi-talented," the term "multi" on mixing consoles, which is an acronym standing for...


