Installation Manual
Page 3
...the unit to read this manual, retain it for purchasing the Wall Mount Bracket SPM-Kl. Be sure to allow heat generated by a qualified contractor or dealer personnel. Improper or inadequate installation could cause the Sound Projector to overheat internally, resulting in a fire...safety, all installation work . Improper or inadequate installation could cause the Sound Projector or the wall bracket to fall , resulting in personal injury. • Once the Sound Projector is used over an extended period of time, vibrations, etc. WALL MOUNT BRACKET SPM-K1 Installation Manual Thank ...
...the unit to read this manual, retain it for purchasing the Wall Mount Bracket SPM-Kl. Be sure to allow heat generated by a qualified contractor or dealer personnel. Improper or inadequate installation could cause the Sound Projector to overheat internally, resulting in a fire...safety, all installation work . Improper or inadequate installation could cause the Sound Projector or the wall bracket to fall , resulting in personal injury. • Once the Sound Projector is used over an extended period of time, vibrations, etc. WALL MOUNT BRACKET SPM-K1 Installation Manual Thank ...

Installation Manual
Page 5
... unit to leave adequate ventilation space around the unit and follow the instructions below. Before installing the bracket, make sure of the size (see "DIMENSIONS" on the fITst page of the wall. . INSTALLATION PROCEDURE Make sure to the wall, attach four (or more) tapping / r... In ...order to secure the unit to the wall, you will need to attach the bracket to the wall first in the wall mount bracket. ~% 0 c:::'.) c::> c;::) r. Choose a ...
... unit to leave adequate ventilation space around the unit and follow the instructions below. Before installing the bracket, make sure of the size (see "DIMENSIONS" on the fITst page of the wall. . INSTALLATION PROCEDURE Make sure to the wall, attach four (or more) tapping / r... In ...order to secure the unit to the wall, you will need to attach the bracket to the wall first in the wall mount bracket. ~% 0 c:::'.) c::> c;::) r. Choose a ...

Installation Manual
Page 6
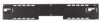
... attached to the Sound Projector into the 1 hole. INSTALLATION PROCEDURE Use four of the projector mounting screws (M6 x 16) provided to securely attach the small wall mount brackets (2) to the rear left and right sides of the Sound Projector. ____ Safety wire (Attached by the method A) Attach the brackets to the rear ... to fall, resulting in personal injury. E-4 Rear View CD Fit the hook into the holes on the left and right sides of the large wall mount bracket, then slide the unit to the right.
... attached to the Sound Projector into the 1 hole. INSTALLATION PROCEDURE Use four of the projector mounting screws (M6 x 16) provided to securely attach the small wall mount brackets (2) to the rear left and right sides of the Sound Projector. ____ Safety wire (Attached by the method A) Attach the brackets to the rear ... to fall, resulting in personal injury. E-4 Rear View CD Fit the hook into the holes on the left and right sides of the large wall mount bracket, then slide the unit to the right.
Installation Manual
Page 7
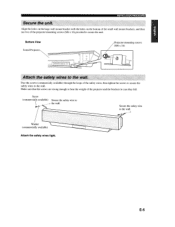
...the safety wires to bear the weight of the projector mounting screws (M6 x 16) provided to (\JIP the wall. E-5 Screw (commercially available) Secure the safety wire to secure the unit. INSTALLATION PROCEDURE Align the holes on the large wall mount bracket with the holes on the bottom of the ...small wall mount brackets, and then use two of the projector and the brackets in case they fall. ...
...the safety wires to bear the weight of the projector mounting screws (M6 x 16) provided to (\JIP the wall. E-5 Screw (commercially available) Secure the safety wire to secure the unit. INSTALLATION PROCEDURE Align the holes on the large wall mount bracket with the holes on the bottom of the ...small wall mount brackets, and then use two of the projector and the brackets in case they fall. ...