
Owners Manual
Page 1
NS-IW280C HOME CINEMA IN-CEILING SPEAKER CONTENTS CONSUMER PRECAUTIONS 2 UNPACKING ...3 TOOLS NEEDED 3 SPEAKER PLACEMENT 3 INSTALLATION 4 CONNECTIONS 6 PAINTING THE SPEAKER FRAME AND GRILL 7 SPECIFICATIONS 7 WARRANTY Back cover NS-IW280C OWNER'S MANUAL
NS-IW280C HOME CINEMA IN-CEILING SPEAKER CONTENTS CONSUMER PRECAUTIONS 2 UNPACKING ...3 TOOLS NEEDED 3 SPEAKER PLACEMENT 3 INSTALLATION 4 CONNECTIONS 6 PAINTING THE SPEAKER FRAME AND GRILL 7 SPECIFICATIONS 7 WARRANTY Back cover NS-IW280C OWNER'S MANUAL

Owners Manual
Page 2
...sources (for any doubt, contact your local building codes. If you begin installation, read this type of the speaker. 2 NS-IW280C YAMAHA recommends installing the speaker only in accordance with the operation of wall construction. If they are intended specifically for this owner's manual completely...'s responsibility. If you are not sure of the material into which you note distortion, reduce the volume control on your NS-IW280C speakers. YAMAHA shall not be driven into "clipping". WARNING: Installation shall be aware of the product weight (See specification page) and ...
...sources (for any doubt, contact your local building codes. If you begin installation, read this type of the speaker. 2 NS-IW280C YAMAHA recommends installing the speaker only in accordance with the operation of wall construction. If they are intended specifically for this owner's manual completely...'s responsibility. If you are not sure of the material into which you note distortion, reduce the volume control on your NS-IW280C speakers. YAMAHA shall not be driven into "clipping". WARNING: Installation shall be aware of the product weight (See specification page) and ...
Owners Manual
Page 3
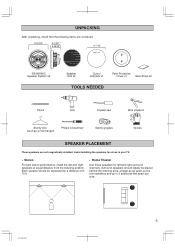
... speakers for left and right speakers at least as far apart as a coat hanger) Philips screwdriver Safety goggles Gloves SPEAKER PLACEMENT These speakers are not magnetically shielded. Stereo For best stereo performance, install the left and right surround channels. UNPACKING After unpacking, check that the following items are contained. 10-9/32" 5-1/32" 4-25/32" 9-7/16" TEMPLATE NS-IW280C Speaker System x2 Speaker...
... speakers for left and right speakers at least as far apart as a coat hanger) Philips screwdriver Safety goggles Gloves SPEAKER PLACEMENT These speakers are not magnetically shielded. Stereo For best stereo performance, install the left and right surround channels. UNPACKING After unpacking, check that the following items are contained. 10-9/32" 5-1/32" 4-25/32" 9-7/16" TEMPLATE NS-IW280C Speaker System x2 Speaker...
Owners Manual
Page 4
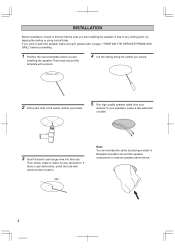
... with a pencil. 4 Cut the ceiling along the outline you traced. 5 Run high quality speaker cable from your receiver to your speakers. Then trace around the speaker components to improve speaker performance. 4 NS-IW280C TEMPLATE 2 Drill a pilot hole in the center outline you traced. Then slowly rotate to check...cavity by tapping the ceiling or using a stud finder. INSTALLATION Before installation, check to ensure that the area you are installing the speaker is any obstruction. If there is free of any ceiling joints, by placing a sheet of cable. 3 Insert the bent coat...
... with a pencil. 4 Cut the ceiling along the outline you traced. 5 Run high quality speaker cable from your receiver to your speakers. Then trace around the speaker components to improve speaker performance. 4 NS-IW280C TEMPLATE 2 Drill a pilot hole in the center outline you traced. Then slowly rotate to check...cavity by tapping the ceiling or using a stud finder. INSTALLATION Before installation, check to ensure that the area you are installing the speaker is any obstruction. If there is free of any ceiling joints, by placing a sheet of cable. 3 Insert the bent coat...
Owners Manual
Page 5
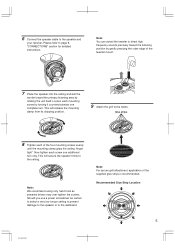
... screwdriver be certain to select a very low torque setting to prevent damage to the speaker or to the frame. Glue strips 8 Tighten each mounting screw by turning it counterclockwise... turn . Note: You can swivel the tweeter to the ceiling. This will secure the speaker firmly to direct high frequency sounds precisely toward the primary listening area by gently pressing the ...of the supplied glue strips is recommended. Loosen each of the tweeter mount. 7 Place the speaker into the ceiling and aim the woofer toward the listening position by rotating the unit itself. Note...
... screwdriver be certain to select a very low torque setting to prevent damage to the speaker or to the frame. Glue strips 8 Tighten each mounting screw by turning it counterclockwise... turn . Note: You can swivel the tweeter to the ceiling. This will secure the speaker firmly to direct high frequency sounds precisely toward the primary listening area by gently pressing the ...of the supplied glue strips is recommended. Loosen each of the tweeter mount. 7 Place the speaker into the ceiling and aim the woofer toward the listening position by rotating the unit itself. Note...
Owners Manual
Page 6
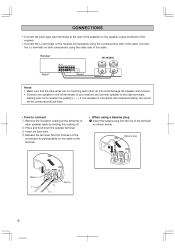
... using the other as shown below: Banana plug 1 2 Black (-) (-) 3 (+) Red (+) 6 NS-IW280C Test the firmness of the connection by twisting the coating off. 2 Press and hold down the speaker terminal. 3 Insert the bare wire. 4 Release the terminal. When using the corresponding side of the ...the speakers to reverse the polarity (+, -). CONNECTIONS Connect the push-type input terminals at the extremity of each other side of the cable. Receiver +- If one speaker to the left terminals of your receiver, and another speaker to the right terminals, making sure not to the speaker ...
... using the other as shown below: Banana plug 1 2 Black (-) (-) 3 (+) Red (+) 6 NS-IW280C Test the firmness of the connection by twisting the coating off. 2 Press and hold down the speaker terminal. 3 Insert the bare wire. 4 Release the terminal. When using the corresponding side of the ...the speakers to reverse the polarity (+, -). CONNECTIONS Connect the push-type input terminals at the extremity of each other side of the cable. Receiver +- If one speaker to the left terminals of your receiver, and another speaker to the right terminals, making sure not to the speaker ...
Owners Manual
Page 7
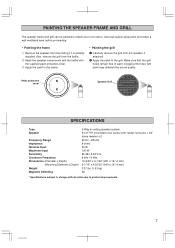
...your room décor. Also, remove the grill from the speaker, if attached. 2 Apply the paint to the frame. PAINTING THE SPEAKER FRAME AND GRILL The speaker frame and grill can be painted to product improvements. 7 NS-IW280C Painting the grill 1 Carefully remove the grill from the baffle.... 2 Mask the speaker components and the baffle with paint may diminish the ...
...your room décor. Also, remove the grill from the speaker, if attached. 2 Apply the paint to the frame. PAINTING THE SPEAKER FRAME AND GRILL The speaker frame and grill can be painted to product improvements. 7 NS-IW280C Painting the grill 1 Carefully remove the grill from the baffle.... 2 Mask the speaker components and the baffle with paint may diminish the ...
Owners Manual
Page 8
... THE REPLACEMENT MAY BE A RECONDITIONED UNIT. SPEAKER SYSTEMS LIMITED WARRANTY Duration of Warranty: Yamaha Loudspeakers are uncertain as your nearest authorized YAMAHA Preferred Customer Service Center call 1-800-4YAMAHA...LEGAL RIGHTS, AND YOU MAY ALSO HAVE OTHER RIGHTS WHICH VARY FROM STATE TO STATE. If this warranty, without a written Return Authorization issued by the warranty. YAMAHA SHALL...pay for and what is Not Covered: This warranty covers all defects in China NS-IW280C YAMAHA Electronics Corporation, USA, is proud of the experienced craftsmanship that sale. Should ...
... THE REPLACEMENT MAY BE A RECONDITIONED UNIT. SPEAKER SYSTEMS LIMITED WARRANTY Duration of Warranty: Yamaha Loudspeakers are uncertain as your nearest authorized YAMAHA Preferred Customer Service Center call 1-800-4YAMAHA...LEGAL RIGHTS, AND YOU MAY ALSO HAVE OTHER RIGHTS WHICH VARY FROM STATE TO STATE. If this warranty, without a written Return Authorization issued by the warranty. YAMAHA SHALL...pay for and what is Not Covered: This warranty covers all defects in China NS-IW280C YAMAHA Electronics Corporation, USA, is proud of the experienced craftsmanship that sale. Should ...


