
Owner's Manual
Page 5
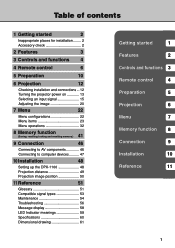
... 1 Getting started 2 Inappropriate places for installation........ 2 Accessory check 2 2 Features 3 3 Controls and functions 4 4 Remote control 6 5 Preparation 10 6 Projection 12 Checking installation and connections ... 12 Turning the projector power on 13 Selecting an... memory.) 9 Connection 46 Connecting to AV components 46 Connecting to computer devices .......... 47 10 Installation 48 Setting up the DPX-1100 48 Projection distance 49 Projection image position 50 11 Reference 51 Glossary 51 Compatible signal types 53 Maintenance 54 Troubleshooting 56 Message...
... 1 Getting started 2 Inappropriate places for installation........ 2 Accessory check 2 2 Features 3 3 Controls and functions 4 4 Remote control 6 5 Preparation 10 6 Projection 12 Checking installation and connections ... 12 Turning the projector power on 13 Selecting an... memory.) 9 Connection 46 Connecting to AV components 46 Connecting to computer devices .......... 47 10 Installation 48 Setting up the DPX-1100 48 Projection distance 49 Projection image position 50 11 Reference 51 Glossary 51 Compatible signal types 53 Maintenance 54 Troubleshooting 56 Message...

Owner's Manual
Page 6
... ventilation to prevent exhaust overheating the unit. 3. Places with at least 30 cm (1 feet) of this unit is not correctly installed in your package. • Remote control • Batteries (AA, UM-3 or R6) • Power cable • Trigger-out DC plug (For USA only) AUTO V. Unstable places • If this unit...
... ventilation to prevent exhaust overheating the unit. 3. Places with at least 30 cm (1 feet) of this unit is not correctly installed in your package. • Remote control • Batteries (AA, UM-3 or R6) • Power cable • Trigger-out DC plug (For USA only) AUTO V. Unstable places • If this unit...

Owner's Manual
Page 7
...each memory number, you can also use the remote control to access many lens functions such as focus, zoom, and lens shift to fine-tune the projector from watching a DVD to use the automatic color balance function The DPX-1100 allows you to become the standard for the... opening the menu screen. 3 The latest digital interface provides sharp, detailed images The DPX-1100 is set to adjust the 7-axis WRGBYCM color coordinate and gain parameters directly. Intelligent memory functions The DPX-1100 can access image adjustment menu items at the touch of environments. For each input jack...
...each memory number, you can also use the remote control to access many lens functions such as focus, zoom, and lens shift to fine-tune the projector from watching a DVD to use the automatic color balance function The DPX-1100 allows you to become the standard for the... opening the menu screen. 3 The latest digital interface provides sharp, detailed images The DPX-1100 is set to adjust the 7-axis WRGBYCM color coordinate and gain parameters directly. Intelligent memory functions The DPX-1100 can access image adjustment menu items at the touch of environments. For each input jack...

Owner's Manual
Page 8
.../ON A A STANDBY/ON indicator (There is also an LED on and off. 6 (Enter) button Sets values when the DPX-1100 is displaying the menu. buttons for the project image on the front panel of the LED indicator meanings. See page 59 for ...SETTING ASPECT INPUT LAMP COVER TEMP FAN DIGITAL CINEMA PROJECTOR DPX-1100 6 7 8 9 0 1 LED Indicators The main unit is not displayed, the DPX-1100 displays the in test pattern on and off. 0 Cursor buttons Use the h, g, +, - 3 Controls and functions Main unit Front remote control sensor STANDBY/ON indicator Exhaust vent Lens Lens cap...
.../ON A A STANDBY/ON indicator (There is also an LED on and off. 6 (Enter) button Sets values when the DPX-1100 is displaying the menu. buttons for the project image on the front panel of the LED indicator meanings. See page 59 for ...SETTING ASPECT INPUT LAMP COVER TEMP FAN DIGITAL CINEMA PROJECTOR DPX-1100 6 7 8 9 0 1 LED Indicators The main unit is not displayed, the DPX-1100 displays the in test pattern on and off. 0 Cursor buttons Use the h, g, +, - 3 Controls and functions Main unit Front remote control sensor STANDBY/ON indicator Exhaust vent Lens Lens cap...

Owner's Manual
Page 9
...input jacks 3 - 5, and RGB signal connectors from computers or AV components. Main unit Controls and functions 3 Rear remote control sensor q w er INPUT B HDMI INPUT A OUT IN REMOTE RS-232C TRIGGER OUT RGB/YPBPR/YCBCR D4 VIDEO G/Y B/PB/CB R/PR/CR HD/SYNC VD S VIDEO VIDEO ...1 2 3 45 6 7 8 90 1 INPUT B (D-sub 15 pin) Receives component video and RGB (RGB/YPBPR/YCBCR) signals. The REMOTE OUT jack outputs the signal received through a cable. Use an S-VIDEO cable for these connections. 3 G/Y (G, or luminance signal) 4 B/PB/CB (B, or color...
...input jacks 3 - 5, and RGB signal connectors from computers or AV components. Main unit Controls and functions 3 Rear remote control sensor q w er INPUT B HDMI INPUT A OUT IN REMOTE RS-232C TRIGGER OUT RGB/YPBPR/YCBCR D4 VIDEO G/Y B/PB/CB R/PR/CR HD/SYNC VD S VIDEO VIDEO ...1 2 3 45 6 7 8 90 1 INPUT B (D-sub 15 pin) Receives component video and RGB (RGB/YPBPR/YCBCR) signals. The REMOTE OUT jack outputs the signal received through a cable. Use an S-VIDEO cable for these connections. 3 G/Y (G, or luminance signal) 4 B/PB/CB (B, or color...

Owner's Manual
Page 10
... modes. u (Enter) button Sets values when the DPX-1100 is projecting. t PATT (PATTERN) button Switches on and off the built-in -line image quality adjustment menu. ( page 40) 6 When using the remote control, point it is currently receiving. 3 V.POS...p LIGHT S VIDEO A HDMI q VIDEO B D4 INPUT MEMORY 1 2 3 w 4 5 6 1 Transmit indicator Lights up when the remote control sends infrared signals to the main unit. 2 AUTO button Automatically sets the DPX-1100 to the best settings for the type of 7m (23 feet) or less. 1 2 e AUTO 3 r V. w MEMORY area Calls stored...
... modes. u (Enter) button Sets values when the DPX-1100 is projecting. t PATT (PATTERN) button Switches on and off the built-in -line image quality adjustment menu. ( page 40) 6 When using the remote control, point it is currently receiving. 3 V.POS...p LIGHT S VIDEO A HDMI q VIDEO B D4 INPUT MEMORY 1 2 3 w 4 5 6 1 Transmit indicator Lights up when the remote control sends infrared signals to the main unit. 2 AUTO button Automatically sets the DPX-1100 to the best settings for the type of 7m (23 feet) or less. 1 2 e AUTO 3 r V. w MEMORY area Calls stored...

Owner's Manual
Page 11
...within 10 seconds. a Remote control code switch The remote control functions when the code set in the menu is the same as that set on and off the input signal selection menu display. p HIDE button Temporarily halts projection of the image the DPX-1100 is ID-1. Press ...again to cancel this jack to link the remote control to this effect. The default menu setting is currently displaying. s Remote control cable jack Connect a cable (commercially available) to the main unit. ...
...within 10 seconds. a Remote control code switch The remote control functions when the code set in the menu is the same as that set on and off the input signal selection menu display. p HIDE button Temporarily halts projection of the image the DPX-1100 is ID-1. Press ...again to cancel this jack to link the remote control to this effect. The default menu setting is currently displaying. s Remote control cable jack Connect a cable (commercially available) to the main unit. ...

Owner's Manual
Page 12
...-232C TRIGGER OUT RGB/YPBPR/YCBCR D4 VIDEO G/Y B/PB/CB R/PR/CR HD/SYNC VD S-VIDEO VIDEO 8 Use the wired remote control configuration to control the DPX-1100 without having to the REMOTE IN jack on the main unit. After loading the batteries, close the cover until it off with those in the battery...
...-232C TRIGGER OUT RGB/YPBPR/YCBCR D4 VIDEO G/Y B/PB/CB R/PR/CR HD/SYNC VD S-VIDEO VIDEO 8 Use the wired remote control configuration to control the DPX-1100 without having to the REMOTE IN jack on the main unit. After loading the batteries, close the cover until it off with those in the battery...

Owner's Manual
Page 13
... B D4 INPUT MEMORY 1 2 3 4 5 6 Use within a left/right arc of 30 degrees 4 Use within the following parameters. Limits for using the remote control Use the remote control within a vertical arc of 30 degrees Warning • Bright or fluorescent light on the main unit... remote sensor may inhibit the functioning of the remote control. • Objects placed between the main unit remote sensor and the remote control may not function correctly if you use it outside the limits described here. Remote control 9 Distance to sensor 7m (...
... B D4 INPUT MEMORY 1 2 3 4 5 6 Use within a left/right arc of 30 degrees 4 Use within the following parameters. Limits for using the remote control Use the remote control within a vertical arc of 30 degrees Warning • Bright or fluorescent light on the main unit... remote sensor may inhibit the functioning of the remote control. • Objects placed between the main unit remote sensor and the remote control may not function correctly if you use it outside the limits described here. Remote control 9 Distance to sensor 7m (...

Owner's Manual
Page 16
.... "Setting up the projector and screen" page 48 Image source component STANDBY /ON PURE DIRECT 2CH/MULTI CH INPUT SELECTOR SPEAKERS A B REC OUT/ZONE 2 SOURCE/REMOTE DTV/LD DVD CABLE MD/TAPE SAT CD-R VCR 1 CD VCR 2 DVR VIDEO AUX TUNER PHONO INPUT MODE MULTI CH INPUT STRAIGHT DSP PROGRAM MULTI...
.... "Setting up the projector and screen" page 48 Image source component STANDBY /ON PURE DIRECT 2CH/MULTI CH INPUT SELECTOR SPEAKERS A B REC OUT/ZONE 2 SOURCE/REMOTE DTV/LD DVD CABLE MD/TAPE SAT CD-R VCR 1 CD VCR 2 DVR VIDEO AUX TUNER PHONO INPUT MODE MULTI CH INPUT STRAIGHT DSP PROGRAM MULTI...

Owner's Manual
Page 17
...indicator changes from blinking to solid green, indicating that the unit is blinking green or lit steady green. Projection 13 INPUT B HDMI INPUT A OUT IN REMOTE RS-232C TRIGGER OUT RGB/YPBPR/YCBCR D4 VIDEO G/Y B/PB/CB R/PR/CR HD/SYNC VD S-VIDEO VIDEO AC inlet button STANDBY/ON button 2....into an AC outlet. Press the STANDBY/ON button (the button on Always remove the lens cap before operating the main unit. ASPECT INPUT Remote Control ASPECT INPUT LAMP COVER TEMP FAN Main unit Warning • Do not remove the power cable while the STANDBY/ON indicator is ready ...
...indicator changes from blinking to solid green, indicating that the unit is blinking green or lit steady green. Projection 13 INPUT B HDMI INPUT A OUT IN REMOTE RS-232C TRIGGER OUT RGB/YPBPR/YCBCR D4 VIDEO G/Y B/PB/CB R/PR/CR HD/SYNC VD S-VIDEO VIDEO AC inlet button STANDBY/ON button 2....into an AC outlet. Press the STANDBY/ON button (the button on Always remove the lens cap before operating the main unit. ASPECT INPUT Remote Control ASPECT INPUT LAMP COVER TEMP FAN Main unit Warning • Do not remove the power cable while the STANDBY/ON indicator is ready ...

Owner's Manual
Page 18
... the STANDBY/ON indicator is blinking green or when the fan is present may appear on Placing the DPX-1100 in standby mode button STANDBY/ON button AUTO V. AC inlet INPUT B HDMI INPUT A OUT IN REMOTE RS-232C TRIGGER OUT RGB/YPBPR/YCBCR D4 VIDEO G/Y B/PB/CB R/PR/CR HD/SYNC VD S-... the fan stops, and the STANDBY/ ON indicator turns orange. This could damage the lamp or reduce lamp life. If you wish to place the DPX-1100 in standby mode until the condensation disappears. Memo • The lamp may also cause the projected image to use the main unit for 2 minutes to...
... the STANDBY/ON indicator is blinking green or when the fan is present may appear on Placing the DPX-1100 in standby mode button STANDBY/ON button AUTO V. AC inlet INPUT B HDMI INPUT A OUT IN REMOTE RS-232C TRIGGER OUT RGB/YPBPR/YCBCR D4 VIDEO G/Y B/PB/CB R/PR/CR HD/SYNC VD S-... the fan stops, and the STANDBY/ ON indicator turns orange. This could damage the lamp or reduce lamp life. If you wish to place the DPX-1100 in standby mode until the condensation disappears. Memo • The lamp may also cause the projected image to use the main unit for 2 minutes to...

Owner's Manual
Page 20
... press the button to the right of the input signal name indicates that there is a submenu available for further details. 16 Selecting an input signal Remote cotrol + button Main unit AUTO V. Press the INPUT button. Input signal VIDEO S VIDEO INPUT A INPUT B HDMI D4 The mark to confirm the setting. POS ZOOM...
... press the button to the right of the input signal name indicates that there is a submenu available for further details. 16 Selecting an input signal Remote cotrol + button Main unit AUTO V. Press the INPUT button. Input signal VIDEO S VIDEO INPUT A INPUT B HDMI D4 The mark to confirm the setting. POS ZOOM...

Owner's Manual
Page 21
Remote cotrol Main unit AUTO V. Use the h or g buttons to project an image for a projection image The display aspect parameter sets the ratio of height to ...
Remote cotrol Main unit AUTO V. Use the h or g buttons to project an image for a projection image The display aspect parameter sets the ratio of height to ...

Owner's Manual
Page 24
... If the center of the screen is equipped with the center of the lens of the DPX-1100, use the V.POS button to adjust the position of the projection screen. Press the V.POS button on the remote control, or press the SETTING button on the main unit. 2. buttons to a suitable ...place. 3. PATT button The DPX-1100 is not in line with three test patterns, the crosshatch pattern necessary for focus and ...
... If the center of the screen is equipped with the center of the lens of the DPX-1100, use the V.POS button to adjust the position of the projection screen. Press the V.POS button on the remote control, or press the SETTING button on the main unit. 2. buttons to a suitable ...place. 3. PATT button The DPX-1100 is not in line with three test patterns, the crosshatch pattern necessary for focus and ...

Owner's Manual
Page 25
... [Zoom] from button IRIS SETTING PATT the display menu. Press the ZOOM button on the main unit IRIS V. Press the IRIS button on the remote control, or press the AUTO SETTING button on the ZOOM button AUTO V. ESCAPE PATTERN MENU SETTING button SETTING 3. ESCAPE PATTERN MENU SETTING button SETTING ... the focus of the projected image. 3. Iris ESCAPE MENU 2. Adjusting the iris setting - To exit from the display menu. POS ZOOM FOCUS remote control, or press the SETTING button on the main unit repeatedly to match the size of the iris for the projected image.
... [Zoom] from button IRIS SETTING PATT the display menu. Press the ZOOM button on the main unit IRIS V. Press the IRIS button on the remote control, or press the AUTO SETTING button on the ZOOM button AUTO V. ESCAPE PATTERN MENU SETTING button SETTING 3. ESCAPE PATTERN MENU SETTING button SETTING ... the focus of the projected image. 3. Iris ESCAPE MENU 2. Adjusting the iris setting - To exit from the display menu. POS ZOOM FOCUS remote control, or press the SETTING button on the main unit repeatedly to match the size of the iris for the projected image.

Owner's Manual
Page 26
... the menu. Press the MENU button on the menu group you can be accessed through the menu. Menu items Items displayed here depend on the remote control or the main unit to use for selection. See page 37 for certain types of input signal (Video, Component, RGB TV, RGB PC). Memory... area of a submenu Image Color Temp. Moving the cursor to an item with a submenu attached displays a to suit your preferences. 7 Menu Menu configurations Configure the DPX-1100 to the right of the item name. Change the memory number and lock/unlock memory settings here( page 41-43).
... the menu. Press the MENU button on the menu group you can be accessed through the menu. Menu items Items displayed here depend on the remote control or the main unit to use for selection. See page 37 for certain types of input signal (Video, Component, RGB TV, RGB PC). Memory... area of a submenu Image Color Temp. Moving the cursor to an item with a submenu attached displays a to suit your preferences. 7 Menu Menu configurations Configure the DPX-1100 to the right of the item name. Change the memory number and lock/unlock memory settings here( page 41-43).

Owner's Manual
Page 27
... INPUT B Signal INPUT B Sync Type HDMI Signal Auto Power Off Auto Input Search Display Language Lamp Running Time Reset 4 Setup 5 Location 9 6 Keystone Correction 6 Remote Control Sensor 10 7 6 Remote Control ID 11 6 Lens Adjustment Lock Lamp Power Menu Color 12 Menu Mode 7 Message Trigger Out 13 8 Baud Rate Memo • Menu items you...
... INPUT B Signal INPUT B Sync Type HDMI Signal Auto Power Off Auto Input Search Display Language Lamp Running Time Reset 4 Setup 5 Location 9 6 Keystone Correction 6 Remote Control Sensor 10 7 6 Remote Control ID 11 6 Lens Adjustment Lock Lamp Power Menu Color 12 Menu Mode 7 Message Trigger Out 13 8 Baud Rate Memo • Menu items you...

Owner's Manual
Page 28
... Español Français Italiano Portuguêsa Setup 9: Location Front/Table Front/Ceiling Rear/Table Rear/Ceiling 10: Remote Control Sensor Front & Rear Front Rear Off 11: Remote Control ID ID 1 ID 2 12: Menu Color Monotone 6 Color 7 13: Trigger Out Lamp Fan RS-232C 1 Standard 2 WRGB • Color Temp...
... Español Français Italiano Portuguêsa Setup 9: Location Front/Table Front/Ceiling Rear/Table Rear/Ceiling 10: Remote Control Sensor Front & Rear Front Rear Off 11: Remote Control ID ID 1 ID 2 12: Menu Color Monotone 6 Color 7 13: Trigger Out Lamp Fan RS-232C 1 Standard 2 WRGB • Color Temp...

Owner's Manual
Page 31
... have selected WRGBYCM in order of the projected image. Choices: 0 to automatically adjust the RGB gain and YCM color coordinates and gain based on the remote control when the WRGBYCM menu is displayed. - You can select 3 levels.
... have selected WRGBYCM in order of the projected image. Choices: 0 to automatically adjust the RGB gain and YCM color coordinates and gain based on the remote control when the WRGBYCM menu is displayed. - You can select 3 levels.
