

Owner's Manual
Page 4
... • The plug severed from the mains lead must be performed only by using a blower or lens paper. • Replace the lamp when the LAMP warning indicator blinks in an environment with high humidity (i.e. Caution: Read this before operating this unit. • To assure the finest performance... voltage than that specified. • Do not use this manual. Containers with liquid in a live socket outlet. For U.K. Contact qualified YAMAHA service personnel when any type of plug to modify or fix this unit and the ceiling mounts for future reference. The wire which is ...
... • The plug severed from the mains lead must be performed only by using a blower or lens paper. • Replace the lamp when the LAMP warning indicator blinks in an environment with high humidity (i.e. Caution: Read this before operating this unit. • To assure the finest performance... voltage than that specified. • Do not use this manual. Containers with liquid in a live socket outlet. For U.K. Contact qualified YAMAHA service personnel when any type of plug to modify or fix this unit and the ceiling mounts for future reference. The wire which is ...

Owner's Manual
Page 8
... for explanations of operation. buttons for the project image on and off. 6 (Enter) button Sets values when the DPX-1100 is not displayed, the DPX-1100 displays the in-line image quality adjustment menu. ( page 40) 7 MENU button Switches the settings and adjustments menu ... Exhaust vent Lens Lens cap Adjustable feet Makes small adjustments to the projection angle Lamp cover Ventilation inlet 1 2 3 4 5 1 STANDBY/ON ESCAPE MENU PATTERN SETTING ASPECT INPUT LAMP COVER TEMP FAN DIGITAL CINEMA PROJECTOR DPX-1100 6 7 8 9 0 1 LED Indicators The main unit is equipped with ...
... for explanations of operation. buttons for the project image on and off. 6 (Enter) button Sets values when the DPX-1100 is not displayed, the DPX-1100 displays the in-line image quality adjustment menu. ( page 40) 7 MENU button Switches the settings and adjustments menu ... Exhaust vent Lens Lens cap Adjustable feet Makes small adjustments to the projection angle Lamp cover Ventilation inlet 1 2 3 4 5 1 STANDBY/ON ESCAPE MENU PATTERN SETTING ASPECT INPUT LAMP COVER TEMP FAN DIGITAL CINEMA PROJECTOR DPX-1100 6 7 8 9 0 1 LED Indicators The main unit is equipped with ...

Owner's Manual
Page 17
... Turning the power on the remote control). POS ZOOM FOCUS The indicator blinks green and the lamp 6 IRIS SETTING PATT lights up in preparation for projection. This could damage the lamp or reduce lamp life. Projection 13 STANDBY/ON ESCAPE MENU STANDBY/ON indicator PATTERN SETTING ASPECT INPUT...changes from blinking to solid green, indicating that the unit is blinking green or lit steady green. ASPECT INPUT Remote Control ASPECT INPUT LAMP COVER TEMP FAN Main unit Warning • Do not remove the power cable while the STANDBY/ON indicator is ready to project. ...
... Turning the power on the remote control). POS ZOOM FOCUS The indicator blinks green and the lamp 6 IRIS SETTING PATT lights up in preparation for projection. This could damage the lamp or reduce lamp life. Projection 13 STANDBY/ON ESCAPE MENU STANDBY/ON indicator PATTERN SETTING ASPECT INPUT...changes from blinking to solid green, indicating that the unit is blinking green or lit steady green. ASPECT INPUT Remote Control ASPECT INPUT LAMP COVER TEMP FAN Main unit Warning • Do not remove the power cable while the STANDBY/ON indicator is ready to project. ...

Owner's Manual
Page 18
...the projector power on again. POS ZOOM FOCUS IRIS SETTING PATT ESCAPE MENU STANDBY/ON ESCAPE PATTERN MENU SETTING 1. Press again to place the DPX-1100 in standby mode, press the STANDBY/ON button again. During this time, the STANDBY/ON indicator blinks orange, and pressing STANDBY/ON does ... the lens cap and remove the plug from the AC outlet. Warning • Condensation may also cause the projected image to cool the lamp. When the unit finishes cooling, the fan stops, and the STANDBY/ ON indicator turns orange. Switching the unit on when condensation is present...
...the projector power on again. POS ZOOM FOCUS IRIS SETTING PATT ESCAPE MENU STANDBY/ON ESCAPE PATTERN MENU SETTING 1. Press again to place the DPX-1100 in standby mode, press the STANDBY/ON button again. During this time, the STANDBY/ON indicator blinks orange, and pressing STANDBY/ON does ... the lens cap and remove the plug from the AC outlet. Warning • Condensation may also cause the projected image to cool the lamp. When the unit finishes cooling, the fan stops, and the STANDBY/ ON indicator turns orange. Switching the unit on when condensation is present...

Owner's Manual
Page 20
... SETTING PATT ESCAPE MENU ASPECT INPUT RESET HDMI STILL LIGHT S VIDEO A DVI VIDEO B D4 INPUT MEMORY 1 2 3 4 5 6 STANDBY/ON ESCAPE MENU PATTERN SETTING button ASPECT INPUT LAMP COVER TEMP FAN INPUT button Cursor button 1. Input signal VIDEO S VIDEO INPUT A INPUT B HDMI D4 2. If you set your computer to use the setting from...
... SETTING PATT ESCAPE MENU ASPECT INPUT RESET HDMI STILL LIGHT S VIDEO A DVI VIDEO B D4 INPUT MEMORY 1 2 3 4 5 6 STANDBY/ON ESCAPE MENU PATTERN SETTING button ASPECT INPUT LAMP COVER TEMP FAN INPUT button Cursor button 1. Input signal VIDEO S VIDEO INPUT A INPUT B HDMI D4 2. If you set your computer to use the setting from...

Owner's Manual
Page 21
...], pressing the + button displays a submenu. POS ZOOM FOCUS IRIS SETTING PATT ESCAPE MENU cursor button STANDBY/ON ESCAPE PATTERN MENU SETTING ASPECT INPUT ASPECT INPUT LAMP COVER TEMP FAN 1. Press the ASPECT button. Use the h or g buttons to project an image for a projection image The display aspect parameter sets the ratio...
...], pressing the + button displays a submenu. POS ZOOM FOCUS IRIS SETTING PATT ESCAPE MENU cursor button STANDBY/ON ESCAPE PATTERN MENU SETTING ASPECT INPUT ASPECT INPUT LAMP COVER TEMP FAN 1. Press the ASPECT button. Use the h or g buttons to project an image for a projection image The display aspect parameter sets the ratio...

Owner's Manual
Page 24
...the remote control, or press the SETTING button on the main unit. 2. Lens Shift ASPECT INPUT LAMP COVER TEMP FAN 20 Select an image for adjusting image quality. POS ZOOM FOCUS IRIS SETTING PATT ESCAPE...ESCAPE MENU PATTERN SETTING Color bar pattern ASPECT INPUT LAMP COVER TEMP FAN Adjusting the vertical position - Using the test pattern to select the necessary pattern. PATT button The DPX-1100 is not in line with three test patterns, ... is equipped with the center of the lens of the DPX-1100, use the V.POS button to adjust the position of the projection screen.
...the remote control, or press the SETTING button on the main unit. 2. Lens Shift ASPECT INPUT LAMP COVER TEMP FAN 20 Select an image for adjusting image quality. POS ZOOM FOCUS IRIS SETTING PATT ESCAPE...ESCAPE MENU PATTERN SETTING Color bar pattern ASPECT INPUT LAMP COVER TEMP FAN Adjusting the vertical position - Using the test pattern to select the necessary pattern. PATT button The DPX-1100 is not in line with three test patterns, ... is equipped with the center of the lens of the DPX-1100, use the V.POS button to adjust the position of the projection screen.

Owner's Manual
Page 25
...on the remote control, or press the AUTO SETTING button on the ZOOM button AUTO V. ESCAPE PATTERN MENU SETTING button SETTING 3. ASPECT INPUT LAMP COVER TEMP FAN 21 Press the h or g buttons to adjust the image to select [FOCUS] IRIS SETTING PATT button from button IRIS SETTING...button 2. ESCAPE PATTERN MENU SETTING button SETTING 3. Focus ESCAPE MENU Memo STANDBY/ON ESCAPE button ESCAPE PATTERN MENU SETTING button SETTING ASPECT INPUT LAMP COVER TEMP FAN • When you want to use the test pattern to match the size of the projected image. 3. Press the ...
...on the remote control, or press the AUTO SETTING button on the ZOOM button AUTO V. ESCAPE PATTERN MENU SETTING button SETTING 3. ASPECT INPUT LAMP COVER TEMP FAN 21 Press the h or g buttons to adjust the image to select [FOCUS] IRIS SETTING PATT button from button IRIS SETTING...button 2. ESCAPE PATTERN MENU SETTING button SETTING 3. Focus ESCAPE MENU Memo STANDBY/ON ESCAPE button ESCAPE PATTERN MENU SETTING button SETTING ASPECT INPUT LAMP COVER TEMP FAN • When you want to use the test pattern to match the size of the projected image. 3. Press the ...

Owner's Manual
Page 27
... Ratio Setup Level (SDTV) Setup Level (HDTV) Signal Status Initial 3 Color System INPUT A Signal INPUT B Signal 4 HDMI Signal Display Language Lamp Running Time Reset Setup 5 Location 9 6 Keystone Correction 6 Lens Adjustment Lock Menu Color 12 7 Menu Mode 8 Image Black Level (Brightness)... Sync Type HDMI Signal Auto Power Off Auto Input Search Display Language Lamp Running Time Reset 4 Setup 5 Location 9 6 Keystone Correction 6 Remote Control Sensor 10 7 6 Remote Control ID 11 6 Lens Adjustment Lock Lamp Power Menu Color 12 Menu Mode 7 Message Trigger Out 13 8 ...
... Ratio Setup Level (SDTV) Setup Level (HDTV) Signal Status Initial 3 Color System INPUT A Signal INPUT B Signal 4 HDMI Signal Display Language Lamp Running Time Reset Setup 5 Location 9 6 Keystone Correction 6 Lens Adjustment Lock Menu Color 12 7 Menu Mode 8 Image Black Level (Brightness)... Sync Type HDMI Signal Auto Power Off Auto Input Search Display Language Lamp Running Time Reset 4 Setup 5 Location 9 6 Keystone Correction 6 Remote Control Sensor 10 7 6 Remote Control ID 11 6 Lens Adjustment Lock Lamp Power Menu Color 12 Menu Mode 7 Message Trigger Out 13 8 ...

Owner's Manual
Page 28
... Rear/Ceiling 10: Remote Control Sensor Front & Rear Front Rear Off 11: Remote Control ID ID 1 ID 2 12: Menu Color Monotone 6 Color 7 13: Trigger Out Lamp Fan RS-232C 1 Standard 2 WRGB • Color Temp. • Color selection screen Color coordinate Gain 4 Special • Subtitle Zoom Subtitle Area V Scroll • Cinema Zoom...
... Rear/Ceiling 10: Remote Control Sensor Front & Rear Front Rear Off 11: Remote Control ID ID 1 ID 2 12: Menu Color Monotone 6 Color 7 13: Trigger Out Lamp Fan RS-232C 1 Standard 2 WRGB • Color Temp. • Color selection screen Color coordinate Gain 4 Special • Subtitle Zoom Subtitle Area V Scroll • Cinema Zoom...

Owner's Manual
Page 34
...operations for signals received at INPUT B. Choices: /English/Deutsch/Español/Français/Italiano/Portuguêsa/ / Displays the total lamp running time. Resets all configurations stored by the memory function to their factory default settings. • [Current Memory] : Return the currently... INPUT A Signal INPUT A Sync Type INPUT B Signal INPUT B Sync Type HDMI Signal Auto Power Off Auto Input Search Display Language Lamp Running Time Reset 30 Selects the color system to their default setting. Choices: On/Off Automatically changes inputs when the unit does not receive...
...operations for signals received at INPUT B. Choices: /English/Deutsch/Español/Français/Italiano/Portuguêsa/ / Displays the total lamp running time. Resets all configurations stored by the memory function to their factory default settings. • [Current Memory] : Return the currently... INPUT A Signal INPUT A Sync Type INPUT B Signal INPUT B Sync Type HDMI Signal Auto Power Off Auto Input Search Display Language Lamp Running Time Reset 30 Selects the color system to their default setting. Choices: On/Off Automatically changes inputs when the unit does not receive...

Owner's Manual
Page 35
...Choices: ID1/ID2 Locks the lens adjustment function. Lowers the power supply to control two main units independently. You can choose to [ON]. Choices: Lamp/Fan/RS-232C Sets the transmission speed of the main unit. Choices: Front & Rear/Front/Rear/Off Sets the remote control ID. Set to [... memory number, input signal and other information on screen. This setting becomes valid from the next time you can adjust the power supplied to the lamp within the range of the menu from the [Menu Brightness] and [Menu Contrast] menus. You can receive commands from 3 color types. The ...
...Choices: ID1/ID2 Locks the lens adjustment function. Lowers the power supply to control two main units independently. You can choose to [ON]. Choices: Lamp/Fan/RS-232C Sets the transmission speed of the main unit. Choices: Front & Rear/Front/Rear/Off Sets the remote control ID. Set to [... memory number, input signal and other information on screen. This setting becomes valid from the next time you can adjust the power supplied to the lamp within the range of the menu from the [Menu Brightness] and [Menu Contrast] menus. You can receive commands from 3 color types. The ...

Owner's Manual
Page 36
... only) Returns parameters back to operate the menus. The button functions are listed below. MEMORY 1 2 3 4 5 6 Main Unit STANDBY/ON 4 ESCAPE PATTERN MENU 1 2 SETTING ASPECT INPUT LAMP COVER TEMP FAN 3 32 h / g (Moves the cursor up the menu (e.g. POS ZOOM FOCUS IRIS SETTING PATT ESCAPE MENU 5 ASPECT INPUT RESET HIDE STILL LIGHT S VIDEO...
... only) Returns parameters back to operate the menus. The button functions are listed below. MEMORY 1 2 3 4 5 6 Main Unit STANDBY/ON 4 ESCAPE PATTERN MENU 1 2 SETTING ASPECT INPUT LAMP COVER TEMP FAN 3 32 h / g (Moves the cursor up the menu (e.g. POS ZOOM FOCUS IRIS SETTING PATT ESCAPE MENU 5 ASPECT INPUT RESET HIDE STILL LIGHT S VIDEO...

Owner's Manual
Page 37
... SETTING PATT ESCAPE MENU ASPECT INPUT STANDBY/ON ESCAPE MENU PATTERN SETTING ASPECT INPUT LAMP COVER TEMP FAN Remote Control Main Unit or Remote Control Main Unit 1. Open ... Window Signal Initial Location Keystone Correction Remote Control Sensor Remote Control ID Lens Adjustment Lock Lamp Power Menu Color Menu Mode Message Trigger Out Baud Rate Front / Table 0 Front & Rear ID 1 Off 105... Monotone Basic Off Lamp 115200bps Setup On Advance On Memory 1 VIDEO Menu 33 Memo • If you have opened ...
... SETTING PATT ESCAPE MENU ASPECT INPUT STANDBY/ON ESCAPE MENU PATTERN SETTING ASPECT INPUT LAMP COVER TEMP FAN Remote Control Main Unit or Remote Control Main Unit 1. Open ... Window Signal Initial Location Keystone Correction Remote Control Sensor Remote Control ID Lens Adjustment Lock Lamp Power Menu Color Menu Mode Message Trigger Out Baud Rate Front / Table 0 Front & Rear ID 1 Off 105... Monotone Basic Off Lamp 115200bps Setup On Advance On Memory 1 VIDEO Menu 33 Memo • If you have opened ...

Owner's Manual
Page 38
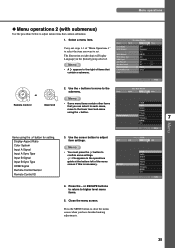
... mode set to adjust. POS ZOOM FOCUS IRIS SETTING PATT ESCAPE MENU ASPECT INPUT Remote Control STANDBY/ON ESCAPE MENU PATTERN SETTING ASPECT INPUT LAMP COVER TEMP FAN Main Unit MENU Button AUTO V. When you wish to [On]. The illustration at right, press +/- Image Move Menu ... top of the menu item. POS ZOOM FOCUS IRIS SETTING PATT ESCAPE MENU ASPECT INPUT Remote Control STANDBY/ON ESCAPE MENU PATTERN SETTING ASPECT INPUT LAMP COVER TEMP FAN Main Unit 5. Use the +/- Close the menu screen. Use the h / g buttons to move to an item in the ...
... mode set to adjust. POS ZOOM FOCUS IRIS SETTING PATT ESCAPE MENU ASPECT INPUT Remote Control STANDBY/ON ESCAPE MENU PATTERN SETTING ASPECT INPUT LAMP COVER TEMP FAN Main Unit MENU Button AUTO V. When you wish to [On]. The illustration at right, press +/- Image Move Menu ... top of the menu item. POS ZOOM FOCUS IRIS SETTING PATT ESCAPE MENU ASPECT INPUT Remote Control STANDBY/ON ESCAPE MENU PATTERN SETTING ASPECT INPUT LAMP COVER TEMP FAN Main Unit 5. Use the +/- Close the menu screen. Use the h / g buttons to move to an item in the ...
Owner's Manual
Page 39
... Window Signal Initial Color System INPUT A Signal INPUT A Sync Type INPUT B Signal INPUT B Sync Type HDMI Signal Auto Power Off Auto Input Search Display Language Lamp Running Time Reset Auto Component Auto RGB TV Auto Component Off Off English 0 Hour Setup On On Memory 1 VIDEO 2. or ESCAPE buttons to return to...
... Window Signal Initial Color System INPUT A Signal INPUT A Sync Type INPUT B Signal INPUT B Sync Type HDMI Signal Auto Power Off Auto Input Search Display Language Lamp Running Time Reset Auto Component Auto RGB TV Auto Component Off Off English 0 Hour Setup On On Memory 1 VIDEO 2. or ESCAPE buttons to return to...

Owner's Manual
Page 42
...screen. 3. appears + : Enter Memory 1 VIDEO 38 Select [Subtitle Zoom] with h or g buttons. From the menu screen select [Initial] Running Time]. [Lamp 2. Image Move Menu Window Signal Initial Color System INPUT A Signal INPUT A Sync Type INPUT B Signal INPUT B Sync Type HDMI Signal Auto Power Off Auto Input... Search Display Language Lamp Running Time Reset Auto Component Auto RGB TV Auto Component Off Off English 12 Hours Setup On On + : Enter Memory 1 VIDEO Image ...
...screen. 3. appears + : Enter Memory 1 VIDEO 38 Select [Subtitle Zoom] with h or g buttons. From the menu screen select [Initial] Running Time]. [Lamp 2. Image Move Menu Window Signal Initial Color System INPUT A Signal INPUT A Sync Type INPUT B Signal INPUT B Sync Type HDMI Signal Auto Power Off Auto Input... Search Display Language Lamp Running Time Reset Auto Component Auto RGB TV Auto Component Off Off English 12 Hours Setup On On + : Enter Memory 1 VIDEO Image ...

Owner's Manual
Page 45
...button with the desired memory number (1-6). Select [Image] or [Signal] group from the menu screen. 41 Memory function Memory configurations The DPX-1100 can store up to 6 sets of configurations, called memory numbers, for each input jack/connector Input VIDEO S VIDEO INPUT A INPUT... MEMORY 1 2 3 4 5 6 1. POS ZOOM FOCUS IRIS SETTING PATT ESCAPE MENU ASPECT INPUT STANDBY/ON ESCAPE MENU PATTERN SETTING ASPECT INPUT LAMP COVER TEMP FAN Remote Control Main Unit 1. SDTV HDTV RGB-PC SDTV HDTV RGB-PC SDTV HDTV SDTV HDTV Total Usable memory numbers 1 to ...
...button with the desired memory number (1-6). Select [Image] or [Signal] group from the menu screen. 41 Memory function Memory configurations The DPX-1100 can store up to 6 sets of configurations, called memory numbers, for each input jack/connector Input VIDEO S VIDEO INPUT A INPUT... MEMORY 1 2 3 4 5 6 1. POS ZOOM FOCUS IRIS SETTING PATT ESCAPE MENU ASPECT INPUT STANDBY/ON ESCAPE MENU PATTERN SETTING ASPECT INPUT LAMP COVER TEMP FAN Remote Control Main Unit 1. SDTV HDTV RGB-PC SDTV HDTV RGB-PC SDTV HDTV SDTV HDTV Total Usable memory numbers 1 to ...

Owner's Manual
Page 58
... cable. 2. If dust accumulates on the underside of the unit rises, which may damage the unit casing. Firmly attach the new filter. Warning • Contact a YAMAHA dealer or service center if you require replacement filters. 54 Carefully place the unit upside down on its side. Clean the filter approximately once every... then wipe with a vacuum cleaner. Remove the power cable from the AC outlet, and remove dust from it becomes difficult to remove any maintenance. The lamp does not light if the filter is heavily soiled.
... cable. 2. If dust accumulates on the underside of the unit rises, which may damage the unit casing. Firmly attach the new filter. Warning • Contact a YAMAHA dealer or service center if you require replacement filters. 54 Carefully place the unit upside down on its side. Clean the filter approximately once every... then wipe with a vacuum cleaner. Remove the power cable from the AC outlet, and remove dust from it becomes difficult to remove any maintenance. The lamp does not light if the filter is heavily soiled.
Owner's Manual
Page 59
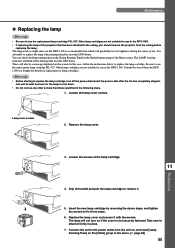
...to remove it into place. 6. Replace the lamp cover and secure it firmly in the DPX-1100. It is not securely fastened. Other lamp cartridges are not suitable for use in place. 7. Grip the handle and pull the lamp cartridge to fix it . 5. Lamp cover screws 2. Reference 3. Loosen the screws...sure to use the replacement lamp cartridge PJL 427. There will also be a message displayed on the [Initial] group in the DPX-1100 is a consumable item which will blink when running time in the [Lamp Running Time] in the DPX-1100. • If replacing the lamp of the Menu screen. Be...
...to remove it into place. 6. Replace the lamp cover and secure it firmly in the DPX-1100. It is not securely fastened. Other lamp cartridges are not suitable for use in place. 7. Grip the handle and pull the lamp cartridge to fix it . 5. Lamp cover screws 2. Reference 3. Loosen the screws...sure to use the replacement lamp cartridge PJL 427. There will also be a message displayed on the [Initial] group in the DPX-1100 is a consumable item which will blink when running time in the [Lamp Running Time] in the DPX-1100. • If replacing the lamp of the Menu screen. Be...
