
Owner's Manual
Page 5
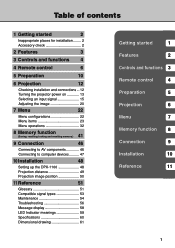
... 13 Selecting an input signal 15 Adjusting the image 20 7 Menu 22 Menu configurations 22 Menu items 23 Menu operations 32 8 Memory function 41 (Saving, recalling, locking and resetting memory.) 9 Connection 46 Connecting to AV components 46 Connecting to computer devices .......... 47 10 Installation 48 Setting up the DPX-1100 48 Projection distance...
... 13 Selecting an input signal 15 Adjusting the image 20 7 Menu 22 Menu configurations 22 Menu items 23 Menu operations 32 8 Memory function 41 (Saving, recalling, locking and resetting memory.) 9 Connection 46 Connecting to AV components 46 Connecting to computer devices .......... 47 10 Installation 48 Setting up the DPX-1100 48 Projection distance...

Owner's Manual
Page 6
... cover the ventilation slots of this unit is installed on the screen. POS ZOOM FOCUS IRIS SETTING PATT ESCAPE MENU ASPECT INPUT RESET HIDE STILL LIGHT S VIDEO A HDMI VIDEO B D4 INPUT MEMORY 1 2 3 4 5 6 • Pin/BNC adapters • Lens cap 2 Places where this unit gets exposed to water or high humidity • If...
... cover the ventilation slots of this unit is installed on the screen. POS ZOOM FOCUS IRIS SETTING PATT ESCAPE MENU ASPECT INPUT RESET HIDE STILL LIGHT S VIDEO A HDMI VIDEO B D4 INPUT MEMORY 1 2 3 4 5 6 • Pin/BNC adapters • Lens cap 2 Places where this unit gets exposed to water or high humidity • If...

Owner's Manual
Page 7
... access image adjustment menu items at the touch of an appropriate resolution. The latest digital interface provides sharp, detailed images The DPX-1100 is set to become the standard for different input resolutions, and the unit will switch to the appropriate parameters when it begins displaying an image of a button, and adjust images...
... access image adjustment menu items at the touch of an appropriate resolution. The latest digital interface provides sharp, detailed images The DPX-1100 is set to become the standard for different input resolutions, and the unit will switch to the appropriate parameters when it begins displaying an image of a button, and adjust images...

Owner's Manual
Page 8
... Lens cap Adjustable feet Makes small adjustments to the projection angle Lamp cover Ventilation inlet 1 2 3 4 5 1 STANDBY/ON ESCAPE MENU PATTERN SETTING ASPECT INPUT LAMP COVER TEMP FAN DIGITAL CINEMA PROJECTOR DPX-1100 6 7 8 9 0 1 LED Indicators The main unit is equipped with 5 indicators to display various states of the LED indicator meanings. See page 59...
... Lens cap Adjustable feet Makes small adjustments to the projection angle Lamp cover Ventilation inlet 1 2 3 4 5 1 STANDBY/ON ESCAPE MENU PATTERN SETTING ASPECT INPUT LAMP COVER TEMP FAN DIGITAL CINEMA PROJECTOR DPX-1100 6 7 8 9 0 1 LED Indicators The main unit is equipped with 5 indicators to display various states of the LED indicator meanings. See page 59...

Owner's Manual
Page 9
...(HDMITM jack) Receives HDMITM signals from the VIDEO output jacks of other AV components. Main unit Controls and functions 3 Rear remote control sensor q w er INPUT B HDMI INPUT A OUT IN REMOTE RS-232C TRIGGER OUT RGB/YPBPR/YCBCR D4 VIDEO G/Y B/PB/CB R/PR/CR HD/SYNC VD S VIDEO VIDEO 1 2 3 45 6... 7 8 90 1 INPUT B (D-sub 15 pin) Receives component video and RGB (RGB/YPBPR/YCBCR) signals. Use BNC cables for these connections. 9 AC inlet Insert the supplied ...
...(HDMITM jack) Receives HDMITM signals from the VIDEO output jacks of other AV components. Main unit Controls and functions 3 Rear remote control sensor q w er INPUT B HDMI INPUT A OUT IN REMOTE RS-232C TRIGGER OUT RGB/YPBPR/YCBCR D4 VIDEO G/Y B/PB/CB R/PR/CR HD/SYNC VD S VIDEO VIDEO 1 2 3 45 6... 7 8 90 1 INPUT B (D-sub 15 pin) Receives component video and RGB (RGB/YPBPR/YCBCR) signals. Use BNC cables for these connections. 9 AC inlet Insert the supplied ...

Owner's Manual
Page 10
... effect. POS ZOOM FOCUS 4 IRIS SETTING PATT 5 t ESCAPE 6 MENU y 7 u 8 ASPECT 9 RESET 0 STILL INPUT i o HIDE p LIGHT S VIDEO A HDMI q VIDEO B D4 INPUT MEMORY 1 2 3 w 4 5 6 1 Transmit indicator Lights up when the remote control sends infrared signals to the main unit. 2 AUTO button Automatically sets the DPX-1100 to those on and off the settings and adjustments menu display.
... effect. POS ZOOM FOCUS 4 IRIS SETTING PATT 5 t ESCAPE 6 MENU y 7 u 8 ASPECT 9 RESET 0 STILL INPUT i o HIDE p LIGHT S VIDEO A HDMI q VIDEO B D4 INPUT MEMORY 1 2 3 w 4 5 6 1 Transmit indicator Lights up when the remote control sends infrared signals to the main unit. 2 AUTO button Automatically sets the DPX-1100 to those on and off the settings and adjustments menu display.

Owner's Manual
Page 11
... as that set in the menu is ID-1. p HIDE button Temporarily halts projection of the image the DPX-1100 is currently displaying. Press again to this switch lights the high-use 2, 6, 8, e, y, and i buttons. The light disappears if you do not perform any operation within 10 seconds. i INPUT button Switches on the remote control.
... as that set in the menu is ID-1. p HIDE button Temporarily halts projection of the image the DPX-1100 is currently displaying. Press again to this switch lights the high-use 2, 6, 8, e, y, and i buttons. The light disappears if you do not perform any operation within 10 seconds. i INPUT button Switches on the remote control.

Owner's Manual
Page 12
...in the battery compartment. 3 3. AUTO ESCAPE V.POS IRIS ZOOM SETTING FOCUS PATT MENU ID-1 STILL RESET ASPECT INPUT ID-2 S VIDEO HIDE VIDEO A B LIGHT HDMI 4 1 2MEMORYINPUT D4 5 3 6 INPUT B HDMI INPUT A OUT IN REMOTE RS-232C TRIGGER OUT RGB/YPBPR/YCBCR D4 VIDEO G/Y B/PB/CB R/PR/CR HD/... immediately, taking care not to the REMOTE IN jack on the main unit. Use the wired remote control configuration to control the DPX-1100 without having to be used closer to the main unit than normal, or does not always operate correctly, exchange the batteries for...
...in the battery compartment. 3 3. AUTO ESCAPE V.POS IRIS ZOOM SETTING FOCUS PATT MENU ID-1 STILL RESET ASPECT INPUT ID-2 S VIDEO HIDE VIDEO A B LIGHT HDMI 4 1 2MEMORYINPUT D4 5 3 6 INPUT B HDMI INPUT A OUT IN REMOTE RS-232C TRIGGER OUT RGB/YPBPR/YCBCR D4 VIDEO G/Y B/PB/CB R/PR/CR HD/... immediately, taking care not to the REMOTE IN jack on the main unit. Use the wired remote control configuration to control the DPX-1100 without having to be used closer to the main unit than normal, or does not always operate correctly, exchange the batteries for...

Owner's Manual
Page 13
...control signal and inhibit functioning. Distance to sensor 7m (approximate value) Angle to sensor 30˚ vertically and horizontally (approximate value) INPUT B HDMI INPUT A OUT IN REMOTE RS-232C TRIGGER OUT RGB/YPBPR/YCBCR D4 VIDEO G/Y B/PB/CB R/PR/CR HD/SYNC VD S-VIDEO... VIDEO AUTO V. Remote control 9 POS ZOOM FOCUS IRIS SETTING PATT ESCAPE MENU ASPECT INPUT RESET HIDE STILL LIGHT S VIDEO A HDMI VIDEO B D4 INPUT MEMORY 1 2 3 4 5 6 Use within a left/right arc of 30 degrees 4 Use within the following parameters....
...control signal and inhibit functioning. Distance to sensor 7m (approximate value) Angle to sensor 30˚ vertically and horizontally (approximate value) INPUT B HDMI INPUT A OUT IN REMOTE RS-232C TRIGGER OUT RGB/YPBPR/YCBCR D4 VIDEO G/Y B/PB/CB R/PR/CR HD/SYNC VD S-VIDEO... VIDEO AUTO V. Remote control 9 POS ZOOM FOCUS IRIS SETTING PATT ESCAPE MENU ASPECT INPUT RESET HIDE STILL LIGHT S VIDEO A HDMI VIDEO B D4 INPUT MEMORY 1 2 3 4 5 6 Use within a left/right arc of 30 degrees 4 Use within the following parameters....

Owner's Manual
Page 15
... the power on and selecting an image for projection • Turn on the projector power 5 • Begin playback of the input image • Select an input signal • Select a projection image aspect • Adjust the image Focus/Vertical and Horizontal position/Size/Iris page 12 - ...menu to adjust the image quality and other parameters • Image quality: Set image quality details • Signal setting: Set input signal details • Default settings: Set the default settings for everyday use • Installation settings: Set to adjust these parameters when necessary.
... the power on and selecting an image for projection • Turn on the projector power 5 • Begin playback of the input image • Select an input signal • Select a projection image aspect • Adjust the image Focus/Vertical and Horizontal position/Size/Iris page 12 - ...menu to adjust the image quality and other parameters • Image quality: Set image quality details • Signal setting: Set input signal details • Default settings: Set the default settings for everyday use • Installation settings: Set to adjust these parameters when necessary.

Owner's Manual
Page 16
... and connections Pre-operation check Prior to projection, adjust settings to suit the location of the main unit and screen, and the input signal you used this unit. "Connecting to project images correctly. Projection preparations complete For an explanation of the source image for projection...REC OUT/ZONE 2 SOURCE/REMOTE DTV/LD DVD CABLE MD/TAPE SAT CD-R VCR 1 CD VCR 2 DVR VIDEO AUX TUNER PHONO INPUT MODE MULTI CH INPUT STRAIGHT DSP PROGRAM MULTI JOG EFFECT SILENT OPTIMIZER MIC VIDEO AUX BALANCE TONE CONTROL PHONES S VIDEO VIDEO L AUDIO R OPTICAL Are the ...
... and connections Pre-operation check Prior to projection, adjust settings to suit the location of the main unit and screen, and the input signal you used this unit. "Connecting to project images correctly. Projection preparations complete For an explanation of the source image for projection...REC OUT/ZONE 2 SOURCE/REMOTE DTV/LD DVD CABLE MD/TAPE SAT CD-R VCR 1 CD VCR 2 DVR VIDEO AUX TUNER PHONO INPUT MODE MULTI CH INPUT STRAIGHT DSP PROGRAM MULTI JOG EFFECT SILENT OPTIMIZER MIC VIDEO AUX BALANCE TONE CONTROL PHONES S VIDEO VIDEO L AUDIO R OPTICAL Are the ...

Owner's Manual
Page 17
...insert the plug into an AC outlet. Press the STANDBY/ON button (the button on Always remove the lens cap before operating the main unit. INPUT B HDMI INPUT A OUT IN REMOTE RS-232C TRIGGER OUT RGB/YPBPR/YCBCR D4 VIDEO G/Y B/PB/CB R/PR/CR HD/SYNC VD S-VIDEO VIDEO AC ...inlet button STANDBY/ON button 2. ASPECT INPUT Remote Control ASPECT INPUT LAMP COVER TEMP FAN Main unit Warning • Do not remove the power cable while the STANDBY/ON indicator is ready to solid green...
...insert the plug into an AC outlet. Press the STANDBY/ON button (the button on Always remove the lens cap before operating the main unit. INPUT B HDMI INPUT A OUT IN REMOTE RS-232C TRIGGER OUT RGB/YPBPR/YCBCR D4 VIDEO G/Y B/PB/CB R/PR/CR HD/SYNC VD S-VIDEO VIDEO AC ...inlet button STANDBY/ON button 2. ASPECT INPUT Remote Control ASPECT INPUT LAMP COVER TEMP FAN Main unit Warning • Do not remove the power cable while the STANDBY/ON indicator is ready to solid green...

Owner's Manual
Page 18
... the STANDBY/ON indicator blinks orange, and pressing STANDBY/ON does not turn main unit power on the screen. If you wish to place the DPX-1100 in standby mode until the condensation disappears. When the unit finishes cooling, the fan stops, and the STANDBY/ ON indicator turns orange. Warning &#... INPUT LAMP COVER TEMP FAN Main unit 2. This is activated. Condensation may also cause the projected image to enter standby. Press again to be cloudy. If you do not plan to cool the lamp. Memo • The lamp may blink when half lit. Switching the unit on Placing the DPX-1100...
... the STANDBY/ON indicator blinks orange, and pressing STANDBY/ON does not turn main unit power on the screen. If you wish to place the DPX-1100 in standby mode until the condensation disappears. When the unit finishes cooling, the fan stops, and the STANDBY/ ON indicator turns orange. Warning &#... INPUT LAMP COVER TEMP FAN Main unit 2. This is activated. Condensation may also cause the projected image to enter standby. Press again to be cloudy. If you do not plan to cool the lamp. Memo • The lamp may blink when half lit. Switching the unit on Placing the DPX-1100...

Owner's Manual
Page 19
...components connected to the D4 VIDEO jack. 6 Projection 15 Selecting an input signal Selecting using the INPUT button Press the INPUT button to the S VIDEO jack. Choose from the following: INPUT SIGNAL Projection image signal VIDEO Selects component video signals received from a ...source component. D4 VIDEO Selects component signals received from AV components connected to the HDMI jack. INPUT A INPUT B HDMI • Component • RGB PC • RGB TV • Component • RGB PC • RGB TV •...
...components connected to the D4 VIDEO jack. 6 Projection 15 Selecting an input signal Selecting using the INPUT button Press the INPUT button to the S VIDEO jack. Choose from the following: INPUT SIGNAL Projection image signal VIDEO Selects component video signals received from a ...source component. D4 VIDEO Selects component signals received from AV components connected to the HDMI jack. INPUT A INPUT B HDMI • Component • RGB PC • RGB TV • Component • RGB PC • RGB TV •...

Owner's Manual
Page 20
... monitor simultaneously, the main unit may not project the image correctly. Input signal VIDEO S VIDEO INPUT A INPUT B HDMI D4 The mark to select an input signal, then press the button. Input signal VIDEO S VIDEO INPUT A INPUT B HDMI D4 2. Use the h or g buttons to the right of the input signal name indicates that there is a submenu available for selection...
... monitor simultaneously, the main unit may not project the image correctly. Input signal VIDEO S VIDEO INPUT A INPUT B HDMI D4 The mark to select an input signal, then press the button. Input signal VIDEO S VIDEO INPUT A INPUT B HDMI D4 2. Use the h or g buttons to the right of the input signal name indicates that there is a submenu available for selection...

Owner's Manual
Page 21
... can use depends on the display. POS ZOOM FOCUS IRIS SETTING PATT ESCAPE MENU cursor button STANDBY/ON ESCAPE PATTERN MENU SETTING ASPECT INPUT ASPECT INPUT LAMP COVER TEMP FAN 1. Squeeze Smart Zoom Zoom Special Through Memo • The display aspect you select [Special] or [Through... parameter to [Auto] to select a display aspect. ( page 22- 40) Projection 17 Remote cotrol Main unit AUTO V. Selecting an input signal Selecting a display aspect for a projection image The display aspect parameter sets the ratio of height to width the unit uses to select...
... can use depends on the display. POS ZOOM FOCUS IRIS SETTING PATT ESCAPE MENU cursor button STANDBY/ON ESCAPE PATTERN MENU SETTING ASPECT INPUT ASPECT INPUT LAMP COVER TEMP FAN 1. Squeeze Smart Zoom Zoom Special Through Memo • The display aspect you select [Special] or [Through... parameter to [Auto] to select a display aspect. ( page 22- 40) Projection 17 Remote cotrol Main unit AUTO V. Selecting an input signal Selecting a display aspect for a projection image The display aspect parameter sets the ratio of height to width the unit uses to select...

Owner's Manual
Page 22
... 4:3 images and resize the vertical image so that fill the screen. Cinema Zoom Removes the black bar from cinescope size screens for RGB PC input signals. 18 This mode is fully displayed, cutting both screen sides. Use this case, manually select a suitable setting. The size of the ...projection image depends on the input source, the unit may appear to display subtitles on the resolution of the screen. There are two types: SDTV for 4:3 images, and HDTV ...
... 4:3 images and resize the vertical image so that fill the screen. Cinema Zoom Removes the black bar from cinescope size screens for RGB PC input signals. 18 This mode is fully displayed, cutting both screen sides. Use this case, manually select a suitable setting. The size of the ...projection image depends on the input source, the unit may appear to display subtitles on the resolution of the screen. There are two types: SDTV for 4:3 images, and HDTV ...

Owner's Manual
Page 23
Projection Input signal type Input image Standard 4:3 image Letter box Squeeze 14:9 image HDMI RGB PC All Normal Cinema Scope Normal Squeeze Display aspect Normal Smart Zoom Zoom Subtitle Zoom Cinema Zoom Squeeze Squeeze Cinema Squeeze 14:9 Zoom Normal Cinema Zoom Normal Normal Through Squeeze Through Selecting an input signal Projected image SUBTITLE 6 19
Projection Input signal type Input image Standard 4:3 image Letter box Squeeze 14:9 image HDMI RGB PC All Normal Cinema Scope Normal Squeeze Display aspect Normal Smart Zoom Zoom Subtitle Zoom Cinema Zoom Squeeze Squeeze Cinema Squeeze 14:9 Zoom Normal Cinema Zoom Normal Normal Through Squeeze Through Selecting an input signal Projected image SUBTITLE 6 19

Owner's Manual
Page 24
...can adjust the image to a maximum of half of the height of the screen is equipped with the center of the lens of the DPX-1100, use the V.POS button to select the necessary pattern. AUTO V. POS ZOOM FOCUS IRIS SETTING PATT ESCAPE MENU PATT button 1. Crosshatch ...pattern Grayscale pattern STANDBY/ON PATTERN button 3. ESCAPE MENU PATTERN SETTING Color bar pattern ASPECT INPUT LAMP COVER TEMP FAN Adjusting the vertical position - POS ZOOM FOCUS IRIS SETTING PATT ESCAPE MENU STANDBY/ON ESCAPE button ESCAPE PATTERN...
...can adjust the image to a maximum of half of the height of the screen is equipped with the center of the lens of the DPX-1100, use the V.POS button to select the necessary pattern. AUTO V. POS ZOOM FOCUS IRIS SETTING PATT ESCAPE MENU PATT button 1. Crosshatch ...pattern Grayscale pattern STANDBY/ON PATTERN button 3. ESCAPE MENU PATTERN SETTING Color bar pattern ASPECT INPUT LAMP COVER TEMP FAN Adjusting the vertical position - POS ZOOM FOCUS IRIS SETTING PATT ESCAPE MENU STANDBY/ON ESCAPE button ESCAPE PATTERN...

Owner's Manual
Page 25
... 1. To exit from button IRIS SETTING PATT the display menu. Focus ESCAPE MENU Memo STANDBY/ON ESCAPE button ESCAPE PATTERN MENU SETTING button SETTING ASPECT INPUT LAMP COVER TEMP FAN • When you want to use the test pattern to adjust image focus press the PATT button on the remote control... button 2. To exit from IRIS SETTING PATT the display menu. ZOOM button Enlarge or reduce the size of an image - Iris ESCAPE MENU 2. ASPECT INPUT LAMP COVER TEMP FAN 21 POS ZOOM FOCUS remote control, or press the SETTING button on the main unit V.
... 1. To exit from button IRIS SETTING PATT the display menu. Focus ESCAPE MENU Memo STANDBY/ON ESCAPE button ESCAPE PATTERN MENU SETTING button SETTING ASPECT INPUT LAMP COVER TEMP FAN • When you want to use the test pattern to adjust image focus press the PATT button on the remote control... button 2. To exit from IRIS SETTING PATT the display menu. ZOOM button Enlarge or reduce the size of an image - Iris ESCAPE MENU 2. ASPECT INPUT LAMP COVER TEMP FAN 21 POS ZOOM FOCUS remote control, or press the SETTING button on the main unit V.