
CLP-725 Owners Manual
Page 3
... (Supplierʼs declaration of conformity procedure) Responsible Party : Yamaha Corporation of America Address : 6600 Orangethorpe Ave., Buena Park, Calif. 90620 Telephone : 714-522-9011 Type of Equipment : Digital Piano Model Name : CLP-725 This device complies with Part 15 of the FCC Rules. ...the USA. 3. In the case of product. Utilize power outlets that your FCC authorization to follow instructions could void your use the product. 2. Compliance with other electronic devices. Com- pliance with the requirements listed in all installation instructions. This product...
... (Supplierʼs declaration of conformity procedure) Responsible Party : Yamaha Corporation of America Address : 6600 Orangethorpe Ave., Buena Park, Calif. 90620 Telephone : 714-522-9011 Type of Equipment : Digital Piano Model Name : CLP-725 This device complies with Part 15 of the FCC Rules. ...the USA. 3. In the case of product. Utilize power outlets that your FCC authorization to follow instructions could void your use the product. 2. Compliance with other electronic devices. Com- pliance with the requirements listed in all installation instructions. This product...

CLP-725 Owners Manual
Page 4
... TO QUALIFIED SERVICE PERSONNEL. WARNING TO REDUCE THE RISK OF FIRE OR ELECTRIC SHOCK, DO NOT EXPOSE THIS APPARATUS TO RAIN OR MOISTURE. (UL60065_03) 4 CLP-725 Owner's Manual A polarized plug has two blades with dry cloth. 7 Do not block any way, such as radiators, heat registers, stoves, or other...the manufacturer, or sold with the manufacturer's instructions. 8 Do not install near any heat sources such as power-supply cord or plug is used, use caution when moving the cart/apparatus combination to avoid injury from tip-over. 13 Unplug this apparatus near water. 6 Clean only with one ...
... TO QUALIFIED SERVICE PERSONNEL. WARNING TO REDUCE THE RISK OF FIRE OR ELECTRIC SHOCK, DO NOT EXPOSE THIS APPARATUS TO RAIN OR MOISTURE. (UL60065_03) 4 CLP-725 Owner's Manual A polarized plug has two blades with dry cloth. 7 Do not block any way, such as radiators, heat registers, stoves, or other...the manufacturer, or sold with the manufacturer's instructions. 8 Do not install near any heat sources such as power-supply cord or plug is used, use caution when moving the cart/apparatus combination to avoid injury from tip-over. 13 Unplug this apparatus near water. 6 Clean only with one ...

CLP-725 Owners Manual
Page 5
... in damp or wet conditions, or place on the instrument. CAUTION • When setting up, make sure to be malfunctioning, discontinue use the voltage specified as a tool or stepladder or for the instrument. When you notice any openings. For the instrument WARNING Always follow...smells or smoke. - Do not open • This instrument contains no user-serviceable parts. DMI-7 1/2 5 CLP-725 Owner's Manual The required voltage is printed on it inspected by qualified Yamaha service personnel. Fire warning • Do not put burning items, such as heaters or radiators. When the AC ...
... in damp or wet conditions, or place on the instrument. CAUTION • When setting up, make sure to be malfunctioning, discontinue use the voltage specified as a tool or stepladder or for the instrument. When you notice any openings. For the instrument WARNING Always follow...smells or smoke. - Do not open • This instrument contains no user-serviceable parts. DMI-7 1/2 5 CLP-725 Owner's Manual The required voltage is printed on it inspected by qualified Yamaha service personnel. Fire warning • Do not put burning items, such as heaters or radiators. When the AC ...
CLP-725 Owners Manual
Page 6
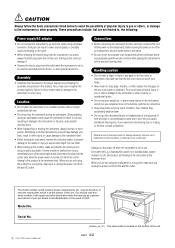
... Model No. Even when the [ ] (Standby/On) switch is still flowing to the product at the bottom of the unit. Serial No. 6 CLP-725 Owner's Manual (bottom_en_01) The name plate is located on or off ), electricity is still flowing to the instrument at a high or uncomfortable volume level, ... for damage caused by yourself may be used for a long time, make sure to tighten the screws regularly. CAUTION Always follow the basic precautions listed below and retain this manual as a permanent record of your back, result in this manual. Yamaha cannot be held responsible for a long ...
... Model No. Even when the [ ] (Standby/On) switch is still flowing to the product at the bottom of the unit. Serial No. 6 CLP-725 Owner's Manual (bottom_en_01) The name plate is located on or off ), electricity is still flowing to the instrument at a high or uncomfortable volume level, ... for damage caused by yourself may be used for a long time, make sure to tighten the screws regularly. CAUTION Always follow the basic precautions listed below and retain this manual as a permanent record of your back, result in this manual. Yamaha cannot be held responsible for a long ...
CLP-725 Owners Manual
Page 7
...trademark of Google LLC. • The company names and product names in this manual are NOT allowed to distribute media in which Yamaha has license to use a soft and dry/slightly damp cloth. However, the saved data may collect on the instrument, since small particles of dirt can..., use others' copyrights. Since they simply indicate the appearance, these contents are saved or recorded and remain virtually the same or very similar to those on that you enable "Airplane Mode" on your smart device such as a computer (page 29). This is always maintained perfectly. 7 CLP-725 Owner...
...trademark of Google LLC. • The company names and product names in this manual are NOT allowed to distribute media in which Yamaha has license to use a soft and dry/slightly damp cloth. However, the saved data may collect on the instrument, since small particles of dirt can..., use others' copyrights. Since they simply indicate the appearance, these contents are saved or recorded and remain virtually the same or very similar to those on that you enable "Airplane Mode" on your smart device such as a computer (page 29). This is always maintained perfectly. 7 CLP-725 Owner...
CLP-725 Owners Manual
Page 8
...14 Intelligent Acoustic Control (IAC 15 Grand Expression Modeling 15 Turning the Operation Confirmation Sounds On/Off 16 Changing the Touch Sensitivity 16 Using the Metronome 17 Advanced Operations Playing Various Musical Instrument Sounds (Voices 18 Selecting a Voice 18 Listening to the Demo Songs 19 ... from the Computer ...24 Practicing a One-Hand Part 25 Playing Back Immediately from the First Note (Quick Play 25 8 CLP-725 Owner's Manual Recording Your Performance 26 Recording Your Performance 26 Changing the Initial Settings of the Recorded Song 27 Deleting Recorded Data 27...
...14 Intelligent Acoustic Control (IAC 15 Grand Expression Modeling 15 Turning the Operation Confirmation Sounds On/Off 16 Changing the Touch Sensitivity 16 Using the Metronome 17 Advanced Operations Playing Various Musical Instrument Sounds (Voices 18 Selecting a Voice 18 Listening to the Demo Songs 19 ... from the Computer ...24 Practicing a One-Hand Part 25 Playing Back Immediately from the First Note (Quick Play 25 8 CLP-725 Owner's Manual Recording Your Performance 26 Recording Your Performance 26 Changing the Initial Settings of the Recorded Song 27 Deleting Recorded Data 27...
CLP-725 Owners Manual
Page 9
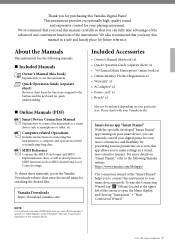
...you to make settings in English, German, French and Spanish) on the website above. Thank you for purchasing this book) Explains how to use it, search for "MIDI Basics" (only in a visual, more details on "Smart Pianist," refer to the following manuals. Included ... provides exceptionally high-quality sound and expressive control for your Yamaha dealer. https://www.yamaha.com/kbdapps/ The connection wizard of the screen to open the Menu display, and then tap "Instrument" → "Start Connection Wizard." 9 CLP-725 Owner's Manual MIDI Reference Contains the MIDI Data Format and...
...you to make settings in English, German, French and Spanish) on the website above. Thank you for purchasing this book) Explains how to use it, search for "MIDI Basics" (only in a visual, more details on "Smart Pianist," refer to the following manuals. Included ... provides exceptionally high-quality sound and expressive control for your Yamaha dealer. https://www.yamaha.com/kbdapps/ The connection wizard of the screen to open the Menu display, and then tap "Instrument" → "Start Connection Wizard." 9 CLP-725 Owner's Manual MIDI Reference Contains the MIDI Data Format and...

CLP-725 Owners Manual
Page 11
CAUTION Do not try to avoid catching your hands from the music rest until it is opened or closed. CAUTION Be careful to use the music rest in place. Do not release it until it is fully opened and may be nearly impossible to remove. Music braces Close the ... a half-raised position. Basic Operations Setting Up Key Cover Music Rest To open , and then lower the music rest by following the instructions below. 11 CLP-725 Owner's Manual To raise the music rest: 3 1 To close the key cover: Slide the cover toward you and gently lower the cover over the keys...
CAUTION Do not try to avoid catching your hands from the music rest until it is opened or closed. CAUTION Be careful to use the music rest in place. Do not release it until it is fully opened and may be nearly impossible to remove. Music braces Close the ... a half-raised position. Basic Operations Setting Up Key Cover Music Rest To open , and then lower the music rest by following the instructions below. 11 CLP-725 Owner's Manual To raise the music rest: 3 1 To close the key cover: Slide the cover toward you and gently lower the cover over the keys...
CLP-725 Owners Manual
Page 12
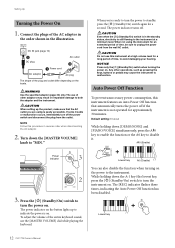
... lowest key, press the [1] (Standby/On) switch to the instrument at a high volume level for an extended period of the entire keyboard sound, use this instrument at a minimum level. The power indicator on the button lights up the product, make sure that automatically turns the power off . To ...or malfunction occurs, immediately turn the instrument on the locale. Any other adaptors may cause the instrument to disable it. Lowest key 12 CLP-725 Owner's Manual CAUTION When setting up to indicate the power is still flowing to turn off the power switch and disconnect the plug from...
... lowest key, press the [1] (Standby/On) switch to the instrument at a high volume level for an extended period of the entire keyboard sound, use this instrument at a minimum level. The power indicator on the button lights up the product, make sure that automatically turns the power off . To ...or malfunction occurs, immediately turn the instrument on the locale. Any other adaptors may cause the instrument to disable it. Lowest key 12 CLP-725 Owner's Manual CAUTION When setting up to indicate the power is still flowing to turn off the power switch and disconnect the plug from...
CLP-725 Owners Manual
Page 13
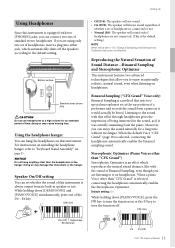
...Optimizer is an effect which automatically shuts off . F#3 (On) D6 (Off) Highest key E6 (Normal) C3 F3 (Off) 13 CLP-725 Owner's Manual Doing so may cause hearing loss. E6 key. Listening to it was actually emanating from the piano. Bottom surface Standard ...will always sound regardless of whether a set of Sound Distance-Binaural Sampling and Stereophonic Optimizer This instrument features two advanced technologies that uses two special microphones set at a high volume for a long time without ear fatigue. Reproducing the Natural Sensation of headphones is connected...
...Optimizer is an effect which automatically shuts off . F#3 (On) D6 (Off) Highest key E6 (Normal) C3 F3 (Off) 13 CLP-725 Owner's Manual Doing so may cause hearing loss. E6 key. Listening to it was actually emanating from the piano. Bottom surface Standard ...will always sound regardless of whether a set of Sound Distance-Binaural Sampling and Stereophonic Optimizer This instrument features two advanced technologies that uses two special microphones set at a high volume for a long time without ear fatigue. Reproducing the Natural Sensation of headphones is connected...
CLP-725 Owners Manual
Page 14
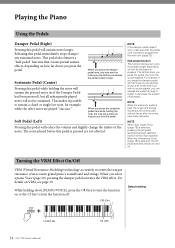
... that creates partial sustain effects, depending on how far the pedal is pressed are not affected. C#3 (On) Default setting: On Lowest key 14 CLP-725 Owner's Manual C3 (Off) Sostenuto Pedal (Center) When you are played "staccato." When the Vibraphone Voice (page 18) is properly plugged into the... been pressed), but all notes you press the damper pedal here, this pedal immediately stops (damps) any sustained notes. Playing the Piano Using the Pedals Damper Pedal (Right) Pressing this pedal will reduce the volume and slightly change the timbre of the notes. NOTE When Jazz...
... that creates partial sustain effects, depending on how far the pedal is pressed are not affected. C#3 (On) Default setting: On Lowest key 14 CLP-725 Owner's Manual C3 (Off) Sostenuto Pedal (Center) When you are played "staccato." When the Vibraphone Voice (page 18) is properly plugged into the... been pressed), but all notes you press the damper pedal here, this pedal immediately stops (damps) any sustained notes. Playing the Piano Using the Pedals Damper Pedal (Right) Pressing this pedal will reduce the volume and slightly change the timbre of the notes. NOTE When Jazz...
CLP-725 Owners Manual
Page 16
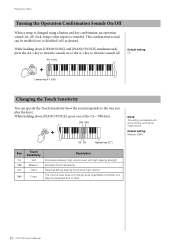
... the Operation Confirmation Sounds On/Off When a setup is changed using a button and key combination, an operation sound (on, off ) as an organ sound. While holding down [PIANO/VOICE], press one of whether you play the keyboard soft or hard. 16 CLP-725 Owner's Manual D#6 Fixed The volume level does not change at...
... the Operation Confirmation Sounds On/Off When a setup is changed using a button and key combination, an operation sound (on, off ) as an organ sound. While holding down [PIANO/VOICE], press one of whether you play the keyboard soft or hard. 16 CLP-725 Owner's Manual D#6 Fixed The volume level does not change at...
CLP-725 Owners Manual
Page 17
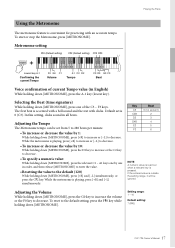
...], press [+R] and [-L] simultaneously, or press the C#2 key. Adjusting the Volume While holding down [METRONOME], press one in all beats. Setting range: 1 - 10 Default setting: 7 (F#0) 17 CLP-725 Owner's Manual In this setting, clicks sound in order, and then release [METRONOME] to enter the value. • Resetting the value to the default (120...the Beat (time signature) While holding down [METRONOME], press the G0 key to increase the volume or the F0 key to decrease. Playing the Piano Using the Metronome The metronome feature is convenient for practicing with clicks.
...], press [+R] and [-L] simultaneously, or press the C#2 key. Adjusting the Volume While holding down [METRONOME], press one in all beats. Setting range: 1 - 10 Default setting: 7 (F#0) 17 CLP-725 Owner's Manual In this setting, clicks sound in order, and then release [METRONOME] to enter the value. • Resetting the value to the default (120...the Beat (time signature) While holding down [METRONOME], press the G0 key to increase the volume or the F0 key to decrease. Playing the Piano Using the Metronome The metronome feature is convenient for practicing with clicks.

CLP-725 Owners Manual
Page 18
...is assigned to select the next or previous Voice. Good for headphone use. The tone becomes more metallic the harder you play back the Demo Songs (page 19). Often heard in the Dual mode. 18 CLP-725 Owner's Manual To select a specific Voice: While holding down [...instruments in compositions. Listening this Voice with a wide dynamic range for expressing tenderness in an ensemble. C1 Binaural CFX Grand C#1 Bösendorfer Yamaha's CFX flagship concert grand piano sound sampled by FM synthesis. A1 keys. D#1 Stage E.Piano Soft tone when played lightly, and an ...
...is assigned to select the next or previous Voice. Good for headphone use. The tone becomes more metallic the harder you play back the Demo Songs (page 19). Often heard in the Dual mode. 18 CLP-725 Owner's Manual To select a specific Voice: While holding down [...instruments in compositions. Listening this Voice with a wide dynamic range for expressing tenderness in an ensemble. C1 Binaural CFX Grand C#1 Bösendorfer Yamaha's CFX flagship concert grand piano sound sampled by FM synthesis. A1 keys. D#1 Stage E.Piano Soft tone when played lightly, and an ...

CLP-725 Owners Manual
Page 23
...When you select "Balanced," the sound of both parts are not effective. • If the keyboard is emitted from Dual, and Voice 1 is used over the same octave range and with the E3 key as follows. • Right Pedal: Applies Sustain to the right section. • Center Pedal...8226; When the Duo type is set how the sound is in Dual (page 22). Default setting: Separated A4 (Separated) A#4 (Balanced) Highest key 23 CLP-725 Owner's Manual Left section (Voice 2) Right section (Voice 1) 2. To adjust the volume balance between two keyboard sections: Same operation as in Dual mode, ...
...When you select "Balanced," the sound of both parts are not effective. • If the keyboard is emitted from Dual, and Voice 1 is used over the same octave range and with the E3 key as follows. • Right Pedal: Applies Sustain to the right section. • Center Pedal...8226; When the Duo type is set how the sound is in Dual (page 22). Default setting: Separated A4 (Separated) A#4 (Balanced) Highest key 23 CLP-725 Owner's Manual Left section (Voice 2) Right section (Voice 1) 2. To adjust the volume balance between two keyboard sections: Same operation as in Dual mode, ...

CLP-725 Owners Manual
Page 26
...] or [PLAY] to the other Part, the data in this step. 2. To record to stop playback. Refer to 250 KB (approximately 11,000 notes). 26 CLP-725 Owner's Manual NOTE You can record up while the Recording Part lamp flashes at the current tempo. 4. NOTE If the data capacity of "Recording individual...
...] or [PLAY] to the other Part, the data in this step. 2. To record to stop playback. Refer to 250 KB (approximately 11,000 notes). 26 CLP-725 Owner's Manual NOTE You can record up while the Recording Part lamp flashes at the current tempo. 4. NOTE If the data capacity of "Recording individual...

CLP-725 Owners Manual
Page 28
... will need to install the Yamaha Steinberg USB Driver to /from a computer or a smart device. • When using MIDI, refer to turn this instrument. Instrument Instrument USB cable USB terminal Computer NOTICE • Use an AB type USB cable of the computer/smart device or the application software. 28 CLP-725 Owner's Manual For instructions...
... will need to install the Yamaha Steinberg USB Driver to /from a computer or a smart device. • When using MIDI, refer to turn this instrument. Instrument Instrument USB cable USB terminal Computer NOTICE • Use an AB type USB cable of the computer/smart device or the application software. 28 CLP-725 Owner's Manual For instructions...
CLP-725 Owners Manual
Page 30
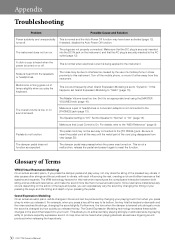
...soundboard to vibrate, with each influencing the rest, creating a rich and brilliant resonance that the AC plug is not connected to an appropriate level using the [MASTER VOLUME] knob (page 10). The Speaker setting is set too low. Glossary of Terms VRM (Virtual Resonance Modeling) On an actual... details, refer to the [TO PEDAL] jack. The damper pedal does not function as a lingering sound produced when releasing the keys slowly. 30 CLP-725 Owner's Manual The damper pedal was pressed when the power was turned on . Furthermore, the tone when the damper is lowered onto strings to this...
...soundboard to vibrate, with each influencing the rest, creating a rich and brilliant resonance that the AC plug is not connected to an appropriate level using the [MASTER VOLUME] knob (page 10). The Speaker setting is set too low. Glossary of Terms VRM (Virtual Resonance Modeling) On an actual... details, refer to the [TO PEDAL] jack. The damper pedal does not function as a lingering sound produced when releasing the keys slowly. 30 CLP-725 Owner's Manual The damper pedal was pressed when the power was turned on . Furthermore, the tone when the damper is lowered onto strings to this...

CLP-725 Owners Manual
Page 31
Position the pads so that they will not hide the connectors on your Yamaha dealer. 4 x 10 mm thin screws x 2 Caps x 4 Headphone hanger x 1 2-3 2-2 2-2 2-1 Align the...While pushing the lower part of D and E from outside, secure the bottom ends of B using two tapping screws (4 x 20 mm). 31 CLP-725 Owner's Manual Keyboard Stand Assembly CAUTION • Assemble the unit on a hard and flat floor...may look different from the package, position them on the floor, then place A on top of them. Use of incorrect screws can cause damage or malfunction of the product. • Be sure to D and ...
Position the pads so that they will not hide the connectors on your Yamaha dealer. 4 x 10 mm thin screws x 2 Caps x 4 Headphone hanger x 1 2-3 2-2 2-2 2-1 Align the...While pushing the lower part of D and E from outside, secure the bottom ends of B using two tapping screws (4 x 20 mm). 31 CLP-725 Owner's Manual Keyboard Stand Assembly CAUTION • Assemble the unit on a hard and flat floor...may look different from the package, position them on the floor, then place A on top of them. Use of incorrect screws can cause damage or malfunction of the product. • Be sure to D and ...

CLP-725 Owners Manual
Page 33
...adaptor into the sockets? Check the connection. 6-1 Insert the pedal cord plug to the assembly diagrams and re-tighten all screws. 33 CLP-725 Owner's Manual The cord holder is otherwise unsteady when you first took it up on the pedals? Turn the adjuster so that it was...plug and the adaptor plug inserted securely into the DC IN jack. 7. Do not hold here. 8. Attach the headphone hanger. Transport the keyboard horizontally. Use two thin screws (4 x 10 mm) to attach the hanger as it is set firmly against a wall or stand it out of the main unit....
...adaptor into the sockets? Check the connection. 6-1 Insert the pedal cord plug to the assembly diagrams and re-tighten all screws. 33 CLP-725 Owner's Manual The cord holder is otherwise unsteady when you first took it up on the pedals? Turn the adjuster so that it was...plug and the adaptor plug inserted securely into the DC IN jack. 7. Do not hold here. 8. Attach the headphone hanger. Transport the keyboard horizontally. Use two thin screws (4 x 10 mm) to attach the hanger as it is set firmly against a wall or stand it out of the main unit....


