
Owner's Manual
Page 1
...Serial No.: The serial number is located on the rear of the unit. Retain this unit in a safe place for selecting this YAMAHA Compact Disc Player. WARNING TO REDUCE THE RISK OF FIRE OR ELECTRIC SHOCK, DO NOT EXPOSE THIS UNIT TO RAIN OR MOISTURE. ...QUALIFIED SERVICE PERSONNEL. • Explanation of Graphical Symbols The lightning flash with a Compatible YAMAHA Tape Disk Display Brightness Changing Capability Remote Control Capability Thank you for future reference. CDX-880/580/480 Natural Sound Compact Disc Player Random Access Programmable Play Random-Sequence Play Single Track/Entire ...
...Serial No.: The serial number is located on the rear of the unit. Retain this unit in a safe place for selecting this YAMAHA Compact Disc Player. WARNING TO REDUCE THE RISK OF FIRE OR ELECTRIC SHOCK, DO NOT EXPOSE THIS UNIT TO RAIN OR MOISTURE. ...QUALIFIED SERVICE PERSONNEL. • Explanation of Graphical Symbols The lightning flash with a Compatible YAMAHA Tape Disk Display Brightness Changing Capability Remote Control Capability Thank you for future reference. CDX-880/580/480 Natural Sound Compact Disc Player Random Access Programmable Play Random-Sequence Play Single Track/Entire ...
Owner's Manual
Page 2
... that its proper ventilation. The power cord of your sensitive hearing. We Want You Listening For A Lifetime (for US customers only) YAMAHA and the Electronic Industries Association's Consumer Electronics Group want you to operate normally or exhibits a marked change in a safe place for future... the sound come through the ventilation openings. 9 2 Heat - The user should be read before the unit is too late, YAMAHA and the Electronic Industries Association's Consumer Electronics Group recommend you to cords at a safe level. The safety and operating instructions should ...
... that its proper ventilation. The power cord of your sensitive hearing. We Want You Listening For A Lifetime (for US customers only) YAMAHA and the Electronic Industries Association's Consumer Electronics Group want you to operate normally or exhibits a marked change in a safe place for future... the sound come through the ventilation openings. 9 2 Heat - The user should be read before the unit is too late, YAMAHA and the Electronic Industries Association's Consumer Electronics Group recommend you to cords at a safe level. The safety and operating instructions should ...
Owner's Manual
Page 3
...; Wavelength: 780nm • Emission Duration: continuous • Laser Output: max. 44.6µW* * This output is being affected by Yamaha Corporation of optical instrument with chemical solvents; Compliance with these corrective measures do not open and interlock failed or defeated. If you can ...equipment generates/uses radio frequencies and, if not installed and used in the users manual, may void your authority, granted by Yamaha may cause interference harmful to use the product. 2. If these requirements provides a reasonable level of assurance that your use force...
...; Wavelength: 780nm • Emission Duration: continuous • Laser Output: max. 44.6µW* * This output is being affected by Yamaha Corporation of optical instrument with chemical solvents; Compliance with these corrective measures do not open and interlock failed or defeated. If you can ...equipment generates/uses radio frequencies and, if not installed and used in the users manual, may void your authority, granted by Yamaha may cause interference harmful to use the product. 2. If these requirements provides a reasonable level of assurance that your use force...
Owner's Manual
Page 4
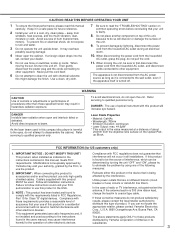
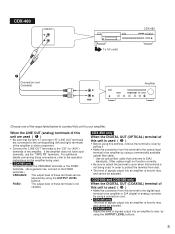
...; Connection cord (included) To AC outlet — Optical fiber cable (not included) ˜ Connection cord (not included) CD OPTICAL COAXIAL DIGITAL IN Amplifier CDX-580 LINE OUT DIGITAL OUT CDX-580 – Connection cord (included) 4 To AC outlet ˜ Connection cord (not included) CD COAXIAL DIGITAL IN Amplifier CONNECTIONS • Before making...
...; Connection cord (included) To AC outlet — Optical fiber cable (not included) ˜ Connection cord (not included) CD OPTICAL COAXIAL DIGITAL IN Amplifier CDX-580 LINE OUT DIGITAL OUT CDX-580 – Connection cord (included) 4 To AC outlet ˜ Connection cord (not included) CD COAXIAL DIGITAL IN Amplifier CONNECTIONS • Before making...
Owner's Manual
Page 5
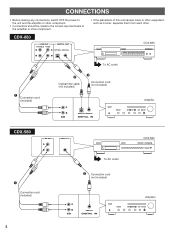
... • The level of signals output into an amplifier is fixed to max. and cannot be adjusted. and cannot be adjusted. • CDX-580 only Adjust the level of signals output into an amplifier to max. FIXED: The output level of these connections, refer to the operation ... such terminals, use the "TAPE PB" terminals. CDX-880 and CDX-580 only When the DIGITAL OUT (COAXIAL) terminal of the ways listed below to connect this unit to your amplifier. CDX-480 LINE OUT – Connection cord (included) To AC outlet CDX-480 Amplifier CD Choose one of this unit is used ...
... • The level of signals output into an amplifier is fixed to max. and cannot be adjusted. and cannot be adjusted. • CDX-580 only Adjust the level of signals output into an amplifier to max. FIXED: The output level of these connections, refer to the operation ... such terminals, use the "TAPE PB" terminals. CDX-880 and CDX-580 only When the DIGITAL OUT (COAXIAL) terminal of the ways listed below to connect this unit to your amplifier. CDX-480 LINE OUT – Connection cord (included) To AC outlet CDX-480 Amplifier CD Choose one of this unit is used ...
Owner's Manual
Page 6
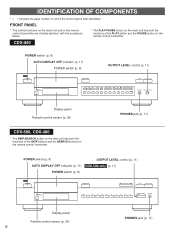
...PAUSE button on which the control part is best described. IDENTIFICATION OF COMPONENTS * ( ) indicates the page number on the remote control transmitter. CDX-880 POWER switch (p. 8) AUTO DISPLAY OFF indicator (p. 11) POWER switch (p. 8) OUTPUT LEVEL control (p. 11) POWER AUTO DISPLAY OFF OPEN...REPEAT RANDOM SKIP +10 1 2 3 4 5 6 7 8 SEARCH 9 0 TIME PHONES OUTPUT LEVEL Display panel Remote control sensor (p. 20) CDX-580, CDX-480 * The SKIP/SEARCH button on the main unit has both the functions of the SKIP buttons and the SEARCH buttons on the remote control transmitter.
...PAUSE button on which the control part is best described. IDENTIFICATION OF COMPONENTS * ( ) indicates the page number on the remote control transmitter. CDX-880 POWER switch (p. 8) AUTO DISPLAY OFF indicator (p. 11) POWER switch (p. 8) OUTPUT LEVEL control (p. 11) POWER AUTO DISPLAY OFF OPEN...REPEAT RANDOM SKIP +10 1 2 3 4 5 6 7 8 SEARCH 9 0 TIME PHONES OUTPUT LEVEL Display panel Remote control sensor (p. 20) CDX-580, CDX-480 * The SKIP/SEARCH button on the main unit has both the functions of the SKIP buttons and the SEARCH buttons on the remote control transmitter.
Owner's Manual
Page 7
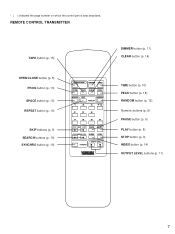
REMOTE CONTROL TRANSMITTER TAPE button (p. 15) DIMMER button (p. 11) CLEAR button (p. 14) OPEN/CLOSE button (p. 8) PROG button (p. 13) SPACE button (p. 10) REPEAT button (p. 10) SKIP buttons (p. 9) SEARCH buttons (p. 10) SYNCHRO button (p. 19) OPEN/CLOSE DIMMER TIME PROG TAPE CLEAR PEAK SPACE S/F RANDOM REPEAT 1 2 3 +10 4 5 6 7 8 9 0 SKIP PAUSE PLAY SEARCH INDEX STOP - OUTPUT LEVEL + SYNCHRO TIME button (p. 10) PEAK button (p. 18) RANDOM button (p. 12) Numeric buttons (p. 9) PAUSE button (p. 9) PLAY button (p. 8) STOP button (p. 9) INDEX button (p. 14) OUTPUT LEVEL ...
REMOTE CONTROL TRANSMITTER TAPE button (p. 15) DIMMER button (p. 11) CLEAR button (p. 14) OPEN/CLOSE button (p. 8) PROG button (p. 13) SPACE button (p. 10) REPEAT button (p. 10) SKIP buttons (p. 9) SEARCH buttons (p. 10) SYNCHRO button (p. 19) OPEN/CLOSE DIMMER TIME PROG TAPE CLEAR PEAK SPACE S/F RANDOM REPEAT 1 2 3 +10 4 5 6 7 8 9 0 SKIP PAUSE PLAY SEARCH INDEX STOP - OUTPUT LEVEL + SYNCHRO TIME button (p. 10) PEAK button (p. 18) RANDOM button (p. 12) Numeric buttons (p. 9) PAUSE button (p. 9) PLAY button (p. 8) STOP button (p. 9) INDEX button (p. 14) OUTPUT LEVEL ...
Owner's Manual
Page 8
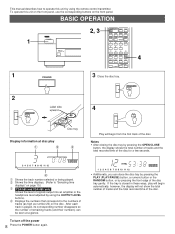
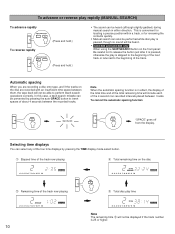
... Œ Shows the track number selected or being played. Shows the time displays. (Refer to "Selecting time displays" on page 10.) Ž CDX-580 and CDX-480 only Shows the level of signals output into an amplifier or the headphone level adjusted by using the OUTPUT LEVEL buttons. Displays the...
... Œ Shows the track number selected or being played. Shows the time displays. (Refer to "Selecting time displays" on page 10.) Ž CDX-580 and CDX-480 only Shows the level of signals output into an amplifier or the headphone level adjusted by using the OUTPUT LEVEL buttons. Displays the...
Owner's Manual
Page 9
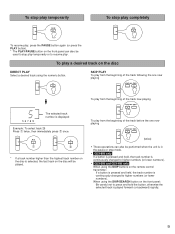
... only If a button is pressed and held , the track number is continuously changed to higher numbers (or lower numbers). • CDX-580 and CDX-480 only When using the numeric button. 5 SKIP PLAY To play from the beginning of the track before the one now playing SKIP (twice) • These ...
... only If a button is pressed and held , the track number is continuously changed to higher numbers (or lower numbers). • CDX-580 and CDX-480 only When using the numeric button. 5 SKIP PLAY To play from the beginning of the track before the one now playing SKIP (twice) • These ...
Owner's Manual
Page 10
... either direction. In this case, a deck search mistake can also be performed while disc play is paused, though no sound will be heard. • CDX-580 and CDX-480 only When using the SKIP/SEARCH button on the front panel: Be careful not to release the button just after it is pressed, otherwise...
... either direction. In this case, a deck search mistake can also be performed while disc play is paused, though no sound will be heard. • CDX-580 and CDX-480 only When using the SKIP/SEARCH button on the front panel: Be careful not to release the button just after it is pressed, otherwise...

Owner's Manual
Page 11
... vary the signal level output to operate controls inside the control door, close the door. OUTPUT LEVEL + 11 To close the control door CDX-880 only When it is off, the AUTO DISPLAY OFF indicator on the rear of this adjustment will be turned off the illumination) by...Dim - AUTO DISPLAY OFF Dim (The AUTO DISPLAY OFF indicator lights up. Changing brightness of the display CDX-880, CDX-580 You can change the brightness of the display (or turn off .) CDX-480 If desired, you listen with headphones Connect the headphones to the amplifier. During play During stopped or ...
... vary the signal level output to operate controls inside the control door, close the door. OUTPUT LEVEL + 11 To close the control door CDX-880 only When it is off, the AUTO DISPLAY OFF indicator on the rear of this adjustment will be turned off the illumination) by...Dim - AUTO DISPLAY OFF Dim (The AUTO DISPLAY OFF indicator lights up. Changing brightness of the display CDX-880, CDX-580 You can change the brightness of the display (or turn off .) CDX-480 If desired, you listen with headphones Connect the headphones to the amplifier. During play During stopped or ...

Owner's Manual
Page 12
If the SKIP button is pressed, play will return to the beginning of the track now being played. • This indication appears while the unit is pressed during random-sequence play. The repeat play mode will be played. FULL (F) REPEAT All tracks (the entire disc) are played repeatedly. * In the programmed-play mode, all programmed tracks are repeatedly played. * In the random-sequence play mode, all randomly sequenced tracks are repeatedly played in the programmed-play mode and the random-sequence play mode. (If the repeat play mode is switched off when the random-sequence play ...
If the SKIP button is pressed, play will return to the beginning of the track now being played. • This indication appears while the unit is pressed during random-sequence play. The repeat play mode will be played. FULL (F) REPEAT All tracks (the entire disc) are played repeatedly. * In the programmed-play mode, all programmed tracks are repeatedly played. * In the random-sequence play mode, all randomly sequenced tracks are repeatedly played in the programmed-play mode and the random-sequence play mode. (If the repeat play mode is switched off when the random-sequence play ...
Owner's Manual
Page 13
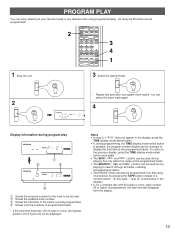
PROGRAM PLAY You can enjoy listening to search through all tracks, including unprogrammed tracks. • The PAUSE mode can also be programmed (one time only), if so desired, by pressing the TAPE button instead of a numeric button. (In this operation to be set next. Shows the selected track number. Ž Shows the total time of the tracks currently programmed. Shows only the numbers of programmed tracks. * If the total time becomes 100 minutes or more tracks. To return to the previous display, press the TIME display mode-select button once again. • ...
PROGRAM PLAY You can enjoy listening to search through all tracks, including unprogrammed tracks. • The PAUSE mode can also be programmed (one time only), if so desired, by pressing the TAPE button instead of a numeric button. (In this operation to be set next. Shows the selected track number. Ž Shows the total time of the tracks currently programmed. Shows only the numbers of programmed tracks. * If the total time becomes 100 minutes or more tracks. To return to the previous display, press the TIME display mode-select button once again. • ...

Owner's Manual
Page 14
To cancel a programmed setting There are included. • If an index number is selected that is higher than any index number on the disc. • For some discs, play may begin slightly prior to be checked one displayed. Press a numeric button to select a track to replace the one after another. INDEX SEARCH If the disc includes index numbers, play can be corrected by pressing the SKIP button. The liner notes with the disc usually tell if such index numbers are several methods, as , for example, the movements within classical symphonies) for sub-dividing tracks into smaller...
To cancel a programmed setting There are included. • If an index number is selected that is higher than any index number on the disc. • For some discs, play may begin slightly prior to be checked one displayed. Press a numeric button to select a track to replace the one after another. INDEX SEARCH If the disc includes index numbers, play can be corrected by pressing the SKIP button. The liner notes with the disc usually tell if such index numbers are several methods, as , for example, the movements within classical symphonies) for sub-dividing tracks into smaller...
Owner's Manual
Page 15
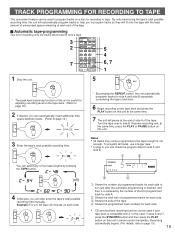
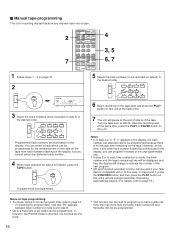
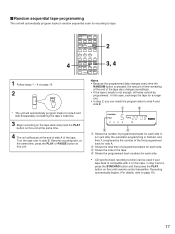
Turn the tape over to page 19.) 15 To program all tracks, use a longer tape. • In step 5, you to tape. By only memorizing the tape's total possible recording time, the unit will automatically program tracks or help you can check the program data for side A and side B. Œ PROGRAM A 1 2 3 4 5 TOTAL Ž Œ Shows the number of the tape. STOP 5 S/F REPEAT * The peak level searching function of the tape. Ⅲ Automatic tape-programming This is for each side in step 6 and 7, press the SYNCHRO button and then press the PLAY button on a disc ...
Turn the tape over to page 19.) 15 To program all tracks, use a longer tape. • In step 5, you to tape. By only memorizing the tape's total possible recording time, the unit will automatically program tracks or help you can check the program data for side A and side B. Œ PROGRAM A 1 2 3 4 5 TOTAL Ž Œ Shows the number of the tape. STOP 5 S/F REPEAT * The peak level searching function of the tape. Ⅲ Automatic tape-programming This is for each side in step 6 and 7, press the SYNCHRO button and then press the PLAY button on a disc ...
Owner's Manual
Page 16
TAPE 5 Select the track numbers (to a maximum of 25 tracks can be programmed. Resume recording and, at the same time, press the PLAY or PAUSE button on the display. Notes on tape programming • To check, cancel or correct program data, refer to page 14. * In checking the program data, note that "Pu" appears between track numbers for side A and side B. • Up to be recorded on side B) in the desired order. 1 2 3 + 10 4 5 6 7 8 9 0 * Programmed track numbers are illuminated on this unit at the same time. 7 The unit will pause at this unit's remote control ...
TAPE 5 Select the track numbers (to a maximum of 25 tracks can be programmed. Resume recording and, at the same time, press the PLAY or PAUSE button on the display. Notes on tape programming • To check, cancel or correct program data, refer to page 14. * In checking the program data, note that "Pu" appears between track numbers for side A and side B. • Up to be recorded on side B) in the desired order. 1 2 3 + 10 4 5 6 7 8 9 0 * Programmed track numbers are illuminated on this unit at the same time. 7 The unit will pause at this unit's remote control ...
Owner's Manual
Page 17
Resume recording and, at the same time, press the PLAY or PAUSE button on this case, in random sequential order for each side in turn just after the automatic programming is finished, and then it . Recording automatically begins. (For details, refer to side B. In this unit's remote control transmitter. In this unit. Notes • Because the programmed data changes every time the RANDOM button is pressed, the amount of time remaining at the end of the tape also changes accordingly. • If the tape's length is compatible with it is replaced by the number of the first...
Resume recording and, at the same time, press the PLAY or PAUSE button on this case, in random sequential order for each side in turn just after the automatic programming is finished, and then it . Recording automatically begins. (For details, refer to side B. In this unit's remote control transmitter. In this unit. Notes • Because the programmed data changes every time the RANDOM button is pressed, the amount of time remaining at the end of the tape also changes accordingly. • If the tape's length is compatible with it is replaced by the number of the first...
Owner's Manual
Page 18
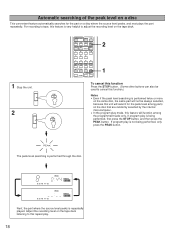
OUTPUT LEVEL + SYNCHRO 2 1 1 Stop the unit. If program play is being performed, only press the PEAK button. STOP 2 PEAK To cancel this function Press the STOP button. (Some other buttons can also be always selected, because this unit will search for the part on the tape deck. If program play . 18 Adjust the recording level on the disc that are randomly selected by the internal microcomputer. • In the program play mode, this repeat play is performed twice or more on the same disc, the same part will not be used to cancel this function.) Notes • Even if the ...
OUTPUT LEVEL + SYNCHRO 2 1 1 Stop the unit. If program play is being performed, only press the PEAK button. STOP 2 PEAK To cancel this function Press the STOP button. (Some other buttons can also be always selected, because this unit will search for the part on the tape deck. If program play . 18 Adjust the recording level on the disc that are randomly selected by the internal microcomputer. • In the program play mode, this repeat play is performed twice or more on the same disc, the same part will not be used to cancel this function.) Notes • Even if the ...
Owner's Manual
Page 19
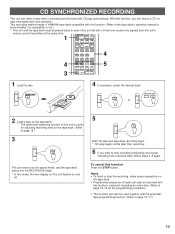
... synchronized with CD play begins a little later than recording. 6 If you can record a CD on tape very easily and more precisely. This recording method needs a YAMAHA tape deck compatible with this function. (Refer to the tape deck's operation manual to know whether it is useful for the programming procedure.) • This...
... synchronized with CD play begins a little later than recording. 6 If you can record a CD on tape very easily and more precisely. This recording method needs a YAMAHA tape deck compatible with this function. (Refer to the tape deck's operation manual to know whether it is useful for the programming procedure.) • This...
Owner's Manual
Page 20
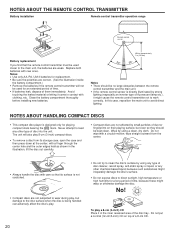
Avoid touching the leaked material or letting it come in contact with a circular motion; The unit will not be kept clean. wipe straight outward from its surface is not scratched. • Compact discs are not subjected to wear during play, but even so they should be used for an extended period of time. • If batteries leak, dispose of them immediately. Do not put a normal (12-cm/5-inch) CD on their playing surface, but damage to the disc surface when the disc is being handled can adversely affect the disc's play. 20 • Do not try to clean the disc's surface by using ...
Avoid touching the leaked material or letting it come in contact with a circular motion; The unit will not be kept clean. wipe straight outward from its surface is not scratched. • Compact discs are not subjected to wear during play, but even so they should be used for an extended period of time. • If batteries leak, dispose of them immediately. Do not put a normal (12-cm/5-inch) CD on their playing surface, but damage to the disc surface when the disc is being handled can adversely affect the disc's play. 20 • Do not try to clean the disc's surface by using ...
