
Owner's Manual
Page 2
... Protection - REFER SERVICING TO QUALIFIED SERVICE PERSONNEL. • Explanation of Graphical Symbols The lightning flash with care. Please record the serial number of this Owner's Manual in the operating instructions or as radiators, stoves, or other appliances that objects do not fall into and liquids are not likely to be referred...
... Protection - REFER SERVICING TO QUALIFIED SERVICE PERSONNEL. • Explanation of Graphical Symbols The lightning flash with care. Please record the serial number of this Owner's Manual in the operating instructions or as radiators, stoves, or other appliances that objects do not fall into and liquids are not likely to be referred...
Owner's Manual
Page 3
...by using one of the following measures: Relocate either this type of interference, which can not locate the appropriate retailer, please contact Yamaha Electronics Corp., U.S.A. 6660 Orangethorpe Ave, Buena Park, CA 90620. If these requirements provides a reasonable level of assurance that is found...not result in harmful interference with this product in the users manual, may void your authority, granted by the interference. NOTE : This product has been tested and found to eliminate the problem by Yamaha Corporation of radio or TV interference, relocate/reorient the antenna....
...by using one of the following measures: Relocate either this type of interference, which can not locate the appropriate retailer, please contact Yamaha Electronics Corp., U.S.A. 6660 Orangethorpe Ave, Buena Park, CA 90620. If these requirements provides a reasonable level of assurance that is found...not result in harmful interference with this product in the users manual, may void your authority, granted by the interference. NOTE : This product has been tested and found to eliminate the problem by Yamaha Corporation of radio or TV interference, relocate/reorient the antenna....
Owner's Manual
Page 5
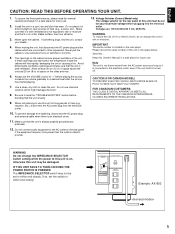
...change the IMPEDANCE SELECTOR switch setting while the power to rain or moisture and that the unit is an electrical storm. 11. TOTAL Example: AX-892 5 Make sure that it is well ventilated and not exposed to this unit is turned off. If something drops into the electrical outlet.... The openings on the rear panel. Always set for future use this Owner's Manual in direct sunlight or near sources of heat (e.g., a stove, etc.). To prevent damage from the electrical outlet. 10. Voltages are connected to the...
...change the IMPEDANCE SELECTOR switch setting while the power to rain or moisture and that the unit is an electrical storm. 11. TOTAL Example: AX-892 5 Make sure that it is well ventilated and not exposed to this unit is turned off. If something drops into the electrical outlet.... The openings on the rear panel. Always set for future use this Owner's Manual in direct sunlight or near sources of heat (e.g., a stove, etc.). To prevent damage from the electrical outlet. 10. Voltages are connected to the...

Owner's Manual
Page 6
... to this unit and other connected components off. q If you have YAMAHA components numbered 1, 2, 3, etc. TOTAL IMPEDANCE SELECTOR + Right --... + Left OUTPUT OUTPUT AUDIO OUT Compact disc player Tuner Video cassette player, LD player, etc. AX-492 Turntable Tape deck 1 Tape deck 2 Speakers A Right Left + -- + OUTPUT GND LINE... TAPE PB 3 REC OUT 4 TUNER TAPE 1 TAPE PB 3 REC OUT 4 TAPE 2 (MD) R AUX R L A B CAUTION SEE INSTRUCTION MANUAL FOR CONNECT SETTING SPEAKERS VOLTAGE SELECTOR AC OUTLETS A OR B : 4Ω MIN. /SPEAKER A + B : 8Ω MIN. /SPEAKER A OR ...
... to this unit and other connected components off. q If you have YAMAHA components numbered 1, 2, 3, etc. TOTAL IMPEDANCE SELECTOR + Right --... + Left OUTPUT OUTPUT AUDIO OUT Compact disc player Tuner Video cassette player, LD player, etc. AX-492 Turntable Tape deck 1 Tape deck 2 Speakers A Right Left + -- + OUTPUT GND LINE... TAPE PB 3 REC OUT 4 TUNER TAPE 1 TAPE PB 3 REC OUT 4 TAPE 2 (MD) R AUX R L A B CAUTION SEE INSTRUCTION MANUAL FOR CONNECT SETTING SPEAKERS VOLTAGE SELECTOR AC OUTLETS A OR B : 4Ω MIN. /SPEAKER A + B : 8Ω MIN. /SPEAKER A OR ...

Owner's Manual
Page 7
English AX-592 Turntable Tape deck 1 Tape deck 2 Speakers A Right Left - +- + GND OUTPUT LINE OUT LINE IN LINE OUT LINE IN PHONO R L MM MC R L 1 CD GND COUPLER L PRE OUT R MAIN IN L 2 TAPE PB 3 REC OUT 4 TUNER TAPE 1 TAPE PB 3 REC OUT 4 TAPE 2 (MD) R AUX PHONO REMOTE CONTROL SPEAKERS R A L R L CAUTION SEE INSTRUCTION MANUAL FOR CONNECT...
English AX-592 Turntable Tape deck 1 Tape deck 2 Speakers A Right Left - +- + GND OUTPUT LINE OUT LINE IN LINE OUT LINE IN PHONO R L MM MC R L 1 CD GND COUPLER L PRE OUT R MAIN IN L 2 TAPE PB 3 REC OUT 4 TUNER TAPE 1 TAPE PB 3 REC OUT 4 TAPE 2 (MD) R AUX PHONO REMOTE CONTROL SPEAKERS R A L R L CAUTION SEE INSTRUCTION MANUAL FOR CONNECT...

Owner's Manual
Page 8
... player, etc. To electrical outlet + Left Compact disc player Tuner * For descriptions of the shaded areas, refer to page 10. AX-892 Turntable Tape deck 1 Tape deck 2 Speakers A Right Left - +- + GND OUTPUT LINE OUT LINE IN LINE OUT LINE IN...IN L R R L 1 CD GND L 2 TAPE PB 3 REC OUT 4 TUNER TAPE 1 TAPE PB 3 REC OUT 4 TAPE 2 (MD) R AUX REMOTE CONTROL PHONO SPEAKERS R CAUTION SEE INSTRUCTION MANUAL FOR CONNECT SETTING L A R L B IMPEDANCE SELECTOR VOLTAGE SELECTOR A OR B : 4Ω MIN. /SPEAKER A + B : 8Ω MIN. /SPEAKER A OR B : 6Ω MIN. /...
... player, etc. To electrical outlet + Left Compact disc player Tuner * For descriptions of the shaded areas, refer to page 10. AX-892 Turntable Tape deck 1 Tape deck 2 Speakers A Right Left - +- + GND OUTPUT LINE OUT LINE IN LINE OUT LINE IN...IN L R R L 1 CD GND L 2 TAPE PB 3 REC OUT 4 TUNER TAPE 1 TAPE PB 3 REC OUT 4 TAPE 2 (MD) R AUX REMOTE CONTROL PHONO SPEAKERS R CAUTION SEE INSTRUCTION MANUAL FOR CONNECT SETTING L A R L B IMPEDANCE SELECTOR VOLTAGE SELECTOR A OR B : 4Ω MIN. /SPEAKER A + B : 8Ω MIN. /SPEAKER A OR B : 6Ω MIN. /...

Owner's Manual
Page 10
... REMOTE CONTROL PRE OUT/MAIN IN terminals AX-592 and AX-892 only Removing the jumper pins enables this...PHONO REMOTE CONTROL (AX-592) PHONO (AX-892) PHONO (MM/MC) switch AX-592 and AX-892 only Select ...either MM or MC depending on the external control amplifier to this terminal will normally minimize hum, but in . GND terminal (for connection of a signalprocessing system such as a power amplifier, connect the outputs of the sound level. For details, refer to the owner's manual.... REMOTE CONTROL (PHONO) connector AX-592 and AX-892 only If you use this...
... REMOTE CONTROL PRE OUT/MAIN IN terminals AX-592 and AX-892 only Removing the jumper pins enables this...PHONO REMOTE CONTROL (AX-592) PHONO (AX-892) PHONO (MM/MC) switch AX-592 and AX-892 only Select ...either MM or MC depending on the external control amplifier to this terminal will normally minimize hum, but in . GND terminal (for connection of a signalprocessing system such as a power amplifier, connect the outputs of the sound level. For details, refer to the owner's manual.... REMOTE CONTROL (PHONO) connector AX-592 and AX-892 only If you use this...
Owner's Manual
Page 14
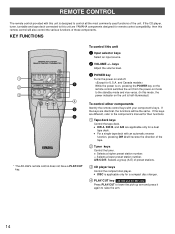
... keys Control the tape deck. While the power is applicable only for remote control compatibility, then this unit are different, refer to the component's manual for a dual tape deck. q DISC is on, pressing the POWER key on the remote control switches the unit from the power-on mode ... Tuner keys Control the tuner. +: Selects a higher preset station number. -: Selects a lower preset station number. If the keys are YAMAHA components designed for a compact disc changer. 4 PLAY/CUT key AX-592 and AX-892 only Press PLAY/CUT to lower the pick-up arm and press it again to the standby mode and...
... keys Control the tape deck. While the power is applicable only for remote control compatibility, then this unit are different, refer to the component's manual for a dual tape deck. q DISC is on, pressing the POWER key on the remote control switches the unit from the power-on mode ... Tuner keys Control the tuner. +: Selects a higher preset station number. -: Selects a lower preset station number. If the keys are YAMAHA components designed for a compact disc changer. 4 PLAY/CUT key AX-592 and AX-892 only Press PLAY/CUT to lower the pick-up arm and press it again to the standby mode and...


