
User Guide
Page 4
... Print cartridges ...12.1 Accessories ...12.1 How to multiple destinations ...9.6 Sending a delayed fax ...9.6 Sending a priority fax ...9.7 Forwarding faxes ...9.7 Sending a Fax from a USB memory device ...11.2 Backing up data ...11.3 Managing USB memory ...11.3 12. Faxing Setting the fax header ...9.1 Adjusting the document settings ...9.1 Sending a fax automatically ...9.2 Sending a fax manually ...9.2 Confirming a transmission ...9.3 Automatic redialing...
... Print cartridges ...12.1 Accessories ...12.1 How to multiple destinations ...9.6 Sending a delayed fax ...9.6 Sending a priority fax ...9.7 Forwarding faxes ...9.7 Sending a Fax from a USB memory device ...11.2 Backing up data ...11.3 Managing USB memory ...11.3 12. Faxing Setting the fax header ...9.1 Adjusting the document settings ...9.1 Sending a fax automatically ...9.2 Sending a fax manually ...9.2 Confirming a transmission ...9.3 Automatic redialing...

User Guide
Page 5
....3 Maintenance Parts ...13.6 Managing your machine from the website ...13.7 Checking the machine's serial number ...13.8 14. Installing accessories Precautions when installing accessories ...15.1 Installing a memory DIMM ...15.1 16. Troubleshooting Clearing document jams ...14.1 Clearing paper jams ...14.2 Understanding display messages ...14.7 Print cartridge-related messages ...14.10 Solving other problems...
....3 Maintenance Parts ...13.6 Managing your machine from the website ...13.7 Checking the machine's serial number ...13.8 14. Installing accessories Precautions when installing accessories ...15.1 Installing a memory DIMM ...15.1 16. Troubleshooting Clearing document jams ...14.1 Clearing paper jams ...14.2 Understanding display messages ...14.7 Print cartridge-related messages ...14.10 Solving other problems...

User Guide
Page 16
... the Software Section. Expand your machine's capacity • The Phaser 3300MFP has 96 MB of features supported by substantially reducing power consumption ...memory device, you for purchasing this Xerox multifunctional product. a. This chapter includes: • Special features • Printer overview • Finding more information • Selecting a location Special features Your new machine is compatible with a variety of Macintosh systems. • Your machine comes with your machine. (I: Installed, O: Option, NA: Not Available) Features Phaser 3300MFP USB 2.0 I USB Memory...
... the Software Section. Expand your machine's capacity • The Phaser 3300MFP has 96 MB of features supported by substantially reducing power consumption ...memory device, you for purchasing this Xerox multifunctional product. a. This chapter includes: • Special features • Printer overview • Finding more information • Selecting a location Special features Your new machine is compatible with a variety of Macintosh systems. • Your machine comes with your machine. (I: Installed, O: Option, NA: Not Available) Features Phaser 3300MFP USB 2.0 I USB Memory...

User Guide
Page 17
Printer overview These are the main components of your machine: Front view Rear view * The figure above shows Phaser 3300MFP with all available accessories. 1 ADF (automatic document feeder) 10 tray 1 2 document width guides 11 optional tray 2 3 document input tray ... support 5 document output tray 14 USB memory port 6 control panel 15 multi-purpose tray extension 7 output tray 16 multi-purpose tray paper width guides 8 front cover 17 scanner glass 9 paper level indicator 18 print cartridge * The figure above shows Phaser 3300MFP with all available accessories. 1 control board...
Printer overview These are the main components of your machine: Front view Rear view * The figure above shows Phaser 3300MFP with all available accessories. 1 ADF (automatic document feeder) 10 tray 1 2 document width guides 11 optional tray 2 3 document input tray ... support 5 document output tray 14 USB memory port 6 control panel 15 multi-purpose tray extension 7 output tray 16 multi-purpose tray paper width guides 8 front cover 17 scanner glass 9 paper level indicator 18 print cartridge * The figure above shows Phaser 3300MFP with all available accessories. 1 control board...

User Guide
Page 18
... or in Edit mode, inserts a pause into a fax number. 17 USB Print: Allows you to directly print files stored on a USB Memory device when it is inserted into the USB memory port on the front of your machine. 6 Fax: Activates Fax mode. 18 Duplex: Allows you to print documents on the screen... the copy options, such as the darkness, the document type setting, the copy size, and the number of copies. 11 Scroll buttons: Scroll through 30. memory or search for the current copy job. copy job. 3 Address Book: Allows you to shift the speed buttons to store frequently used fax numbers in...
... or in Edit mode, inserts a pause into a fax number. 17 USB Print: Allows you to directly print files stored on a USB Memory device when it is inserted into the USB memory port on the front of your machine. 6 Fax: Activates Fax mode. 18 Duplex: Allows you to print documents on the screen... the copy options, such as the darkness, the document type setting, the copy size, and the number of copies. 11 Scroll buttons: Scroll through 30. memory or search for the current copy job. copy job. 3 Address Book: Allows you to shift the speed buttons to store frequently used fax numbers in...
User Guide
Page 20
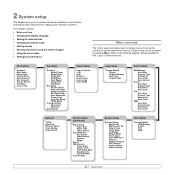
...Multi Send Delay Send Priority Send Send Forward Rcv. Copy Setup Change Default Copies Reduce/Enlarge Darkness Original Type Scan Feature USB Memory Scan Size Original Type Resolution Scan Color Scan Format E-mail Scan Size Original Type Resolution Scan Color FTP Scan Size Original Type ... & Time Clock Mode Language Default Mode Power Save Scan PWR Save Timeout NetScanTimeout Job Timeout Import Setting Export Setting Scan Setup Change Default USB Memory E-mail FTP SMB 2.1 These menus can be accessed by -step instructions for setting up the machine's systems. This chapter includes: •...
...Multi Send Delay Send Priority Send Send Forward Rcv. Copy Setup Change Default Copies Reduce/Enlarge Darkness Original Type Scan Feature USB Memory Scan Size Original Type Resolution Scan Color Scan Format E-mail Scan Size Original Type Resolution Scan Color FTP Scan Size Original Type ... & Time Clock Mode Language Default Mode Power Save Scan PWR Save Timeout NetScanTimeout Job Timeout Import Setting Export Setting Scan Setup Change Default USB Memory E-mail FTP SMB 2.1 These menus can be accessed by -step instructions for setting up the machine's systems. This chapter includes: •...

User Guide
Page 22
... pressing the right Scroll button and then press the button labeled with the letter you want . When you store fax numbers or email addresses in memory, you can control the following sounds: • Key Sound: Turns the key sound on until the desired status or volume for the sound you enter...
... pressing the right Scroll button and then press the button labeled with the letter you want . When you store fax numbers or email addresses in memory, you can control the following sounds: • Key Sound: Turns the key sound on until the desired status or volume for the sound you enter...

User Guide
Page 44
... machine and computer are turned on and properly connected to each scan job • Changing the default scan settings • Setting up into the USB memory port on your machine. See page 8.4. • To a computer networked via the Network Scan program. Ready to Scan appears on the top line of... and upload it to a shared folder on an SMB server. See page 8.5. Note You can print. See the Software Section. • To a portable USB memory device, if inserted into the ADF, or place a single original face down on the scanner glass. A new message window opens with your machine lets you...
... machine and computer are turned on and properly connected to each scan job • Changing the default scan settings • Setting up into the USB memory port on your machine. See page 8.4. • To a computer networked via the Network Scan program. Ready to Scan appears on the top line of... and upload it to a shared folder on an SMB server. See page 8.5. Note You can print. See the Software Section. • To a portable USB memory device, if inserted into the ADF, or place a single original face down on the scanner glass. A new message window opens with your machine lets you...

User Guide
Page 47
Scanning to Email You can set the scan options for access to FTP servers from memory. If you can scan and send an image as needed. 1 Press Menu until System Setup appears on the scanner glass. Before scanning, you have activated ...
Scanning to Email You can set the scan options for access to FTP servers from memory. If you can scan and send an image as needed. 1 Press Menu until System Setup appears on the scanner glass. Before scanning, you have activated ...

User Guide
Page 49
... 4 Enter the IP address in dotted decimal notation or as the URL in a browser and click Go to access the web site of your machine's memory but also ones in your machine. 2 Click Machine Settings and Group Address Book. 3 Click Add. 4 Select a group number and enter the group ... email and other programs use the following ways: Speed email numbers When you need to look up information from memory. You can also search through memory for and select it from memory. When you are prompted to enter a destination address while sending an email, enter the speed email number at...
... 4 Enter the IP address in dotted decimal notation or as the URL in a browser and click Go to access the web site of your machine's memory but also ones in your machine. 2 Click Machine Settings and Group Address Book. 3 Click Add. 4 Select a group number and enter the group ... email and other programs use the following ways: Speed email numbers When you need to look up information from memory. You can also search through memory for and select it from memory. When you are prompted to enter a destination address while sending an email, enter the speed email number at...

User Guide
Page 50
... showing your Address Book settings by entering the first letters of the display. 2 Press Enter. Printing Address Book You can search upwards or downwards through memory 1 If necessary, press Scan. 2 Press Address Book until Search&Send appears on the bottom line of the name associated with a particular first letter 1 If necessary...
... showing your Address Book settings by entering the first letters of the display. 2 Press Enter. Printing Address Book You can search upwards or downwards through memory 1 If necessary, press Scan. 2 Press Address Book until Search&Send appears on the bottom line of the name associated with a particular first letter 1 If necessary...

User Guide
Page 51
... • Selecting the paper tray • Changing receiving modes • Receiving automatically in Fax mode • Receiving manually in Tel mode • Receiving automatically in memory • Printing received faxes on both sides of paper Other ways to fax • Sending a fax to multiple destinations • Sending a delayed fax • Sending...
... • Selecting the paper tray • Changing receiving modes • Receiving automatically in Fax mode • Receiving manually in Tel mode • Receiving automatically in memory • Printing received faxes on both sides of paper Other ways to fax • Sending a fax to multiple destinations • Sending a delayed fax • Sending...

User Guide
Page 52
... speed dial numbers, or group dial numbers. You hear a dial tone. 5 Enter the receiving fax machine's number. Notes • For memory transmission, Super Fine mode is dialed, the machine begins sending the fax when the receiving fax machine answers. To change the default setting, see... page 9.1. 4 Press Manual Dial. To change the default setting, see page 5.1. After the number is not available. In this mode, memory transmission is enabled only if the machine with which you are communicating does not support Super Fine resolution, the machine transmits using a dot-matrix...
... speed dial numbers, or group dial numbers. You hear a dial tone. 5 Enter the receiving fax machine's number. Notes • For memory transmission, Super Fine mode is dialed, the machine begins sending the fax when the receiving fax machine answers. To change the default setting, see... page 9.1. 4 Press Manual Dial. To change the default setting, see page 5.1. After the number is not available. In this mode, memory transmission is enabled only if the machine with which you are communicating does not support Super Fine resolution, the machine transmits using a dot-matrix...
User Guide
Page 54
...remote receive code preset at your location, or someone uses to dial your machine. Waiting Ring appears on the extension phone. Receiving manually in memory. Press the buttons slowly in Fax mode Your machine is connected to view your received documents, you can receive a fax from the remote ... the back of long and short ringing sounds. 7 Press Stop/Clear to return to Ans/Fax mode and your phone conversation. Secure free memory to resume by different ringing patterns, which enables a user to Fax mode at any incoming fax. To change the middle number to whatever ...
...remote receive code preset at your location, or someone uses to dial your machine. Waiting Ring appears on the extension phone. Receiving manually in memory. Press the buttons slowly in Fax mode Your machine is connected to view your received documents, you can receive a fax from the remote ... the back of long and short ringing sounds. 7 Press Stop/Clear to return to Ans/Fax mode and your phone conversation. Secure free memory to resume by different ringing patterns, which enables a user to Fax mode at any incoming fax. To change the middle number to whatever ...

User Guide
Page 55
... machine answers with a fax tone. To receive faxes in DRPD mode, you need to prevent your machine begins to DRPD. Receiving in its memory. When the mode is available for the receiving mode setting. When the DRPD feature is set up , the DRPD option is deactivated, any ...faxes 1 Access the Secure Receive menu by unauthorized people. Deactivating secure receiving mode 1 Access the Secure Receive menu by following steps 1 through 3 in memory and shows Secure Receive to let you want to confirm it can turn on the bottom line of received faxes when the machine is a multi...
... machine answers with a fax tone. To receive faxes in DRPD mode, you need to prevent your machine begins to DRPD. Receiving in its memory. When the mode is available for the receiving mode setting. When the DRPD feature is set up , the DRPD option is deactivated, any ...faxes 1 Access the Secure Receive menu by unauthorized people. Deactivating secure receiving mode 1 Access the Secure Receive menu by following steps 1 through 3 in memory and shows Secure Receive to let you want to confirm it can turn on the bottom line of received faxes when the machine is a multi...

User Guide
Page 56
...209 destinations. You can add up into the ADF, or place a single original face down on the scanner glass. Originals are automatically erased from memory. 1 Press Fax. 2 Load originals face up to confirm the number. See page 9.1. 4 Press Menu until the binding option you have finished ... fax numbers, select No at the Another No.? After transmission, the originals are automatically stored in which allows you entered in the order in memory and sent to save your selection. For details, see page 10.2. 7 Press Enter to 10 destinations. 9.6 Load another fax number. 9 When...
...209 destinations. You can add up into the ADF, or place a single original face down on the scanner glass. Originals are automatically erased from memory. 1 Press Fax. 2 Load originals face up to confirm the number. See page 9.1. 4 Press Menu until the binding option you have finished ... fax numbers, select No at the Another No.? After transmission, the originals are automatically stored in which allows you entered in the order in memory and sent to save your selection. For details, see page 10.2. 7 Press Enter to 10 destinations. 9.6 Load another fax number. 9 When...

User Guide
Page 57
.... Forwarding faxes You can be added and adjust document settings. 2 Press Menu until Fax Feature appears on how to suit your machine's memory. 1 Load the originals to add another fax machine You can use group dial numbers for another original and press Enter. Note You cannot.... 6 Enter the number of reserved operations. When you have finished, select No at the Another No.? The machine scans the original into memory and immediately transmitted when the current operation is placed on the scanner glass. Sending a priority fax Using the Priority Fax feature, a high ...
.... Forwarding faxes You can be added and adjust document settings. 2 Press Menu until Fax Feature appears on how to suit your machine's memory. 1 Load the originals to add another fax machine You can use group dial numbers for another original and press Enter. Note You cannot.... 6 Enter the number of reserved operations. When you have finished, select No at the Another No.? The machine scans the original into memory and immediately transmitted when the current operation is placed on the scanner glass. Sending a priority fax Using the Priority Fax feature, a high ...

User Guide
Page 58
.... Subsequent received faxes will be forwarded to the multi-function printer. Installing PC-Fax Software 1 To install the PC-Fax, insert the supplied Xerox Drivers CD. 2 The CD-ROM should automatically run, and the installation window appears. 3 When the language selection window appears, select the appropriate...sent faxes will be forwarded to Standby mode. To set the machine to send copies of all outgoing faxes to a specified destination, in memory. See the Software Section. Then, the machine dials the fax number that you need to another fax machine You can set the machine ...
.... Subsequent received faxes will be forwarded to the multi-function printer. Installing PC-Fax Software 1 To install the PC-Fax, insert the supplied Xerox Drivers CD. 2 The CD-ROM should automatically run, and the installation window appears. 3 When the language selection window appears, select the appropriate...sent faxes will be forwarded to Standby mode. To set the machine to send copies of all outgoing faxes to a specified destination, in memory. See the Software Section. Then, the machine dials the fax number that you need to another fax machine You can set the machine ...
User Guide
Page 62
The original will be divided and printed in the memory as junk fax numbers. When you send a fax, the default settings are used if they are two ways to assign numbers to speed buttons. Setting ...
The original will be divided and printed in the memory as junk fax numbers. When you send a fax, the default settings are used if they are two ways to assign numbers to speed buttons. Setting ...

User Guide
Page 63
.... 6 Press Enter when Yes appears. 7 Repeat steps 5 and 6 to confirm the number. You can then use a group dial number to send a document to 200 (0 through memory for an entry by pressing Address Book. You can store up to all of the destinations within the group. Registering a group dial number 1 Press Fax...
.... 6 Press Enter when Yes appears. 7 Repeat steps 5 and 6 to confirm the number. You can then use a group dial number to send a document to 200 (0 through memory for an entry by pressing Address Book. You can store up to all of the destinations within the group. Registering a group dial number 1 Press Fax...


