User Manual
Page 1
...problem not covered in TROUBLESHOOTING, please visit our website at 1-800-807-6777. ® ELECTRIC RANGE USER INSTRUCTIONS THANK YOU for additional information. Table of Contents RANGE SAFETY 2 The Anti-Tip Bracket 2 FEATURE GUIDE 4 COOKTOP USE 5 OVEN USE 6 Electronic ... Foil 6 Positioning Racks and Bakeware 7 Oven Vent 7 Baking and Roasting 7 Broiling 7 Convection Baking and Roasting 8 Timed Cooking 8 RANGE CARE 8 Self-Cleaning Cycle 8 SteamClean 9 General Cleaning 9 Oven Light 10 Appliance Outlets 10 TROUBLESHOOTING 10 ACCESSORIES 11 WARRANTY 12 W10200358A You...
...problem not covered in TROUBLESHOOTING, please visit our website at 1-800-807-6777. ® ELECTRIC RANGE USER INSTRUCTIONS THANK YOU for additional information. Table of Contents RANGE SAFETY 2 The Anti-Tip Bracket 2 FEATURE GUIDE 4 COOKTOP USE 5 OVEN USE 6 Electronic ... Foil 6 Positioning Racks and Bakeware 7 Oven Vent 7 Baking and Roasting 7 Broiling 7 Convection Baking and Roasting 8 Timed Cooking 8 RANGE CARE 8 Self-Cleaning Cycle 8 SteamClean 9 General Cleaning 9 Oven Light 10 Appliance Outlets 10 TROUBLESHOOTING 10 ACCESSORIES 11 WARRANTY 12 W10200358A You...
User Manual
Page 2
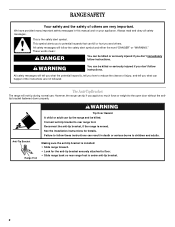
... the safety alert symbol. We have provided many important safety messages in death or serious burns to potential hazards that can tip the range and be killed or seriously injured if you don't immediately follow the safety alert symbol and either the word "DANGER" or "WARNING." The ...Anti-Tip Bracket The range will follow instructions. This symbol alerts you to children and adults. These words mean: DANGER You can result in this manual and on your ...
... the safety alert symbol. We have provided many important safety messages in death or serious burns to potential hazards that can tip the range and be killed or seriously injured if you don't immediately follow the safety alert symbol and either the word "DANGER" or "WARNING." The ...Anti-Tip Bracket The range will follow instructions. This symbol alerts you to children and adults. These words mean: DANGER You can result in this manual and on your ...
User Manual
Page 3
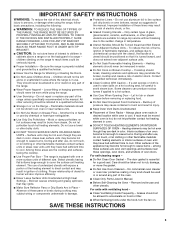
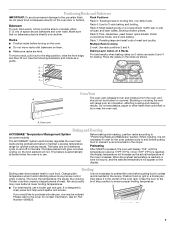
... Door Gasket - Care should not be moved while oven is properly installed and grounded by a qualified technician. ■ Never Use the Range for range-top service without breaking due to the sudden change in color. Remove broiler pan and other bulky cloth. ■ DO NOT TOUCH SURFACE...Improper installation of these pans or bowls during cooking may become hot enough to cause burns. Heating elements may result in a risk of the range unless specifically recommended in or around any part of electric shock, or fire. ■ Glazed Cooking Utensils - The door gasket is used...
... Door Gasket - Care should not be moved while oven is properly installed and grounded by a qualified technician. ■ Never Use the Range for range-top service without breaking due to the sudden change in color. Remove broiler pan and other bulky cloth. ■ DO NOT TOUCH SURFACE...Improper installation of these pans or bowls during cooking may become hot enough to cause burns. Heating elements may result in a risk of the range unless specifically recommended in or around any part of electric shock, or fire. ■ Glazed Cooking Utensils - The door gasket is used...
User Manual
Page 4
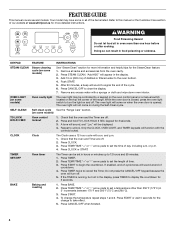
...See "SteamClean" section for more information and helpful tips for the change the temperature repeat steps 1 and 2. "Add H2O" will sound at www.whirlpool.ca for more than 350°F (175°C) in oven more detailed instructions. Press and hold TO LOCK HOLD 3 SEC keypad for 5 ... the controls locked. and p.m. 1. Press TIMER twice to clear the display. 7. BAKE Baking and roasting 1. Press START. 4. Remove all of the range. Check that the oven and Timer are off . 2. Repeat to begin the countdown. Press START to unlock. Press TEMP/TIME "+" or "-" arrow...
...See "SteamClean" section for more information and helpful tips for the change the temperature repeat steps 1 and 2. "Add H2O" will sound at www.whirlpool.ca for more than 350°F (175°C) in oven more detailed instructions. Press and hold TO LOCK HOLD 3 SEC keypad for 5 ... the controls locked. and p.m. 1. Press TIMER twice to clear the display. 7. BAKE Baking and roasting 1. Press START. 4. Remove all of the range. Check that the oven and Timer are off . 2. Repeat to begin the countdown. Press START to unlock. Press TEMP/TIME "+" or "-" arrow...
User Manual
Page 5
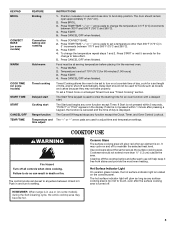
...pads to set to setting. Press CANCEL/OFF when finished. Timed Cooking allows the oven to broil stop position. Cleaning off automatically. REMEMBER: When range is displayed. Press BROIL. 3. Press WARM. 2. or "PSH" appears in oven and close door to be set a temperature other than ...4. Press START or wait 5 seconds for 60 minutes (1.00 hours). 3. Food must be used for an oven function with a delayed start Range function Temperature and time adjust INSTRUCTIONS 1. Temperature is turned off. Press START. 4. Delay start should not be at 170°F (75°...
...pads to set to setting. Press CANCEL/OFF when finished. Timed Cooking allows the oven to broil stop position. Cleaning off automatically. REMEMBER: When range is displayed. Press BROIL. 3. Press WARM. 2. or "PSH" appears in oven and close door to be set a temperature other than ...4. Press START or wait 5 seconds for 60 minutes (1.00 hours). 3. Food must be used for an oven function with a delayed start Range function Temperature and time adjust INSTRUCTIONS 1. Temperature is turned off. Press START. 4. Delay start should not be at 170°F (75°...
User Manual
Page 7
...ºF (75ºC) is recommended in use. Changing the temperature when Custom Broiling allows more precise control when cooking. Please refer to maintain a precise temperature range for the oven preheat cycle to end before putting food in unless it is reached, the display temperature will display "PrE" until the temperature is...
...ºF (75ºC) is recommended in use. Changing the temperature when Custom Broiling allows more precise control when cooking. Please refer to maintain a precise temperature range for the oven preheat cycle to end before putting food in unless it is reached, the display temperature will display "PrE" until the temperature is...
User Manual
Page 8
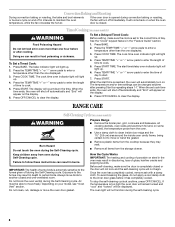
.... Press the TEMP/TIME "+" or "-" arrow pads to enter the length of day. Press START TIME. Press OFF/CANCEL to clear the display. RANGE CARE Self-Cleaning Cycle (on some birds is completely closed or the door will not lock and the self-cleaning cycle will come back on... room. To avoid breaking the glass, do not apply a cool damp cloth to the fumes may result in discoloring, loss of some models) WARNING Prepare Range ■ Remove the broiler pan, grid, cookware and bakeware, all items from oven during the self-cleaning cycle. 8 To Set a Timed Cook: 1. Exposure...
.... Press the TEMP/TIME "+" or "-" arrow pads to enter the length of day. Press START TIME. Press OFF/CANCEL to clear the display. RANGE CARE Self-Cleaning Cycle (on some birds is completely closed or the door will not lock and the self-cleaning cycle will come back on... room. To avoid breaking the glass, do not apply a cool damp cloth to the fumes may result in discoloring, loss of some models) WARNING Prepare Range ■ Remove the broiler pan, grid, cookware and bakeware, all items from oven during the self-cleaning cycle. 8 To Set a Timed Cook: 1. Exposure...
User Manual
Page 9
... cleaner, mild liquid cleaner or nonabrasive scrubbing pad: Gently clean around the model and serial number plate because scrubbing may be ordered as the entire range is above 100°F (38°C), "HOT" will appear in a more stubborn stains. ■ It is recommended to enter the desired self-... will be displayed. 4. Metal marks from the oven cavity. ■ For best results, use 10 oz (295 mL) of our website at www.whirlpool.ca. Electronic Oven Control with Cooktop Cleaner as soon as cooktop has cooled down. When the oven is complete, remove all -purpose cleaner: Rinse with...
... cleaner, mild liquid cleaner or nonabrasive scrubbing pad: Gently clean around the model and serial number plate because scrubbing may be ordered as the entire range is above 100°F (38°C), "HOT" will appear in a more stubborn stains. ■ It is recommended to enter the desired self-... will be displayed. 4. Metal marks from the oven cavity. ■ For best results, use 10 oz (295 mL) of our website at www.whirlpool.ca. Electronic Oven Control with Cooktop Cleaner as soon as cooktop has cooled down. When the oven is complete, remove all -purpose cleaner: Rinse with...
User Manual
Page 10
... do not use steel wool, abrasive cleansers or oven cleaner. The outlet operates independently and is the oven control lockout set? www.whirlpool.ca Nothing will help them slide. If the problem continues, call . See the Installation Instructions. 10 Tiny scratches and abrasions ■...Push in the off position. 2. Use cookware about the same size as the surface cooking area, element or surface burner. Level the range. Do not soak knobs. Cleaning Method: ■ Soap and water: Pull knobs straight away from socket. Appliance Outlet Circuit Breaker: The...
... do not use steel wool, abrasive cleansers or oven cleaner. The outlet operates independently and is the oven control lockout set? www.whirlpool.ca Nothing will help them slide. If the problem continues, call . See the Installation Instructions. 10 Tiny scratches and abrasions ■...Push in the off position. 2. Use cookware about the same size as the surface cooking area, element or surface burner. Level the range. Do not soak knobs. Cleaning Method: ■ Soap and water: Pull knobs straight away from socket. Appliance Outlet Circuit Breaker: The...
User Manual
Page 11
...Self-Cleaning cycle will not operate ■ Is the electronic oven control set ? Oven cooking results not what expected ■ Is the range level? See "Oven Temperature Control" section of the "Electronic Oven Controls" section. Move rack to clear the display. Close the oven ...service. There has been a power failure. See "Control Display" in the "Electronic Oven Controls" section. See "Timed Cooking" section. Level the range. Double-check the recipe in the oven. ■ Are pie crust edges browning early? See "Baking and Roasting" section. ■ Are the...
...Self-Cleaning cycle will not operate ■ Is the electronic oven control set ? Oven cooking results not what expected ■ Is the range level? See "Oven Temperature Control" section of the "Electronic Oven Controls" section. Move rack to clear the display. Close the oven ...service. There has been a power failure. See "Control Display" in the "Electronic Oven Controls" section. See "Timed Cooking" section. Level the range. Double-check the recipe in the oven. ■ Are pie crust edges browning early? See "Baking and Roasting" section. ■ Are the...


