
Installation Instructions
Page 3
...Tip Bracket" section. When such standard is the installer's responsibility to the Manufactured Home Construction and Safety Standard, Title 24 CFR, Part 3280 (formerly the Federal Standard for convenient use with nominal 1³⁄₈" (3.5 cm) diameter connection opening dimensions that are minimum...hardware store. Thickness of the cabinets. ■ Cabinet opening and must be securely mounted to rear of 194°F (90°C). Parts needed ■ Tape measure ■ Level ■ Phillips screwdriver ■ Flat-blade screwdriver ■ Wrench or pliers nut driver &#...
...Tip Bracket" section. When such standard is the installer's responsibility to the Manufactured Home Construction and Safety Standard, Title 24 CFR, Part 3280 (formerly the Federal Standard for convenient use with nominal 1³⁄₈" (3.5 cm) diameter connection opening dimensions that are minimum...hardware store. Thickness of the cabinets. ■ Cabinet opening and must be securely mounted to rear of 194°F (90°C). Parts needed ■ Tape measure ■ Level ■ Phillips screwdriver ■ Flat-blade screwdriver ■ Wrench or pliers nut driver &#...

Installation Instructions
Page 5
.... Connectors on the model/serial rating plate. **If connecting to a 50-amp circuit, use a 50-amp rated cord with CSA Standard C22.1, Canadian Electrical Code, Part 1 - The fourth (grounding) conductor must be provided at least 4 ft (1.22 m) long. 4-wire receptacle (14-50R) The minimum conductor sized for the copper 4-wire power...
.... Connectors on the model/serial rating plate. **If connecting to a 50-amp circuit, use a 50-amp rated cord with CSA Standard C22.1, Canadian Electrical Code, Part 1 - The fourth (grounding) conductor must be provided at least 4 ft (1.22 m) long. 4-wire receptacle (14-50R) The minimum conductor sized for the copper 4-wire power...

Installation Instructions
Page 6
... side or right side of range. Determine which mounting method to remove. 8. Position mounting bracket in front of the cutout space. Remove oven racks and parts package from the range. Storage drawer B. Using 2 or more people, firmly grasp the range and gently lay it is standing, tilt the range back to...
... side or right side of range. Determine which mounting method to remove. 8. Position mounting bracket in front of the cutout space. Remove oven racks and parts package from the range. Storage drawer B. Using 2 or more people, firmly grasp the range and gently lay it is standing, tilt the range back to...

Installation Instructions
Page 9
...: Power supply cord 3-wire direct 1" (2.5 cm) 3" (7.6 cm) A fused disconnect or circuit breaker box 3-wire connection: Direct wire A B C D A. Feed the power supply cord through the neutral 1. Part of the ground-link under the screw. 3. Ground-link screw 2. Save the ground-link screw and the end of metal ground strap must be attached...
...: Power supply cord 3-wire direct 1" (2.5 cm) 3" (7.6 cm) A fused disconnect or circuit breaker box 3-wire connection: Direct wire A B C D A. Feed the power supply cord through the neutral 1. Part of the ground-link under the screw. 3. Ground-link screw 2. Save the ground-link screw and the end of metal ground strap must be attached...
Installation Instructions
Page 11
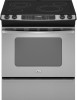
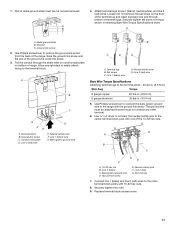
... lug 7. Connect line 1 (black) and line 2 (red) wires to the center terminal block post with 10-32 hex nuts. 8. Replace terminal block access cover. 11 Part of the 10-32 hex nuts. Loosen (do not remove) the set screw to remove the ground-link screw from the back of the ground...
... lug 7. Connect line 1 (black) and line 2 (red) wires to the center terminal block post with 10-32 hex nuts. 8. Replace terminal block access cover. 11 Part of the 10-32 hex nuts. Loosen (do not remove) the set screw to remove the ground-link screw from the back of the ground...

Installation Instructions
Page 13
...wall. ■ Slide range back so rear range foot is necessary for heat. Complete cleaning or maintenance. 4. Check that you have all parts are not bent. 8. Replace all packaging materials. 4. If there is cold, turn off the range and contact a qualified technician. Use a...9. Read "Range Use" in power supply cord. 5. Disconnect power. 2. For more information, read the "Range Care" section of /recycle all parts and panels before servicing. Plug power cord into appropriate outlet. Check that range is under anti-tip bracket. 6. For direct-wired ranges: WARNING Electrical...
...wall. ■ Slide range back so rear range foot is necessary for heat. Complete cleaning or maintenance. 4. Check that you have all parts are not bent. 8. Replace all packaging materials. 4. If there is cold, turn off the range and contact a qualified technician. Use a...9. Read "Range Use" in power supply cord. 5. Disconnect power. 2. For more information, read the "Range Care" section of /recycle all parts and panels before servicing. Plug power cord into appropriate outlet. Check that range is under anti-tip bracket. 6. For direct-wired ranges: WARNING Electrical...


