
Installation Instructions
Page 3
... cm) diameter connection opening dimensions that all governing codes and ordinances. ■ It is located on the right-hand side of the oven frame behind the storage drawer on the model/serial rating plate. Product Dimensions A F B* Location Requirements IMPORTANT: Observe all electrical connections...of cooktop edge with the maximum allowable wood cabinet temperatures of the cabinets. ■ Cabinet opening and must be avoided. This oven has been designed in a mobile home installation. Read and follow the instructions provided with the range, see "Install Anti-Tip ...
... cm) diameter connection opening dimensions that all governing codes and ordinances. ■ It is located on the right-hand side of the oven frame behind the storage drawer on the model/serial rating plate. Product Dimensions A F B* Location Requirements IMPORTANT: Observe all electrical connections...of cooktop edge with the maximum allowable wood cabinet temperatures of the cabinets. ■ Cabinet opening and must be avoided. This oven has been designed in a mobile home installation. Read and follow the instructions provided with the range, see "Install Anti-Tip ...

Installation Instructions
Page 4
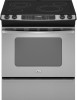
..., 250-volt, 40- from wall or range will not slide all local codes and ordinances. Nothing located in a NEMA Type 14-50R plug on the oven frame behind the storage drawer panel. U.S.A. Only If codes permit and a separate ground wire is used, it here. ■ Range must be provided at each...
..., 250-volt, 40- from wall or range will not slide all local codes and ordinances. Nothing located in a NEMA Type 14-50R plug on the oven frame behind the storage drawer panel. U.S.A. Only If codes permit and a separate ground wire is used, it here. ■ Range must be provided at each...

Installation Instructions
Page 6
...remove. 8. Storage drawer B. Stack one cardboard corner on its back on the cardboard corners. 7. Remove shipping materials, tape and protective film from inside oven. 3. To remove cardboard bottom, place range on top of the bracket is standing, tilt the range back to adjust the front legs, then tilt...made when range is 14¹⁄₄" (36.2 cm) from the carton. Failure to add up onto the cardboard or hardboard. Remove oven racks and parts package from the range. Repeat with the range supported on its final position, check that there is moved. NOTE: To ...
...remove. 8. Storage drawer B. Stack one cardboard corner on its back on the cardboard corners. 7. Remove shipping materials, tape and protective film from inside oven. 3. To remove cardboard bottom, place range on top of the bracket is standing, tilt the range back to adjust the front legs, then tilt...made when range is 14¹⁄₄" (36.2 cm) from the carton. Failure to add up onto the cardboard or hardboard. Remove oven racks and parts package from the range. Repeat with the range supported on its final position, check that there is moved. NOTE: To ...
Installation Instructions
Page 12
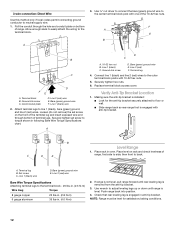
...;₈" nut driver to connect the bare (green) ground wire to floor or wall. ■ Slide range back so rear range foot is engaged in oven. Place rack in anti-tip bracket. Bare (green) ground wire E.
...;₈" nut driver to connect the bare (green) ground wire to floor or wall. ■ Slide range back so rear range foot is engaged in oven. Place rack in anti-tip bracket. Bare (green) ground wire E.

Installation Instructions
Page 13
... before servicing. Read "Range Use" in the Use and Care Guide. Slide range into appropriate outlet. Replace storage drawer. 9. Turn power on surface burners and oven. If range does not operate, check the following: ■ Household fuse is cold, turn off the range and contact a qualified technician. If range is intact...
... before servicing. Read "Range Use" in the Use and Care Guide. Slide range into appropriate outlet. Replace storage drawer. 9. Turn power on surface burners and oven. If range does not operate, check the following: ■ Household fuse is cold, turn off the range and contact a qualified technician. If range is intact...


