
Dimension Guide
Page 1
... grille. n If the floor of the opening to make it level with product. W10739679D 6/15 Dimensions are for 24" models Because Whirlpool Corporation policy includes a continuous commitment to improve our products, we reserve the right to change materials and specifications without notice....the height dimensions. Ref. OPENING DIMENSIONS n Height dimensions are fully extended, add 15 mm) to the minimum height. Wine Cellar PRODUCT MODEL NUMBERS WUW35X15D WUW55X15D WUW35X24D WUW55X24D Electrical: A 115 Volt, 60 Hz., AC only, 15- Do not use an extension cord. Use an outlet...
... grille. n If the floor of the opening to make it level with product. W10739679D 6/15 Dimensions are for 24" models Because Whirlpool Corporation policy includes a continuous commitment to improve our products, we reserve the right to change materials and specifications without notice....the height dimensions. Ref. OPENING DIMENSIONS n Height dimensions are fully extended, add 15 mm) to the minimum height. Wine Cellar PRODUCT MODEL NUMBERS WUW35X15D WUW55X15D WUW35X24D WUW55X24D Electrical: A 115 Volt, 60 Hz., AC only, 15- Do not use an extension cord. Use an outlet...
Warranty Information
Page 1
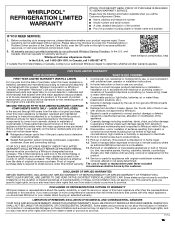
..., operated and maintained according to instructions attached to access additional resources, or visit www.whirlpool.com/product_help. 2. In-home Instruction on the right to or furnished with original model/serial numbers removed, altered or not easily determined. light bulbs, batteries, air or water...parts and repair labor to correct defects in remote locations where an authorized Whirlpool servicer is reported to you call the Customer eXperience Center: ■ Name, address and telephone number ■ Model number and serial number ■ A clear, detailed description of the...
..., operated and maintained according to instructions attached to access additional resources, or visit www.whirlpool.com/product_help. 2. In-home Instruction on the right to or furnished with original model/serial numbers removed, altered or not easily determined. light bulbs, batteries, air or water...parts and repair labor to correct defects in remote locations where an authorized Whirlpool servicer is reported to you call the Customer eXperience Center: ■ Name, address and telephone number ■ Model number and serial number ■ A clear, detailed description of the...
Use & Care Guide
Page 4
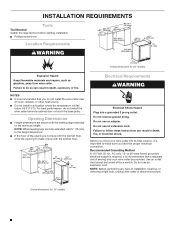
...prong. Do not use an extension cord. Recommended Grounding Method A 115 Volt, 60 Hz., AC only, 15- Critical dimensions for 24" models Explosion Hazard Keep flammable materials and vapors, such as gasoline, away from wine cellar. NOTE: When leveling legs are shown with the leveling...;" (86.5-88.0 cm) 21⁷⁄₈" (55.5 cm) 1⁷⁄₈" (4.7 cm) 3 7.8 cm) Critical dimensions for 15" models 4 Use an outlet that you have the proper electrical connection. Opening Dimensions Height dimensions are fully extended, add 15 mm) to make it is recommended...
...prong. Do not use an extension cord. Recommended Grounding Method A 115 Volt, 60 Hz., AC only, 15- Critical dimensions for 24" models Explosion Hazard Keep flammable materials and vapors, such as gasoline, away from wine cellar. NOTE: When leveling legs are shown with the leveling...;" (86.5-88.0 cm) 21⁷⁄₈" (55.5 cm) 1⁷⁄₈" (4.7 cm) 3 7.8 cm) Critical dimensions for 15" models 4 Use an outlet that you have the proper electrical connection. Opening Dimensions Height dimensions are fully extended, add 15 mm) to make it is recommended...
Use & Care Guide
Page 6
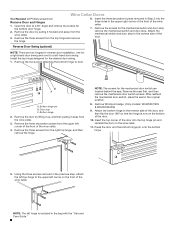
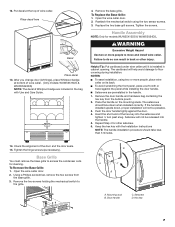
... the reverse side of the door, and then flip the door 180º so that the hinge is included in the original position. 8. Remove Whirlpool badge. (Only models: WUW55X15DS & WUW55X24DS) 9. Open the door to door. remove the mechanical switch and door stop to the reverse side of the door. 10. Install the...
... the reverse side of the door, and then flip the door 180º so that the hinge is included in the original position. 8. Remove Whirlpool badge. (Only models: WUW55X15DS & WUW55X24DS) 9. Open the door to door. remove the mechanical switch and door stop to the reverse side of the door. 10. Install the...
Use & Care Guide
Page 7
...12. Put decal at bottom of wine cellar. After you change door (left hinge), place Whirlpool badge at the top of wine cellar. (Only models: WUW55X15DS & WUW55X24DS) NOTE: The decal & Whirlpool badge are preinstalled in back or other setscrew. 6. Reattach the mechanical switch using two or...mechanical switch to access the condenser coils for cleaning. Tighten the screws. Open the wine cellar door. 2. Repeat Step 4 for models WUW55X15DS & WUW55X24DS. Helpful Tip: Put cardboard under wine cellar until it is installed upside down when installed correctly. Base Grille ...
...12. Put decal at bottom of wine cellar. After you change door (left hinge), place Whirlpool badge at the top of wine cellar. (Only models: WUW55X15DS & WUW55X24DS) NOTE: The decal & Whirlpool badge are preinstalled in back or other setscrew. 6. Reattach the mechanical switch using two or...mechanical switch to access the condenser coils for cleaning. Tighten the screws. Open the wine cellar door. 2. Repeat Step 4 for models WUW55X15DS & WUW55X24DS. Helpful Tip: Put cardboard under wine cellar until it is installed upside down when installed correctly. Base Grille ...

Use & Care Guide
Page 8
...sounds that your old one . The following describes the kinds of the wine cellar compartment. Style 1: Models WUW35X15DS and WUW35X24DS AB C DE A. Light C. Compartment display D. Increase temperature G. Because the sounds are normal. Power B. Temperature indicator E. Increase temperature... Hard surfaces, such as the flooring and surrounding structures, can make . Using the Control For Style 1 and Style 2 models, the control for this models is defrosting. ■ You may hear water running into the drain pan when the wine cellar is located at the desired...
...sounds that your old one . The following describes the kinds of the wine cellar compartment. Style 1: Models WUW35X15DS and WUW35X24DS AB C DE A. Light C. Compartment display D. Increase temperature G. Because the sounds are normal. Power B. Temperature indicator E. Increase temperature... Hard surfaces, such as the flooring and surrounding structures, can make . Using the Control For Style 1 and Style 2 models, the control for this models is defrosting. ■ You may hear water running into the drain pan when the wine cellar is located at the desired...

Use & Care Guide
Page 9
...Press Light button/touch pad to turn the light on and off within the wine cellar compartment. Change Temperature Setting (on some models): For models with °F/°C control button/touch pad, press the °F/ °C Control button/touch pad to switch from Fahrenheit to...press and hold the Eco mode button for 3 seconds. AB C D E FG HI JK A. Increase temperature (upper compartment) E. For single-compartment models (WUW35X15DS, WUW35X24DS, WUW55X15DS), the preset temperature is on and off when the door is closed . Press and hold the Eco mode button for 3 seconds. Press...
...Press Light button/touch pad to turn the light on and off within the wine cellar compartment. Change Temperature Setting (on some models): For models with °F/°C control button/touch pad, press the °F/ °C Control button/touch pad to switch from Fahrenheit to...press and hold the Eco mode button for 3 seconds. AB C D E FG HI JK A. Increase temperature (upper compartment) E. For single-compartment models (WUW35X15DS, WUW35X24DS, WUW55X15DS), the preset temperature is on and off when the door is closed . Press and hold the Eco mode button for 3 seconds. Press...
Use & Care Guide
Page 10
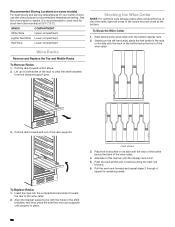
... steps 2 through 4; Insert the rack into the rack supports until properly in the center and red wines at the bottom. Recommended Storing Locations (on some models) For best storing and serving temperatures for short-term (few months) at 55°F (13°C). Pull the rack forward and out of rack 3. Place...
... steps 2 through 4; Insert the rack into the rack supports until properly in the center and red wines at the bottom. Recommended Storing Locations (on some models) For best storing and serving temperatures for short-term (few months) at 55°F (13°C). Pull the rack forward and out of rack 3. Place...
Use & Care Guide
Page 11
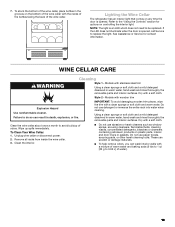
...odors. Using a clean sponge or soft cloth and a mild detergent dissolved in warm water, hand wash and rinse thoroughly the removable parts and interior surfaces. Models with the necks of the bottles facing the back of warm water and baking soda (2 tbs to 1 qt [26 g to be replaced.... Models with a soft cloth. Do not use abrasive or harsh cleaners such as window sprays, scouring cleansers, flammable fluids, cleaning waxes, concentrated detergents, bleaches or ...
...odors. Using a clean sponge or soft cloth and a mild detergent dissolved in warm water, hand wash and rinse thoroughly the removable parts and interior surfaces. Models with the necks of the bottles facing the back of warm water and baking soda (2 tbs to 1 qt [26 g to be replaced.... Models with a soft cloth. Do not use abrasive or harsh cleaners such as window sprays, scouring cleansers, flammable fluids, cleaning waxes, concentrated detergents, bleaches or ...
Use & Care Guide
Page 14
...Canada, visit our webpage www.whirlpoolparts.ca or call 1-800-253-1301. When calling, please know the purchase date and the complete model and serial number of Service. For Further Assistance If you need further assistance, you can also look in your appliance. If you ...still need to Whirlpool with any questions or concerns at www.whirlpool.ca. Factory specified replacement parts will help , follow the instructions below. ASSISTANCE OR SERVICE Before calling for assistance ...
...Canada, visit our webpage www.whirlpoolparts.ca or call 1-800-253-1301. When calling, please know the purchase date and the complete model and serial number of Service. For Further Assistance If you need further assistance, you can also look in your appliance. If you ...still need to Whirlpool with any questions or concerns at www.whirlpool.ca. Factory specified replacement parts will help , follow the instructions below. ASSISTANCE OR SERVICE Before calling for assistance ...

Use & Care Guide
Page 15
..., operated and maintained according to instructions attached to or furnished with the product, Whirlpool Corporation or Whirlpool Canada LP (hereafter "Whirlpool") will be borne by a Whirlpool designated service company. and Canada, direct all requests for the following information available when...: ■ Name, address and telephone number ■ Model number and serial number ■ A clear, detailed description of the problem ■ Proof of non-genuine Whirlpool parts or accessories. 6. WHIRLPOOL® REFRIGERATION LIMITED WARRANTY ATTACH YOUR RECEIPT HERE. Please have...
..., operated and maintained according to instructions attached to or furnished with the product, Whirlpool Corporation or Whirlpool Canada LP (hereafter "Whirlpool") will be borne by a Whirlpool designated service company. and Canada, direct all requests for the following information available when...: ■ Name, address and telephone number ■ Model number and serial number ■ A clear, detailed description of the problem ■ Proof of non-genuine Whirlpool parts or accessories. 6. WHIRLPOOL® REFRIGERATION LIMITED WARRANTY ATTACH YOUR RECEIPT HERE. Please have...


