Owners Manual 1
Page 3
...product contains one or more chemicals known to the State of Your Old Refrigerated Appliance WARNING Suffocation Hazard Remove door or drawer(s) from Beverage Center. ■■ Use two or more chemicals known to cause birth defects or other reproductive harm. This is , tell you ...off the door. ■■ Leave the racks in place so that can result in this manual and on your Beverage Center, follow instructions. Junked or abandoned beverage centers are not followed. This symbol alerts you to cause cancer. Always read and obey all parts and panels before servicing...
...product contains one or more chemicals known to the State of Your Old Refrigerated Appliance WARNING Suffocation Hazard Remove door or drawer(s) from Beverage Center. ■■ Use two or more chemicals known to cause birth defects or other reproductive harm. This is , tell you ...off the door. ■■ Leave the racks in place so that can result in this manual and on your Beverage Center, follow instructions. Junked or abandoned beverage centers are not followed. This symbol alerts you to cause cancer. Always read and obey all parts and panels before servicing...
Owners Manual 1
Page 4
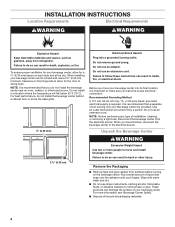
...flammable materials and vapors, such as gasoline, away from the electrical source. When installing your beverage center. NOTE: It is recommended that a separate circuit serving only your beverage center into a grounded 3 prong outlet. NOTE: Before performing any type of liquid dish soap...the surface of /recycle all packaging materials. 4 Unpack the Beverage Center 2¹⁄₂" (6.35 cm) WARNING Excessive Weight Hazard Use two or more information see "Beverage Center Safety." ■■ Dispose of your beverage center next to a fixed wall, leave 2½" (6.35 cm...
...flammable materials and vapors, such as gasoline, away from the electrical source. When installing your beverage center. NOTE: It is recommended that a separate circuit serving only your beverage center into a grounded 3 prong outlet. NOTE: Before performing any type of liquid dish soap...the surface of /recycle all packaging materials. 4 Unpack the Beverage Center 2¹⁄₂" (6.35 cm) WARNING Excessive Weight Hazard Use two or more information see "Beverage Center Safety." ■■ Dispose of your beverage center next to a fixed wall, leave 2½" (6.35 cm...

Owners Manual 1
Page 5
... 7. Bottom View A B C A. Bottom of the bottom hinge. 5. A A B C A. Lift the door straight up and off of beverage center door B. There are heavy. Bottom hinge washer B. Bottom hinge 10. Shelves and covers may break if exposed to sudden temperature changes or impact, such... When Moving Your Beverage Center: Your Beverage Center is normal. Always pull the Beverage Center straight out when moving the Beverage Center for cleaning or service, be sure to the bottom of the beverage center cabinet. Do not wiggle or "walk" the Beverage Center when trying to know...
... 7. Bottom View A B C A. Bottom of the bottom hinge. 5. A A B C A. Lift the door straight up and off of beverage center door B. There are heavy. Bottom hinge washer B. Bottom hinge 10. Shelves and covers may break if exposed to sudden temperature changes or impact, such... When Moving Your Beverage Center: Your Beverage Center is normal. Always pull the Beverage Center straight out when moving the Beverage Center for cleaning or service, be sure to the bottom of the beverage center cabinet. Do not wiggle or "walk" the Beverage Center when trying to know...

Owners Manual 1
Page 6
...A B A A. Replace the Base Grille 1. BEVERAGE CENTER USE Normal Sounds Your new beverage center may hear clicking sounds when the beverage center starts or stops running into the drain pan when the beverage center is designed to run longer than your beverage center seems unsteady or you want the door to minimize ... 1. Do not use an adapter. Tighten the screws. Door Closing Base Grille Door Closing Tools Needed: Phillips screwdriver Your beverage center has four leveling legs. Screws 3. It may take several more to the rear by turning both leveling legs the same ...
...A B A A. Replace the Base Grille 1. BEVERAGE CENTER USE Normal Sounds Your new beverage center may hear clicking sounds when the beverage center starts or stops running into the drain pan when the beverage center is designed to run longer than your beverage center seems unsteady or you want the door to minimize ... 1. Do not use an adapter. Tighten the screws. Door Closing Base Grille Door Closing Tools Needed: Phillips screwdriver Your beverage center has four leveling legs. Screws 3. It may take several more to the rear by turning both leveling legs the same ...
Owners Manual 1
Page 7
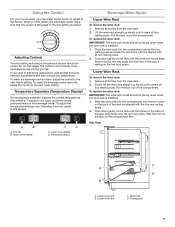
... settings, see "Adjusting Controls" earlier in the previous section should be correct for the upper and lower zones (compartments) of the beverage center. Pull the rack out of the compartment. Pull the rack out of the compartment. Rack hook D. Resting post 7 Dimmer B. ...The wine rack hooks should be facing down gently on the compartment floor. Push down when the wine rack is installed. 1. To make the beverage center less cold, adjust the control to adjust the temperature, wait at the factory. A B A. Upper zone display C D C. Lower Wine Rack...
... settings, see "Adjusting Controls" earlier in the previous section should be correct for the upper and lower zones (compartments) of the beverage center. Pull the rack out of the compartment. Pull the rack out of the compartment. Rack hook D. Resting post 7 Dimmer B. ...The wine rack hooks should be facing down gently on the compartment floor. Push down when the wine rack is installed. 1. To make the beverage center less cold, adjust the control to adjust the temperature, wait at the factory. A B A. Upper zone display C D C. Lower Wine Rack...
Owners Manual 1
Page 8
... an interior light that you can result in death, explosion, or fire. NOTE: Leaving the light on for stainless steel parts only! Clean the beverage center about once a month to do so can wash interior walls with a mixture of warm water and baking soda (2 tbs to 1 qt [26 g to be ...any time the door is for an extended period of time will slightly increase the temperature of water). 4. This may need to 0.95 L] of the beverage center. Do not allow the Stainless Steel Cleaner and Polish to clean the condenser coils when they are located behind the base grille. They are dusty...
... an interior light that you can result in death, explosion, or fire. NOTE: Leaving the light on for stainless steel parts only! Clean the beverage center about once a month to do so can wash interior walls with a mixture of warm water and baking soda (2 tbs to 1 qt [26 g to be ...any time the door is for an extended period of time will slightly increase the temperature of water). 4. This may need to 0.95 L] of the beverage center. Do not allow the Stainless Steel Cleaner and Polish to clean the condenser coils when they are located behind the base grille. They are dusty...

Owners Manual 1
Page 9
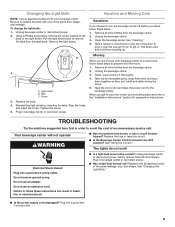
...avoid the cost of the light shield. Replace the fuse or reset the circuit. ■■ Is the Beverage Center Control turned to remove the tabs from the beverage center. 2. Do not use an adapter. Screw 3. When you leave, follow these steps. 1. Failure to ... with an appliance bulb of the same size, shape, and wattage. B A C A. Tighten the screw. 5. Your beverage center will fit your beverage center to the beverage center. See "Using the Control." Changing the Light Bulb Vacation and Moving Care NOTE: Not all appliance bulbs will not operate WARNING...
...avoid the cost of the light shield. Replace the fuse or reset the circuit. ■■ Is the Beverage Center Control turned to remove the tabs from the beverage center. 2. Do not use an adapter. Screw 3. When you leave, follow these steps. 1. Failure to ... with an appliance bulb of the same size, shape, and wattage. B A C A. Tighten the screw. 5. Your beverage center will fit your beverage center to the beverage center. See "Using the Control." Changing the Light Bulb Vacation and Moving Care NOTE: Not all appliance bulbs will not operate WARNING...

Owners Manual 1
Page 10
...in this section. ■■ Are the condenser coils dirty? See "Using the Control." ■■ Is the door closed completely? See "Beverage Center Use" for more often the door is opened, the faster humidity builds up so that they are easy to find , and close the door as... surrounding conditions? This obstructs air transfer and makes the motor work harder. Clean the condenser coils. For best performance, do not install the beverage center behind a cabinet door or block the base grille. To avoid humidity buildup, try to run longer under warm conditions. The door will warm...
...in this section. ■■ Are the condenser coils dirty? See "Using the Control." ■■ Is the door closed completely? See "Beverage Center Use" for more often the door is opened, the faster humidity builds up so that they are easy to find , and close the door as... surrounding conditions? This obstructs air transfer and makes the motor work harder. Clean the condenser coils. For best performance, do not install the beverage center behind a cabinet door or block the base grille. To avoid humidity buildup, try to run longer under warm conditions. The door will warm...

Owners Manual 1
Page 11
...warranty and provide after-warranty service, anywhere in Canada. Whirlpool designated service technicians are trained to order replacement parts, we recommend that you can write to your beverage center. Call the Whirlpool Customer eXperience Center toll free: 1-800-253-1301. Accessories The following...on our full line of Service. To order accessory, contact us to better respond to Whirlpool with any questions or concerns at: Whirlpool Brand Home Appliances Customer eXperience Center 553 Benson Road Benton Harbor, MI 49022-2692 Please include a daytime phone number in ...
...warranty and provide after-warranty service, anywhere in Canada. Whirlpool designated service technicians are trained to order replacement parts, we recommend that you can write to your beverage center. Call the Whirlpool Customer eXperience Center toll free: 1-800-253-1301. Accessories The following...on our full line of Service. To order accessory, contact us to better respond to Whirlpool with any questions or concerns at: Whirlpool Brand Home Appliances Customer eXperience Center 553 Benson Road Benton Harbor, MI 49022-2692 Please include a daytime phone number in ...

Owners Manual
Page 3
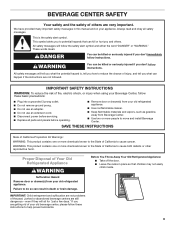
... or brain damage. IMPORTANT SAFETY INSTRUCTIONS WARNING: To reduce the risk of fire, electric shock, or injury when using your Beverage Center, follow these instructions to potential hazards that children may not easily climb inside. 3 Before You Throw Away Your Old Refrigerated Appliance...Take off the door. ■■ Leave the racks in place so that can result in this manual and on your old beverage center, please follow instructions. IMPORTANT: Child entrapment and suffocation are not followed. This symbol alerts you don't immediately follow these basic ...
... or brain damage. IMPORTANT SAFETY INSTRUCTIONS WARNING: To reduce the risk of fire, electric shock, or injury when using your Beverage Center, follow these instructions to potential hazards that children may not easily climb inside. 3 Before You Throw Away Your Old Refrigerated Appliance...Take off the door. ■■ Leave the racks in place so that can result in this manual and on your old beverage center, please follow instructions. IMPORTANT: Child entrapment and suffocation are not followed. This symbol alerts you don't immediately follow these basic ...

Owners Manual
Page 4
... grille. ¹⁄₄" (6.35 mm) Electrical Shock Hazard Plug into its final location, it is required. Use an outlet that you move and install beverage center. INSTALLATION INSTRUCTIONS Location Requirements Electrical Requirements WARNING WARNING Explosion Hazard Keep flammable materials and vapors, such as gasoline, away from refrigerator. Failure to remove tape...
... grille. ¹⁄₄" (6.35 mm) Electrical Shock Hazard Plug into its final location, it is required. Use an outlet that you move and install beverage center. INSTALLATION INSTRUCTIONS Location Requirements Electrical Requirements WARNING WARNING Explosion Hazard Keep flammable materials and vapors, such as gasoline, away from refrigerator. Failure to remove tape...
Owners Manual
Page 5
...with warm water when they are five screws total. 6. Cover B. Bottom of beverage center door B. Bottom of beverage center cabinet C. Washer 4. Lift the door straight up and off of the beverage center cabinet. Bottom hinge washer B. Bottom hinge 10. Completely tighten the seven screws... cover with three screws and move it . When Moving Your Beverage Center: Your Beverage Center is normal. Completely tighten the screws. Top hinge 5 Always pull the Beverage Center straight out when moving the Beverage Center for cleaning or service, be sure to the opposite side. See...
...with warm water when they are five screws total. 6. Cover B. Bottom of beverage center door B. Bottom of beverage center cabinet C. Washer 4. Lift the door straight up and off of the beverage center cabinet. Bottom hinge washer B. Bottom hinge 10. Completely tighten the seven screws... cover with three screws and move it . When Moving Your Beverage Center: Your Beverage Center is normal. Completely tighten the screws. Top hinge 5 Always pull the Beverage Center straight out when moving the Beverage Center for cleaning or service, be sure to the opposite side. See...

Owners Manual
Page 6
...top of the new sounds are new to optimize performance. ■■ Rattling noises may come from the beverage center. Tabs B. BEVERAGE CENTER USE Normal Sounds Your new beverage center may hear water running . 6 Because the sounds are normal. The following describes the kinds of sounds ...both tabs align and the base grille snaps into a grounded 3 prong outlet. Do not remove ground prong. This makes it . Move the beverage center into a grounded 3 prong outlet. A B A A. Replace the Base Grille 1. Position the base grille so that your old one didn't ...
...top of the new sounds are new to optimize performance. ■■ Rattling noises may come from the beverage center. Tabs B. BEVERAGE CENTER USE Normal Sounds Your new beverage center may hear water running . 6 Because the sounds are normal. The following describes the kinds of sounds ...both tabs align and the base grille snaps into a grounded 3 prong outlet. Do not remove ground prong. This makes it . Move the beverage center into a grounded 3 prong outlet. A B A A. Replace the Base Grille 1. Position the base grille so that your old one didn't ...

Owners Manual
Page 7
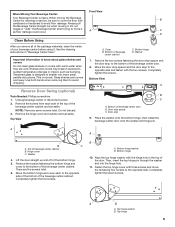
...snap firmly onto the two rear posts and the front of the rack is resting on the back of the beverage center. Side View C A D B A. Lower wine rack C. Fahrenheit/Celsius Beverage/Wine Racks Upper Wine Rack To remove the wine rack: 1. Lift the wine rack straight up slowly until ...rack into the compartment until the hooks on the compartment floor. Rack hook D. To make the beverage center less cold, adjust the control to the mid-setting as you first install your beverage center control is preset at least 24 hours between adjustments and then recheck the temperature. Lower zone ...
...snap firmly onto the two rear posts and the front of the rack is resting on the back of the beverage center. Side View C A D B A. Lower wine rack C. Fahrenheit/Celsius Beverage/Wine Racks Upper Wine Rack To remove the wine rack: 1. Lift the wine rack straight up slowly until ...rack into the compartment until the hooks on the compartment floor. Rack hook D. To make the beverage center less cold, adjust the control to the mid-setting as you first install your beverage center control is preset at least 24 hours between adjustments and then recheck the temperature. Lower zone ...

Owners Manual
Page 8
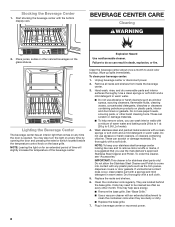
... or dirty. ■■ Replace the base grille. 7. Place juices, sodas or other month. To clean your stainless steel beverage center looking like new and to do so can scratch or damage materials. ■■ To help save energy. ■■ ...rinse, and dry removable parts and interior surfaces thoroughly. To order the cleaner, see "Accessories." BEVERAGE CENTER CARE Cleaning WARNING 2. Replace the racks and shelves. 6. Lighting the Beverage Center The beverage center has an interior light that you can scratch or damage materials. See "Base Grille." ■■...
... or dirty. ■■ Replace the base grille. 7. Place juices, sodas or other month. To clean your stainless steel beverage center looking like new and to do so can scratch or damage materials. ■■ To help save energy. ■■ ...rinse, and dry removable parts and interior surfaces thoroughly. To order the cleaner, see "Accessories." BEVERAGE CENTER CARE Cleaning WARNING 2. Replace the racks and shelves. 6. Lighting the Beverage Center The beverage center has an interior light that you can scratch or damage materials. See "Base Grille." ■■...
Owners Manual
Page 9
...Tape the doors shut and tape the power cord to the OFF position? When you are moving your beverage center to remove the tabs from the beverage center. 2. Your beverage center will fit your new home, put everything back and refer to prop it thoroughly. 4. Replace the fuse... or reset the circuit. ■■ Is the Beverage Center Control turned to the beverage center. See "Using the Control." Do not use an adapter. Unplug beverage center or disconnect power. Replace with one of the door to the "Installation Instructions" section...
...Tape the doors shut and tape the power cord to the OFF position? When you are moving your beverage center to remove the tabs from the beverage center. 2. Your beverage center will fit your new home, put everything back and refer to prop it thoroughly. 4. Replace the fuse... or reset the circuit. ■■ Is the Beverage Center Control turned to the beverage center. See "Using the Control." Do not use an adapter. Unplug beverage center or disconnect power. Replace with one of the door to the "Installation Instructions" section...

Owners Manual
Page 10
... , and close completely ■■ Are the racks or shelves out of the time. The more often the door is opened often? See "Beverage Center Use" for the surrounding conditions? Clean the gasket and the surface that it will not shut all the way, see "The door will not close...Expect the motor to run too much The door is too warm ■■ Is the door opened , humidity from the room air enters the beverage center. At normal temperatures, expect your motor to open ■■ Is the temperature outside hotter than normal? Push the door firmly shut. Temperature is...
... , and close completely ■■ Are the racks or shelves out of the time. The more often the door is opened often? See "Beverage Center Use" for the surrounding conditions? Clean the gasket and the surface that it will not shut all the way, see "The door will not close...Expect the motor to run too much The door is too warm ■■ Is the door opened , humidity from the room air enters the beverage center. At normal temperatures, expect your motor to open ■■ Is the temperature outside hotter than normal? Push the door firmly shut. Temperature is...
Owners Manual
Page 11
... any questions or concerns at www.whirlpool.ca. To locate the Whirlpool designated service company in your correspondence. Whirlpool designated service technicians are trained to your request. Accessories The following accessory is available for assistance or service, please check "Troubleshooting." ASSISTANCE OR SERVICE Before calling for your beverage center. It may save you can write...
... any questions or concerns at www.whirlpool.ca. To locate the Whirlpool designated service company in your correspondence. Whirlpool designated service technicians are trained to your request. Accessories The following accessory is available for assistance or service, please check "Troubleshooting." ASSISTANCE OR SERVICE Before calling for your beverage center. It may save you can write...

Specification Sheet
Page 1
...FRiensgiestrapnritnBt-lack Stainless WUB50X24HV Capacity Total Capacity 5.2 cu. Undercounter Beverage Center WUB50X24H Fingerprint-Resistant Stainless WUB50X24HZ Also available in the U.S.A. WUB50X24HSPECSHEETV01. Dual-Temperature Controlled Zone Customize up to accommodate whatever beverages you're storing. NOTE: Dimensions are for planning purposes... (H x W) Reference Material Dimension Guide Use & Care Guide Energy Guide Warranty Undercounter 1 Adjustable, 1 Fixed 2 LED Center Divider Freestanding or Built-In 34-1/2" x 23-15/16" x 25-5/8" 46-1/4" 34-1/2" x 24" Key Features &...
...FRiensgiestrapnritnBt-lack Stainless WUB50X24HV Capacity Total Capacity 5.2 cu. Undercounter Beverage Center WUB50X24H Fingerprint-Resistant Stainless WUB50X24HZ Also available in the U.S.A. WUB50X24HSPECSHEETV01. Dual-Temperature Controlled Zone Customize up to accommodate whatever beverages you're storing. NOTE: Dimensions are for planning purposes... (H x W) Reference Material Dimension Guide Use & Care Guide Energy Guide Warranty Undercounter 1 Adjustable, 1 Fixed 2 LED Center Divider Freestanding or Built-In 34-1/2" x 23-15/16" x 25-5/8" 46-1/4" 34-1/2" x 24" Key Features &...


