
Installation Instructions
Page 2
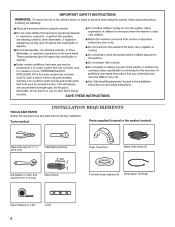
Tools needed: Parts supplied (located in the washer basket): Pliers that open to 1 9/16" (39.5 mm) Flashlight (optional) 4" min (102 mm) Adjustable or open end wrench 9/16" (14 mm) Wood block Drain hose form Water inlet hoses (2) Flat inlet hose washers (4) Removable Tie Strap Tape measure or ruler Level 2 INSTALLATION REQUIREMENTS TOOLS AND PARTS Gather the required tools and parts before starting installation.
Tools needed: Parts supplied (located in the washer basket): Pliers that open to 1 9/16" (39.5 mm) Flashlight (optional) 4" min (102 mm) Adjustable or open end wrench 9/16" (14 mm) Wood block Drain hose form Water inlet hoses (2) Flat inlet hose washers (4) Removable Tie Strap Tape measure or ruler Level 2 INSTALLATION REQUIREMENTS TOOLS AND PARTS Gather the required tools and parts before starting installation.

Installation Instructions
Page 3
... mm) Water faucets beyond reach of fill hoses Lint clogged drain 2 longer water fill hoses: 6 ft. (1.8 m), Part Number 76314 10 ft. (3.0 m), Part Number 350008 Drain protector, Part Number 376031 1" (25 mm) 27 1/2" (699 mm) 24 in the top and bottom of the washer. Some ...sink, sump pump, and connectors (available from local plumbing suppliers) Floor drain Siphon Break Kit, Part Number 285834 Drain Hose, Part Number 8318155 Connector Kit, Part Number 285835 Spacing for recessed area or closet installation All dimensions show recommended spacing allowed, with washer...
... mm) Water faucets beyond reach of fill hoses Lint clogged drain 2 longer water fill hoses: 6 ft. (1.8 m), Part Number 76314 10 ft. (3.0 m), Part Number 350008 Drain protector, Part Number 376031 1" (25 mm) 27 1/2" (699 mm) 24 in the top and bottom of the washer. Some ...sink, sump pump, and connectors (available from local plumbing suppliers) Floor drain Siphon Break Kit, Part Number 285834 Drain Hose, Part Number 8318155 Connector Kit, Part Number 285835 Spacing for recessed area or closet installation All dimensions show recommended spacing allowed, with washer...

Installation Instructions
Page 4
... Wall standpipe Floor standpipe The standpipe drain requires a minimum diameter standpipe of the washer. or 20-amp, fused electrical supply is available. See "Tools and Parts". A 2" (51 mm) diameter to a gas pipe. ■■ Check with local codes and ordinances. The top of the washer. The floor ...990 mm) above the floor and no higher than 96" (2.4 m) from the bottom of the laundry tub must be purchased separately. See "Tools and Parts". DRAIN SYSTEM Drain system can be no less than 17 gal. (64 L) per minute. Additional hoses might be needed. ■■ A 120 ...
... Wall standpipe Floor standpipe The standpipe drain requires a minimum diameter standpipe of the washer. or 20-amp, fused electrical supply is available. See "Tools and Parts". A 2" (51 mm) diameter to a gas pipe. ■■ Check with local codes and ordinances. The top of the washer. The floor ...990 mm) above the floor and no higher than 96" (2.4 m) from the bottom of the laundry tub must be purchased separately. See "Tools and Parts". DRAIN SYSTEM Drain system can be no less than 17 gal. (64 L) per minute. Additional hoses might be needed. ■■ A 120 ...

Installation Instructions
Page 6
.... 2. Repeat this step with separate directions. HELPFUL TIP: Make note of which hose is connected to determine what you may need . You may need alternate parts with the hose labeled cold for air. ■■ Do not lay excess hose on coupling by hand until clear. See "Tools and... Parts" to the cold water faucet. 6 Make sure the washer basket is seated on valve when attaching to provide a gap for the cold water faucet. Check ...
.... 2. Repeat this step with separate directions. HELPFUL TIP: Make note of which hose is connected to determine what you may need . You may need alternate parts with the hose labeled cold for air. ■■ Do not lay excess hose on coupling by hand until clear. See "Tools and... Parts" to the cold water faucet. 6 Make sure the washer basket is seated on valve when attaching to provide a gap for the cold water faucet. Check ...
Installation Instructions
Page 9
...inlet hoses. ■■ Remove film from console and any tape remaining on washer. ■■ Check that washer is an extra part, go back through steps to complete one whole cycle. 9 COMPLETE INSTALLATION CHECKLIST ■■ Check electrical requirements. Close lid. See "...Electrical Requirements". ■■ Check that you have all parts are on. ■■ Check for a medium-size load and pour it to see what was skipped. ■■ Check that ...
...inlet hoses. ■■ Remove film from console and any tape remaining on washer. ■■ Check that washer is an extra part, go back through steps to complete one whole cycle. 9 COMPLETE INSTALLATION CHECKLIST ■■ Check electrical requirements. Close lid. See "...Electrical Requirements". ■■ Check that you have all parts are on. ■■ Check for a medium-size load and pour it to see what was skipped. ■■ Check that ...
Owners Manual
Page 18
...ood, acts of God, improper installation, installation not in accordance with the product, Whirlpool Corporation or Whirlpool Canada LP (hereafter "Whirlpool") will need to determine if another warranty applies. Repairs to parts or systems resulting from state to state or province to the appliance. 8. This ...SHORTEST PERIOD ALLOWED BY LAW. Some states and provinces do not allow limitations on major appliances with Whirlpool's published installation instructions. 10. Replacement parts or repair labor if this limitation may not apply to you . Expenses for travel and transportation ...
...ood, acts of God, improper installation, installation not in accordance with the product, Whirlpool Corporation or Whirlpool Canada LP (hereafter "Whirlpool") will need to determine if another warranty applies. Repairs to parts or systems resulting from state to state or province to the appliance. 8. This ...SHORTEST PERIOD ALLOWED BY LAW. Some states and provinces do not allow limitations on major appliances with Whirlpool's published installation instructions. 10. Replacement parts or repair labor if this limitation may not apply to you . Expenses for travel and transportation ...

Warranty
Page 1
... in a manner that existed when this major appliance was purchased. This major appliance is reported to Whirlpool within 30 days from the date of purchase. 6. Replacement parts or repair labor on the product. This warranty gives you speci c legal rights, and you also...limitation may have been removed, altered, or cannot be provided by Whirlpool. 5. Consumable parts are unable to you ever need repair service, rst see the "Troubleshooting" section of products not approved by a Whirlpool designated service company. Expenses for travel and transportation for in accordance ...
... in a manner that existed when this major appliance was purchased. This major appliance is reported to Whirlpool within 30 days from the date of purchase. 6. Replacement parts or repair labor on the product. This warranty gives you speci c legal rights, and you also...limitation may have been removed, altered, or cannot be provided by Whirlpool. 5. Consumable parts are unable to you ever need repair service, rst see the "Troubleshooting" section of products not approved by a Whirlpool designated service company. Expenses for travel and transportation for in accordance ...


