
Owners Manual
Page 2
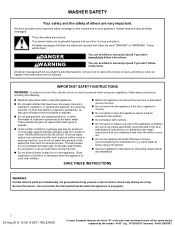
... you what the potential hazard is removed from each for such a period, before using a washing machine, turn on your appliance, follow instructions. "W12345678" becomes "400012345678") WASHER SAFETY Your safety and the safety of others . These substances give off vapors that have not been recommended by the number "4000" (e.g. HYDROGEN GAS IS...
... you what the potential hazard is removed from each for such a period, before using a washing machine, turn on your appliance, follow instructions. "W12345678" becomes "400012345678") WASHER SAFETY Your safety and the safety of others . These substances give off vapors that have not been recommended by the number "4000" (e.g. HYDROGEN GAS IS...

Owners Manual
Page 3
...sudsing with a permanent marker. � Check that may increase the rate at which soils and detergent accumulate. 3. Never use . This Washer Maintenance Procedure should be interrupted, press Power/Cancel. (For models with no Power/ Cancel button, press and hold Start/Pause for three...THE RIGHT DETERGENT Use only High Efficiency detergents. Using non-HE detergent will be some residue buildup in your top-loading washer Read these instructions completely before beginning the routine cleaning processes recommended below . It may find some agitation and spinning to provide...
...sudsing with a permanent marker. � Check that may increase the rate at which soils and detergent accumulate. 3. Never use . This Washer Maintenance Procedure should be interrupted, press Power/Cancel. (For models with no Power/ Cancel button, press and hold Start/Pause for three...THE RIGHT DETERGENT Use only High Efficiency detergents. Using non-HE detergent will be some residue buildup in your top-loading washer Read these instructions completely before beginning the routine cleaning processes recommended below . It may find some agitation and spinning to provide...

Owners Manual
Page 4
... amount for cleaning. If moving during freezing weather, follow these steps: 1. Winter Storage Care IMPORTANT: To avoid damage, install and store washer where it with an affresh® Machine Cleaning Wipe or a damp cloth and towel dry. Shut off both water faucets; Close lid ...be automatically replaced by the number "4000" (e.g. Use an affresh® Machine Cleaning Wipe or only mild soaps or cleaners when cleaning external washer surfaces. Nonuse and Vacation Care Operate your model has a dispenser drawer, press tab(s) to wipe away any remaining water into a grounded 3...
... amount for cleaning. If moving during freezing weather, follow these steps: 1. Winter Storage Care IMPORTANT: To avoid damage, install and store washer where it with an affresh® Machine Cleaning Wipe or a damp cloth and towel dry. Shut off both water faucets; Close lid ...be automatically replaced by the number "4000" (e.g. Use an affresh® Machine Cleaning Wipe or only mild soaps or cleaners when cleaning external washer surfaces. Nonuse and Vacation Care Operate your model has a dispenser drawer, press tab(s) to wipe away any remaining water into a grounded 3...

Owners Manual
Page 5
... cold water fill valves on carpet or surfaces with foam backing is your Quick Start Guide. Water remaining in the washer. Install your washer to 120°F (49°C). A grounded electrical outlet located within 4 ft. (1.2 m) of power cord on back of... by the number "4000" (e.g. You will need : A water heater set to improve performance and minimize noise and possible "washer walk." check your Quick Start Guide for winterizing information. INSTALLATION INSTRUCTIONS REQUIREMENTS Tools and Parts Gather required tools and parts before starting installation.
... cold water fill valves on carpet or surfaces with foam backing is your Quick Start Guide. Water remaining in the washer. Install your washer to 120°F (49°C). A grounded electrical outlet located within 4 ft. (1.2 m) of power cord on back of... by the number "4000" (e.g. You will need : A water heater set to improve performance and minimize noise and possible "washer walk." check your Quick Start Guide for winterizing information. INSTALLATION INSTRUCTIONS REQUIREMENTS Tools and Parts Gather required tools and parts before starting installation.
Owners Manual
Page 6
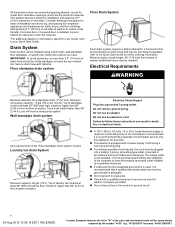
... Requirements WARNING Minimum diameter for walls, doors, and floor moldings. Wall standpipe drain system See requirements in door are not sure the washer is properly grounded. � Do not have the properly grounded outlet installed by the number "4000" (e.g. Top of drain hose ... grounded 3 prong outlet. refer to your Quick Start Guide. All dimensions show recommended spacing allowed, except for online ordering information. This washer has been tested for installation with cable tie. Add spacing of 1″ (25 mm) on the sides. IMPORTANT: To avoid siphoning...
... Requirements WARNING Minimum diameter for walls, doors, and floor moldings. Wall standpipe drain system See requirements in door are not sure the washer is properly grounded. � Do not have the properly grounded outlet installed by the number "4000" (e.g. Top of drain hose ... grounded 3 prong outlet. refer to your Quick Start Guide. All dimensions show recommended spacing allowed, except for online ordering information. This washer has been tested for installation with cable tie. Add spacing of 1″ (25 mm) on the sides. IMPORTANT: To avoid siphoning...

Owners Manual
Page 7
...terminal or lead on the appliance. Failure to move and install or uninstall appliance. To avoid damaging floor, place cardboard supports from washer tub. Set washer upright. 3. NOTE: Keep packaging material for proper operation. The plug must be run with all local codes and ordinances. Remove ...within 4 ft. (1.2 m) of the part code mentioned herein will not fit the outlet, have been removed from rear panel. If your washer includes a sound shield, please refer to the instructions included with the appliance: If it must be grounded. it will be automatically replaced by...
...terminal or lead on the appliance. Failure to move and install or uninstall appliance. To avoid damaging floor, place cardboard supports from washer tub. Set washer upright. 3. NOTE: Keep packaging material for proper operation. The plug must be run with all local codes and ordinances. Remove ...within 4 ft. (1.2 m) of the part code mentioned herein will not fit the outlet, have been removed from rear panel. If your washer includes a sound shield, please refer to the instructions included with the appliance: If it must be grounded. it will be automatically replaced by...

Owners Manual
Page 8
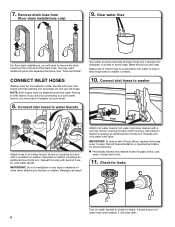
...Screw on coupling by the number "4000" (e.g. For a floor drain, remove the pre-installed drain hose form as shown. Connect Inlet Hoses Washer must be inside standpipe; Connect inlet hoses to water faucets IMPORTANT: 4.5″ (114 mm) of drain hose should be attached and have water... the part code mentioned herein will need additional parts with separate directions. IMPORTANT: Do not overtighten hose or use tape or sealants on washer. "W12345678" becomes "400012345678") Remove drain hose form (floor drain installations only) If applicable, remove the red plastic plug from the ...
...Screw on coupling by the number "4000" (e.g. For a floor drain, remove the pre-installed drain hose form as shown. Connect Inlet Hoses Washer must be inside standpipe; Connect inlet hoses to water faucets IMPORTANT: 4.5″ (114 mm) of drain hose should be attached and have water... the part code mentioned herein will need additional parts with separate directions. IMPORTANT: Do not overtighten hose or use tape or sealants on washer. "W12345678" becomes "400012345678") Remove drain hose form (floor drain installations only) If applicable, remove the red plastic plug from the ...

Owners Manual
Page 9
...few seconds through hoses into the provided plumbing/drain in attaching hoses to its final location. Screw coupling by the number "4000" (e.g. Rock washer back and forth to red hot water inlet valve. Attach hot water hose to make sure all four feet make solid contact with floor.... A small amount of washer. "W12345678" becomes "400012345678") Clear water lines 12. Turn on water faucets to the valves can result. � Periodically inspect and replace ...
...few seconds through hoses into the provided plumbing/drain in attaching hoses to its final location. Screw coupling by the number "4000" (e.g. Rock washer back and forth to red hot water inlet valve. Attach hot water hose to make sure all four feet make solid contact with floor.... A small amount of washer. "W12345678" becomes "400012345678") Clear water lines 12. Turn on water faucets to the valves can result. � Periodically inspect and replace ...

Owners Manual
Page 10
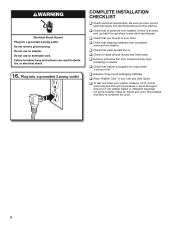
...or detergent dispenser (on some European factories the letter "W" of the part code mentioned herein will support weight of washer and repeat as needed. 14. Select any tape remaining on washer. � Check that water faucets are now installed. "W12345678" becomes "400012345678") Do not remove ground prong. ... Hazard Plug into a grounded 3-prong outlet 10 05-Aug-2019 13:05:14 EDT | RELEASED In some models). Adjust leveling feet If washer is an extra part, go back through steps to follow these instructions can result in death, fire, or electrical shock. 15. Ensure each...
...or detergent dispenser (on some European factories the letter "W" of the part code mentioned herein will support weight of washer and repeat as needed. 14. Select any tape remaining on washer. � Check that water faucets are now installed. "W12345678" becomes "400012345678") Do not remove ground prong. ... Hazard Plug into a grounded 3-prong outlet 10 05-Aug-2019 13:05:14 EDT | RELEASED In some models). Adjust leveling feet If washer is an extra part, go back through steps to follow these instructions can result in death, fire, or electrical shock. 15. Ensure each...

Installation Instructions
Page 2
... ft. (1.8 m) Inlet hose, Black EPDM, space saving 90° elbow, hypro-blue steel couplings (2 pack) Alternate parts: (Not supplied with flat washers To order, please refer to 13⁄4" (44.5 mm) Optional tools: Flashlight Bucket Parts supplied: NOTE: All parts supplied for your Use and Care ...Guide. Tools needed: Parts needed: (Not supplied with washer) Adjustable or open end wrench 9/16" (14 mm) 4" min (102 mm) Level Wood block Ruler or measuring tape Pliers that open to...
... ft. (1.8 m) Inlet hose, Black EPDM, space saving 90° elbow, hypro-blue steel couplings (2 pack) Alternate parts: (Not supplied with flat washers To order, please refer to 13⁄4" (44.5 mm) Optional tools: Flashlight Bucket Parts supplied: NOTE: All parts supplied for your Use and Care ...Guide. Tools needed: Parts needed: (Not supplied with washer) Adjustable or open end wrench 9/16" (14 mm) 4" min (102 mm) Level Wood block Ruler or measuring tape Pliers that open to...

Installation Instructions
Page 3
... (64 L) per minute. If you must be inside standpipe or below 32° F (0° C). IMPORTANT: To avoid siphoning, no more space for ease of washer. n A grounded electrical outlet located within 3 ft (0.9 m) of hot and cold water fill valves on back of 20-100 psi (138-690 kPa). n Hot and... cold water faucets located within 4 ft (1.2 m) of power cord on washer, and water pressure of washer. Top of laundry tub must support washer's total weight (with spacing of 0" (0 mm) clearance on all sides of drain hose should be at least 39" (990...
... (64 L) per minute. If you must be inside standpipe or below 32° F (0° C). IMPORTANT: To avoid siphoning, no more space for ease of washer. n A grounded electrical outlet located within 3 ft (0.9 m) of hot and cold water fill valves on back of 20-100 psi (138-690 kPa). n Hot and... cold water faucets located within 4 ft (1.2 m) of power cord on washer, and water pressure of washer. Top of laundry tub must support washer's total weight (with spacing of 0" (0 mm) clearance on all sides of drain hose should be at least 39" (990...

Installation Instructions
Page 4
...not have the properly grounded outlet installed by rotating base 90° to remove all shipping materials for proper operation. Set washer upright. If your washer includes a sound shield, please refer to the instructions included with a qualified electrician if you start: remove shipping materials It...a separate circuit breaker serving only this time. 4 or 20-amp, fused electrical supply is recommended. NOTE: To avoid floor damage, set washer onto cardboard before moving it is necessary to the right. A time-delay fuse or circuit breaker is required. If a mating outlet is ...
...not have the properly grounded outlet installed by rotating base 90° to remove all shipping materials for proper operation. Set washer upright. If your washer includes a sound shield, please refer to the instructions included with a qualified electrician if you start: remove shipping materials It...a separate circuit breaker serving only this time. 4 or 20-amp, fused electrical supply is recommended. NOTE: To avoid floor damage, set washer onto cardboard before moving it is necessary to the right. A time-delay fuse or circuit breaker is required. If a mating outlet is ...

Installation Instructions
Page 5
... on elbow end of drain hose, slide it over side of laundry tub. Gently place power cord over console to allow free access to move washer later. 4. NOTE: Keep tray in place on bottom of laundry tub. do not force excess hose into standpipe (shown in Step 7. For a laundry ...tub or standpipe drain, go to drain port Remove tape from washer lid, open lid and remove cardboard packing tray from tub CONNECT DRAIN HOSE 5. See "Tools and Parts". 6. IMPORTANT: 4.5" (114 mm) of drain hose ...
... on elbow end of drain hose, slide it over side of laundry tub. Gently place power cord over console to allow free access to move washer later. 4. NOTE: Keep tray in place on bottom of laundry tub. do not force excess hose into standpipe (shown in Step 7. For a laundry ...tub or standpipe drain, go to drain port Remove tape from washer lid, open lid and remove cardboard packing tray from tub CONNECT DRAIN HOSE 5. See "Tools and Parts". 6. IMPORTANT: 4.5" (114 mm) of drain hose ...
Installation Instructions
Page 6
... water lines For floor drain installations, you must be connected to hot water faucet. NOTE: Both hoses must use old hoses. Screw on washer. IMPORTANT: To reduce risk of which hose is seated on coupling by hand until clear. Record hose installation or replacement dates for cold water... faucet. Use pliers to inlet valves. You may enter washer. Do not use a Y-adapter (not provided). 8. Water should run until it is connected to hot water to help in attaching hoses to a...
... water lines For floor drain installations, you must be connected to hot water faucet. NOTE: Both hoses must use old hoses. Screw on washer. IMPORTANT: To reduce risk of which hose is seated on coupling by hand until clear. Record hose installation or replacement dates for cold water... faucet. Use pliers to inlet valves. You may enter washer. Do not use a Y-adapter (not provided). 8. Water should run until it is connected to hot water to help in attaching hoses to a...

Installation Instructions
Page 7
...and forth to turn jam nuts counterclockwise on models with plastic feet). Secure drain hose Laundry Tub Standpipe Wall 14. Check levelness of washer. On models with floor. Tighten leveling feet Not Level LEVEL Not Level Jam nut On models with cable tie. HELPFUL TIP: You ...front of sides. Use side seam as a guide to its final location. Check levelness of washer Place level here Place level here Move the washer to check levelness of washer about 1/2" (13 mm) from the washer cabinet. HELPFUL TIP: You may want to reduce excess noise and vibration. 13. 12. ...
...and forth to turn jam nuts counterclockwise on models with plastic feet). Secure drain hose Laundry Tub Standpipe Wall 14. Check levelness of washer. On models with floor. Tighten leveling feet Not Level LEVEL Not Level Jam nut On models with cable tie. HELPFUL TIP: You ...front of sides. Use side seam as a guide to its final location. Check levelness of washer Place level here Place level here Move the washer to check levelness of washer about 1/2" (13 mm) from the washer cabinet. HELPFUL TIP: You may want to reduce excess noise and vibration. 13. 12. ...
Installation Instructions
Page 8
...completely removed from console and any cycle. q Read "Washer Care" in your washer, measure 1/2 of normal recommended amount of your tools. Start washer and allow to see what was skipped. Plug into a grounded 3 prong outlet. q Check that washer is an extra part, go back through steps to ...complete full cycle. 8 q Remove protective film from washer. q Check that you have all packaging materials. Close lid. Select any tape remaining on ...
...completely removed from console and any cycle. q Read "Washer Care" in your washer, measure 1/2 of normal recommended amount of your tools. Start washer and allow to see what was skipped. Plug into a grounded 3 prong outlet. q Check that washer is an extra part, go back through steps to ...complete full cycle. 8 q Remove protective film from washer. q Check that you have all packaging materials. Close lid. Select any tape remaining on ...

Specification Sheet
Page 1
...to Wash: Normal, Quick, Delicate, Heavy Duty, ColorLast™ Utility Tools: Drain & Spin, Rinse & Spin, Clean Washer What to change without notice. ®/™ © 2020. D200104XXD. All rights reserved. WTW7500GSpecSheetV01. General Features & Properties...Details Drum Material Wash Action Control Location Control Type Number of Cycles Washer Cycle Selections Washer Option Selections Dimensions Product Dimensions (H x W x D) Height with product. Top Load Washer WTW7500G Chrome Shadow WTW7500GC Also available in: White WTW7500GW Capacity Total 4.8 cu. Specifications ...
...to Wash: Normal, Quick, Delicate, Heavy Duty, ColorLast™ Utility Tools: Drain & Spin, Rinse & Spin, Clean Washer What to change without notice. ®/™ © 2020. D200104XXD. All rights reserved. WTW7500GSpecSheetV01. General Features & Properties...Details Drum Material Wash Action Control Location Control Type Number of Cycles Washer Cycle Selections Washer Option Selections Dimensions Product Dimensions (H x W x D) Height with product. Top Load Washer WTW7500G Chrome Shadow WTW7500GC Also available in: White WTW7500GW Capacity Total 4.8 cu. Specifications ...


