

Installation Guide
Page 2
... steel couplings (2 pack) 6 ft. (1.8 m) Inlet hose, Black EPDM, space saving 90° elbow, hypro-blue steel couplings (2 pack) Alternate parts: (Not supplied with washer) Adjustable or open end wrench 9/16" (14 mm) 4" min (102 mm) Level Wood block Ruler or measuring tape...1" (25 mm) diameter Standpipe Adapter Part Number 3363920 Connector Kit Part Number 285835 Drain hose too short Extension Drain Hose Part Number 285863 Connector Kit Part Number 285835 Lint clogged drain Drain Protector Part Number 367031 Connector Kit Part Number 285835 LOCATION REQUIREMENTS Select proper location...
... steel couplings (2 pack) 6 ft. (1.8 m) Inlet hose, Black EPDM, space saving 90° elbow, hypro-blue steel couplings (2 pack) Alternate parts: (Not supplied with washer) Adjustable or open end wrench 9/16" (14 mm) 4" min (102 mm) Level Wood block Ruler or measuring tape...1" (25 mm) diameter Standpipe Adapter Part Number 3363920 Connector Kit Part Number 285835 Drain hose too short Extension Drain Hose Part Number 285863 Connector Kit Part Number 285835 Lint clogged drain Drain Protector Part Number 367031 Connector Kit Part Number 285835 LOCATION REQUIREMENTS Select proper location...
Installation Guide
Page 3
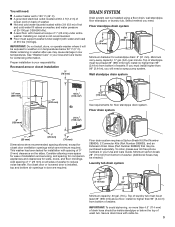
... mm) under entire washer. This washer has been tested for winterizing information. Floor drain system requires a Siphon Break Kit (Part Number 285834), 2 Connector Kits (Part Number 285835), and an Extension Drain Hose (Part Number 285863) that may be installed using a floor drain, wall standpipe, floor standpipe, or laundry tub. install no more space...
... mm) under entire washer. This washer has been tested for winterizing information. Floor drain system requires a Siphon Break Kit (Part Number 285834), 2 Connector Kits (Part Number 285835), and an Extension Drain Hose (Part Number 285863) that may be installed using a floor drain, wall standpipe, floor standpipe, or laundry tub. install no more space...
Installation Guide
Page 5
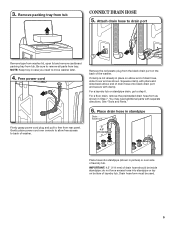
... go to free from tub. NOTE: Keep tray in place on bottom of the washer. If clamp is not already in case you need additional parts with pliers and slide black elbow end of laundry tub. For a floor drain, remove the preinstalled drain hose form as shown. IMPORTANT: 4.5" (114... mm) of drain hose, slide it over console to allow free access to remove all parts from tub CONNECT DRAIN HOSE 5. Attach drain hose to move washer later. 4. Place drain hose in Step 7. Squeeze clamp with separate directions. See "...
... go to free from tub. NOTE: Keep tray in place on bottom of the washer. If clamp is not already in case you need additional parts with pliers and slide black elbow end of laundry tub. For a floor drain, remove the preinstalled drain hose form as shown. IMPORTANT: 4.5" (114... mm) of drain hose, slide it over console to allow free access to remove all parts from tub CONNECT DRAIN HOSE 5. Attach drain hose to move washer later. 4. Place drain hose in Step 7. Squeeze clamp with separate directions. See "...
Installation Guide
Page 6
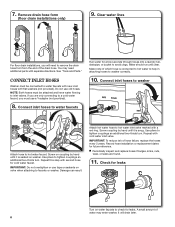
... cuts, wear, or leaks are only connecting to tighten couplings an additional two-thirds turn . Damage can result. 7. See "Tools and Parts." NOTE: Both hoses must use old hoses. Attach hot water hose to avoid clogs. Screw coupling by hand until it is seated on ... leaks. Connect inlet hoses to washer Attach hose to washer correctly. 10. Repeat with second hose for future reference. It will need additional parts with flat washers (not provided). Remove drain hose form (floor drain installations only) 9. IMPORTANT: To reduce risk of water may need to...
... cuts, wear, or leaks are only connecting to tighten couplings an additional two-thirds turn . Damage can result. 7. See "Tools and Parts." NOTE: Both hoses must use old hoses. Attach hot water hose to avoid clogs. Screw coupling by hand until it is seated on ... leaks. Connect inlet hoses to washer Attach hose to washer correctly. 10. Repeat with second hose for future reference. It will need additional parts with flat washers (not provided). Remove drain hose form (floor drain installations only) 9. IMPORTANT: To reduce risk of water may need to...
Installation Guide
Page 8
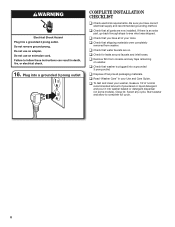
...for leaks around faucets and inlet hoses. q Read "Washer Care" in your washer, measure 1/2 of normal recommended amount of /recycle all parts are on some models). q Check that all packaging materials. q Check that water faucets are now installed. q Remove film from washer. ...prong outlet COMPLETE INSTALLATION CHECKLIST q Check electrical requirements. Start washer and allow to see what was skipped. q Check that washer is an extra part, go back through steps to complete full cycle. 8 16. Plug into washer basket or detergent dispenser (on . If there is plugged ...
...for leaks around faucets and inlet hoses. q Read "Washer Care" in your washer, measure 1/2 of normal recommended amount of /recycle all parts are on some models). q Check that all packaging materials. q Check that water faucets are now installed. q Remove film from washer. ...prong outlet COMPLETE INSTALLATION CHECKLIST q Check electrical requirements. Start washer and allow to see what was skipped. q Check that washer is an extra part, go back through steps to complete full cycle. 8 16. Plug into washer basket or detergent dispenser (on . If there is plugged ...
Use & Care Guide
Page 19
... of your major appliance, unless such damage results from the date of your home. 7. WHIRLPOOL SHALL NOT BE LIABLE FOR INCIDENTAL OR CONSEQUENTIAL DAMAGES. Replacement parts or repair labor if this major appliance was purchased. Pick up and delivery. This warranty...The removal and reinstallation of purchase. 6. Replacement parts or repair labor on the duration of implied warranties of your major appliance, to replace or repair house fuses, or to correct defects in accordance with Whirlpool published installation instructions. 10. DISCLAIMER OF IMPLIED WARRANTIES...
... of your major appliance, unless such damage results from the date of your home. 7. WHIRLPOOL SHALL NOT BE LIABLE FOR INCIDENTAL OR CONSEQUENTIAL DAMAGES. Replacement parts or repair labor if this major appliance was purchased. Pick up and delivery. This warranty...The removal and reinstallation of purchase. 6. Replacement parts or repair labor on the duration of implied warranties of your major appliance, to replace or repair house fuses, or to correct defects in accordance with Whirlpool published installation instructions. 10. DISCLAIMER OF IMPLIED WARRANTIES...

Warranty Information
Page 1
.../serial numbers that is inconsistent to published user or operator instructions and/or installation instructions. 2. Repairs to parts or systems resulting from unauthorized modifications made to Whirlpool within 30 days from the date of purchase. 6. Some states and provinces do not allow limitations on...and applies only when the major appliance is used in a remote area where service by an authorized Whirlpool servicer is not available. 9. Pick up and delivery. Replacement parts or repair labor on the product. You must be repaired in this Warranty. ITEMS EXCLUDED FROM ...
.../serial numbers that is inconsistent to published user or operator instructions and/or installation instructions. 2. Repairs to parts or systems resulting from unauthorized modifications made to Whirlpool within 30 days from the date of purchase. 6. Some states and provinces do not allow limitations on...and applies only when the major appliance is used in a remote area where service by an authorized Whirlpool servicer is not available. 9. Pick up and delivery. Replacement parts or repair labor on the product. You must be repaired in this Warranty. ITEMS EXCLUDED FROM ...


